SonarQube on Windows and MS SQL

Introduction

In the following post we will see what is necessary to install and configure SonarQube 5.4. We will also see how to setup some basic security concerns by making our SonarQube part of our LDAP infrastructure and map security groups to roles.
I’m sure that there are plenty of guides out there, but what I found most annoying meanwhile reading some of them, is that all of them do give several things for granted. Also the information is segmented and not easy to find. I will try in this post to cover even the basic steps that can save you hours of struggling. I’m going to install SonarQube on Windows platform using MS SQL as my database of choice, you can also try Couchbase. Both of these services in my case are going to reside on the same machine, but nothing limits you to use multiple machines for your setup.

Prerequisites

Java runtime is the main prerequisite. Although it works with Java 7, my advice is to install and use JDK 8. At the moment of writing the latest version for my platform is jdk-8u77-windows-x64.exe.
For what concerns MS SQL versions, 2008, 2012 and 2014 are supported. Also the SQL Express is supported. Your SQL server needs to support case-sensitive (CS) and accent-sensitive (AS) collation.

Installing the database

After you installed your MS SQL version of choice, you need to create a database. Add a new database and name it SonarQube.

new-database

Now the important step. In the Options page you need to specify the right collation. It needs to be one of the case-sensitive (CS) and accent-sensitive (AS) collations. In my case I will go for SQL_Latin1_General_CP1_CS_AS.

new-database-options

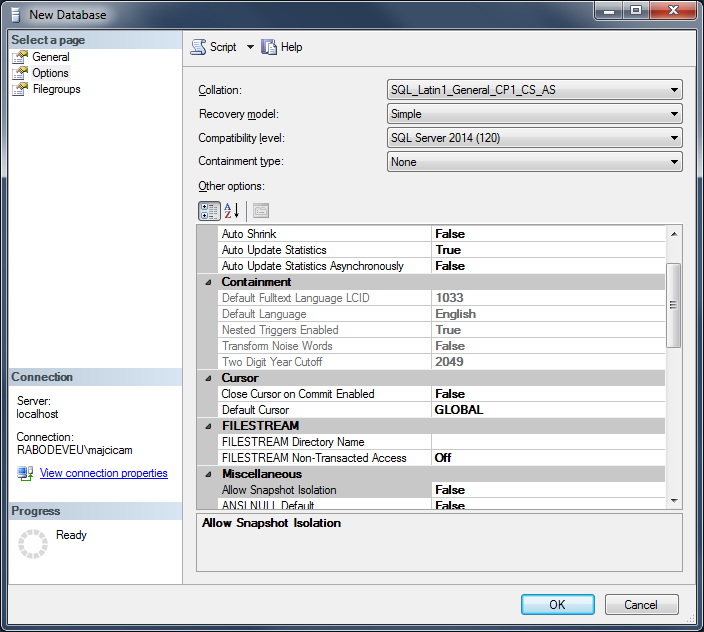
Once that is set, click OK and create the new database.

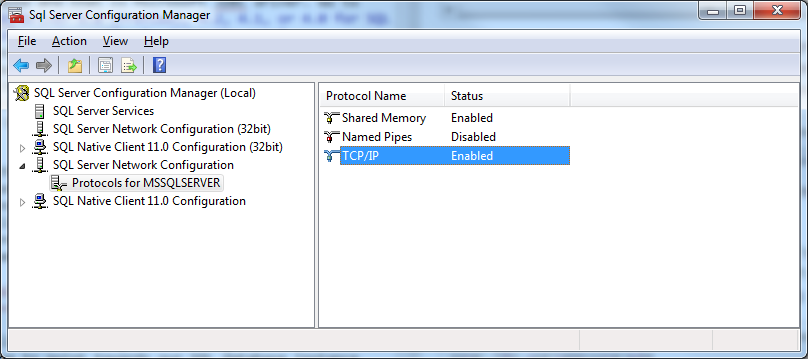
After the database is created, we need to make sure that the TCP/IP protocol is enabled for our SQL instance. Open the Sql Server Configuration Manager and, in the console pane, expand SQL Server Network Configuration. Choose the Protocols for your instance. In the details pane, right-click TCP/IP, and then click Enable. Once done, restart the service. A detailed guide is available on Technet at Enable TCP/IP Network Protocol for SQL Server.

conf-manager

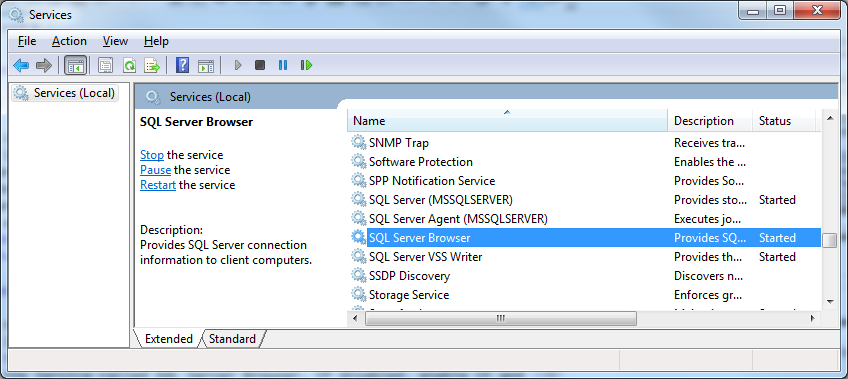
Last but not least, make sure that SQL Server Browser service is running. Often it is disabled by default, however for the JDBC driver to work, it needs to be enabled and running. Open the Services management console and find the Service called SQL Server Browser. If disabled, enable it and start the service.

services

That’s all for now for what database concerns.

Installing SonarQube

Before we start, make sure that the latest JDK is installed, then download the SonarQube installation file from SonarQube website. For this demo I will be using the latest available version of SonarQube at the moment of writing and that is 5.4. After I downloaded sonarqube-5.4.zip I will extract it’s content in a folder of my choice and that is D:\SonarQube.

There is another important file we need to get and set before we can continue configuring SonarQube and that is Microsoft JDBC driver. Go to Download the Microsoft JDBC Driver 6.0 (Preview), 4.2, 4.1, or 4.0 for SQL Server and download sqljdbc_4.2.6420.100_enu.tar.gz file. Once done, open the just downloaded file with compression tool of your choice and extract all of it’s content in a temporary folder. Get into sqljdbc_4.2\enu\auth\x64 folder and copy the only file present in that path, sqljdbc_auth.dll and paste it into your System32 directory, usually C:\Windows\System32.

Now we are ready to start the configuration. Open the main configuration file of SonarQube called sonar.properties. You can find it in the conf folder in your SonarQube installation path. Open it with the editor of your choice and search for the line reporting ‘Microsoft SQLServer 2008/2012/2014 and SQL Azure’. Under that line you should see a the following configuration item that is commented out:

#sonar.jdbc.url=jdbc:sqlserver://localhost;databaseName=sonar;integratedSecurity=true

We need to uncomment this line by removing the hash sign in front of it and change the connection string to point towards our SQL database instance (the one we create earlier).
Following, an example of the connection string using a name instance of SQL:

sonar.jdbc.url=jdbc:sqlserver://localhost;databaseName=SonarQube;instanceName=DEV_01;integratedSecurity=true

If you are using the default instance, you can simply omit the instanceName=DEV_01 from your connection string.

Also you can see I’ve set to use the integrated security. If you want to use SQL Authentication, remove the integratedSecurity=true part and specify the credentials as separate configuration items under your connection string (also create users in SQL accordingly and map the newly create user to dbo schema).

sonar.jdbc.url=jdbc:sqlserver://localhost;databaseName=SonarQube
sonar.jdbc.username=sonarqube
sonar.jdbc.password=mypassword

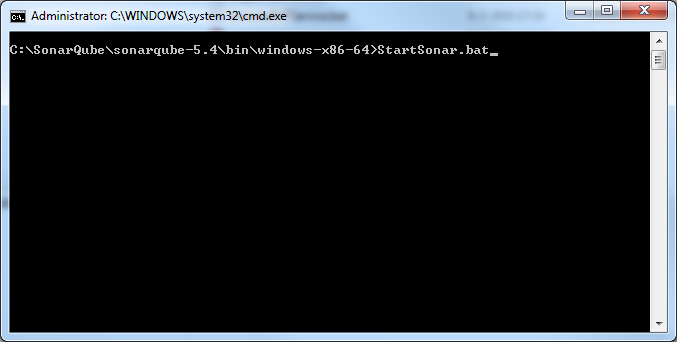
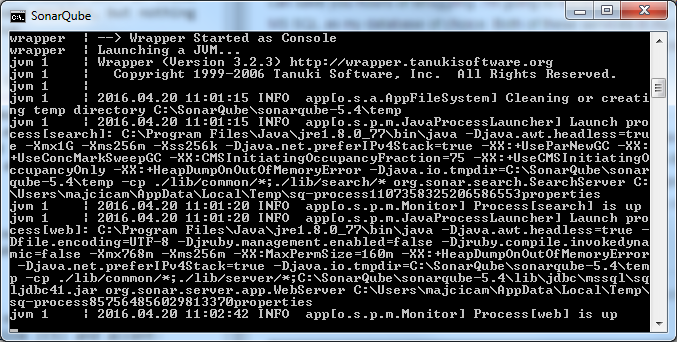
Once the connection string is set, save the configuration file and try starting SonarQube. Open the command prompt and move to ...\bin\windows-x86-64 folder and execute StartSonar.bat

start-sonar

If everything is set right, you should see a message in the console INFO app[o.s.p.m.Monitor] Process[web] is up.

first-run

Now you can open the web browser of your choice and head to http://localhost:9000. A welcome page on SonarQube should be shown.

first-run-browser

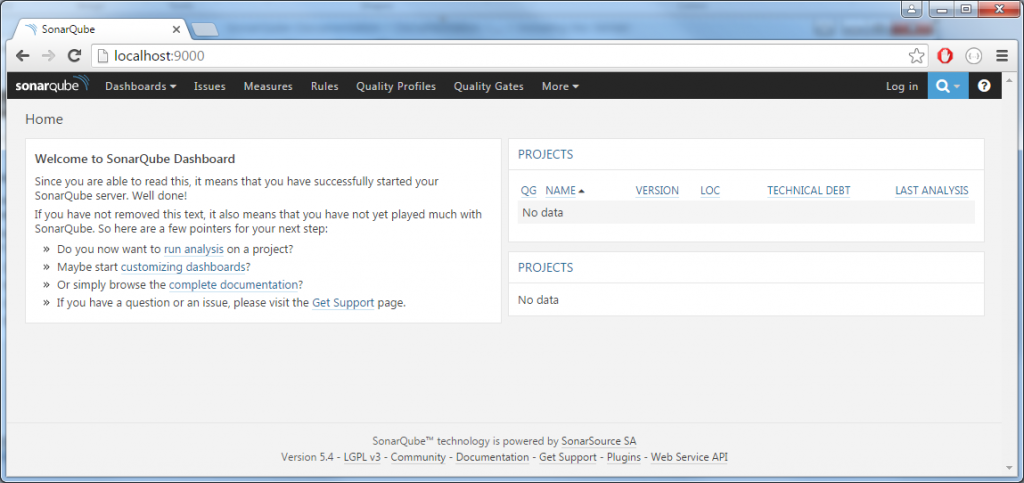
If the page loaded, congratulations, SonarQube is running correctly on your machine.

What is left to do is to create a service that will run SonarQube. Stop the current execution with a CTRL+C and terminate the batch job. In the same bin folder where StartSonar.bat is located, you will find InstallNTService.bat. Execute the just mentioned batch file and you should receive the wrapper | SonarQube installed. message. This means that a new service is created. Check your services management console and you should find a service called SonarQube:

services-sonar

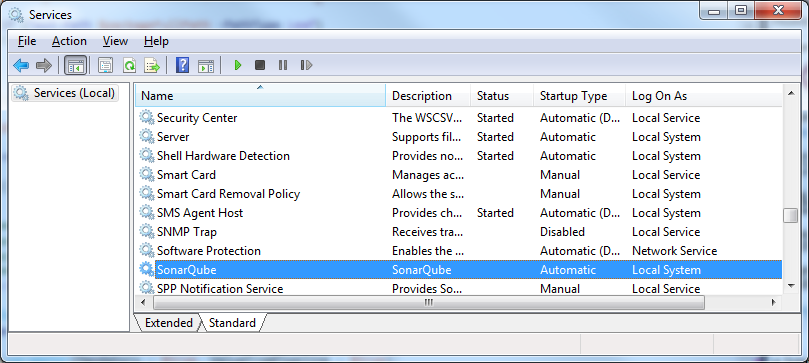
As you can see from the picture, service is created but not started.
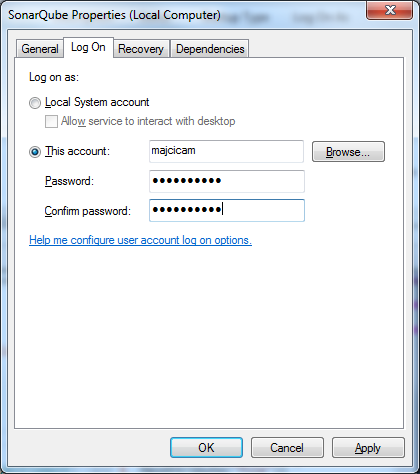
By default, the “Local System” account is used to execute the SonarQube service. If this account doesn’t have the required permission to create some directories/files in the SonarQube installation directory (which is the case by default on recent Windows versions), the execution of the SonarQube service will fail. In such case, the SonarQube service must be configured to run in the context of a suitable account.
Right click on the SonarQube service and choose properties then move to Log On tab choose “This account”, and select an account that can read/write the folder in which SonarQube is installed. Hopefully you will have a specific service account created for this purpose.

service-logon

Now, you can start the service manually or by launching StartNTService.bat.

Services configuration

SonarQube is the only web application running on my server, so I will move it from the port 9000 to the default 80. To do so, edit the sonar.properties configuration file and find the #sonar.web.port=9000 comment line. Uncomment it and change port value to 80, sonar.web.port=80.

After this change you need to restart your SonarQube service and try to reach your localhost in the browser. If all went fine you will not need to specify the port at the end of the address.

SonarQube behind a proxy

I wrote in the past time numerous post about running services and applications behind a proxy. SonarQube will not be an exception to that practice. You may wonder why SonarQube should have access to internet and my answer is, plug-ins. Plug-ins are essential to SonarQube and installing and updating them is easiest done via Update Center, a functionality integrated in the administrative portal. In order for it to work, SonarQube needs to be able to access the internet. In case you are behind a proxy, you need to modify again sonar.properties configuration file.

Search for #sonar.web.javaAdditionalOpts= configuration line and modify it by specifying http, https proxy host and port:

sonar.web.javaAdditionalOpts=-Dhttp.proxyHost=swg.myProxy.com -Dhttp.proxyPort=8080 -Dhttps.proxyHost=swg.myProxy.com -Dhttps.proxyPort=8080

Restart the service and try the Update Center. Open SonarQube web page and log in with the default admin user (password is also admin). Click on the administration menu item and then, in the sub-menu, choose System -> Update Center. Check if the updates are retrieved and try to update one of the plug-ins installed by default, like C#. If all goes well you will see the following screen

update-center

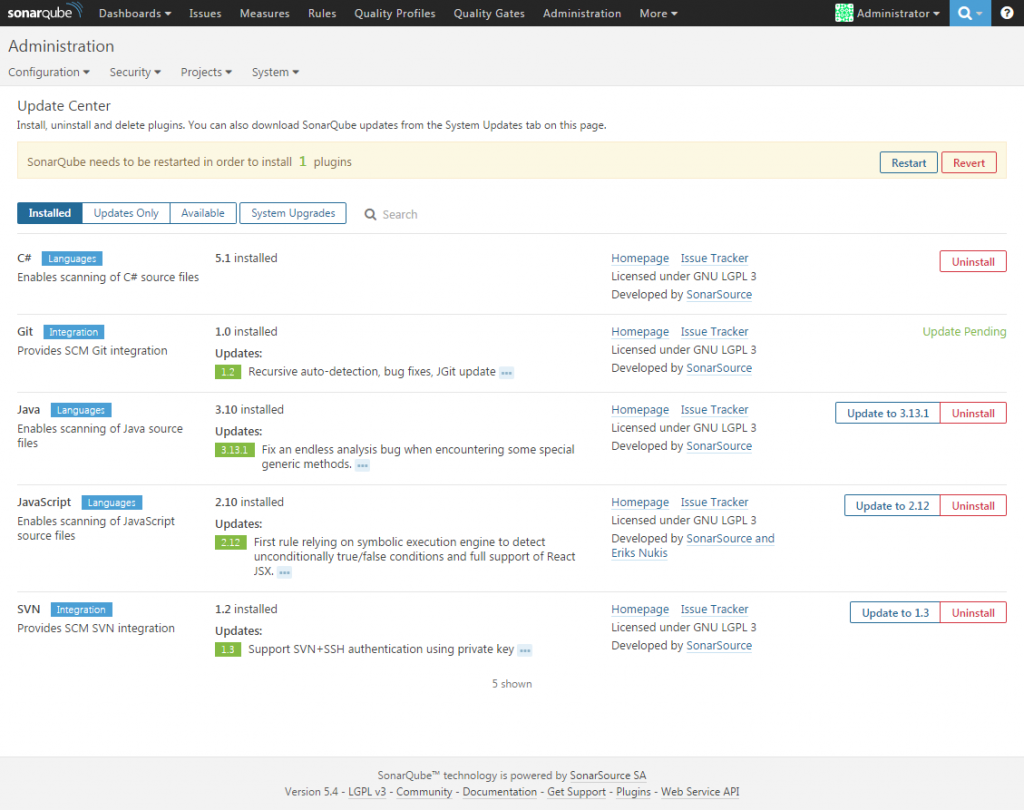
Once the plug-in is installed you will see a button in the notification message that offers to restart the server for you. In my case it never worked and after choosing this option my server stopped replaying. In order to get it back online, you need to manually restart the service.

This problem is addressed in SONAR-7422 and it is a recognized bug. It should be fixed in the SonarQube version 5.6.

If you where able to install or update plug-in correctly, then your proxy settings where picked up fine.

Securing SonarQube connection

You can setup SonarQube to run on a https secure connection. It natively supports the SSL certificates however it is not advised to configure it. Using a reverse proxy infrastructure is the recommended way to set up your SonarQube installation on production environments which need to be highly secured. This allows to fully master all the security parameters that you want. I will not dig into details on how to set up IIS to leverage the reverse proxy setup. If interested in this, you can read the following blog post on Jesse Houwing’s blog, Configure SSL for SonarQube on Windows. It will guide you in setting up IIS that will act as a proxy for the secure calls towards your SonarQube server.

Security configuration

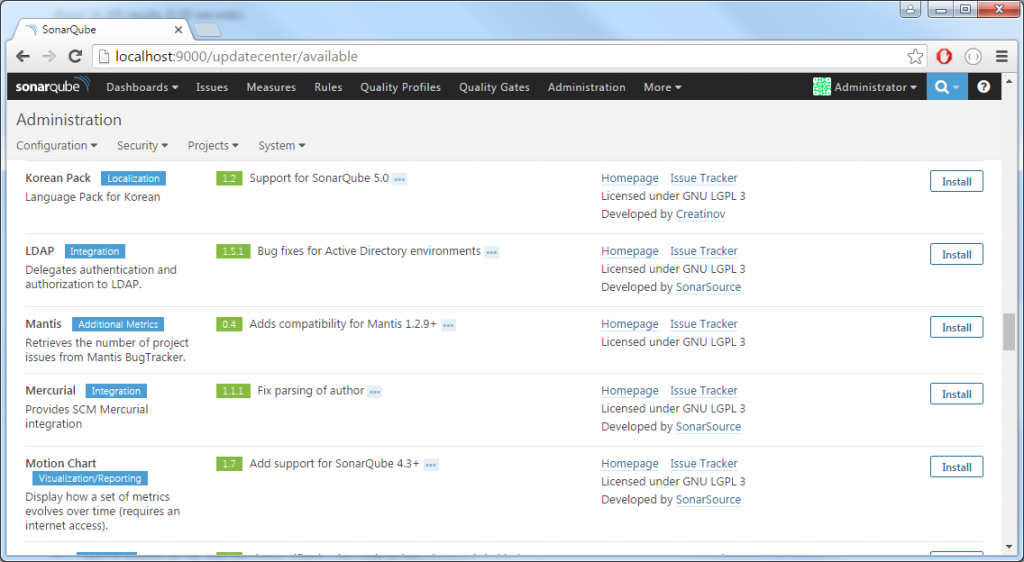
My desire is to integrate the authentication of the SonarQube server with my LDAP (Active Directory domain services). In order to do that, we need to install LDAP plug-in. Locate the LDAP plug-in in update center under available plug-ins and install it.

plugin-ldap

Before you restart your SonarQube service, open the sonar.properties configuration file and add the following section:

#----------------------------------------------------------------------
# LDAP

sonar.security.realm=LDAP
sonar.forceAuthentication=true
sonar.authenticator.downcase=true

This are the only necessary settings if you are part of the Active Directory domain. Restart the SonarQube service and open the portal. If all went well, SSO kicked in, and you should be logged in with your domain account. Now comes the fun part. Log out, then, log in again as administrator and go to Administration -> Security -> Users screen. You should see in the list the domain account you logged in with. Update groups for this account and assign it to sonar-administrators group.

user-to-admin

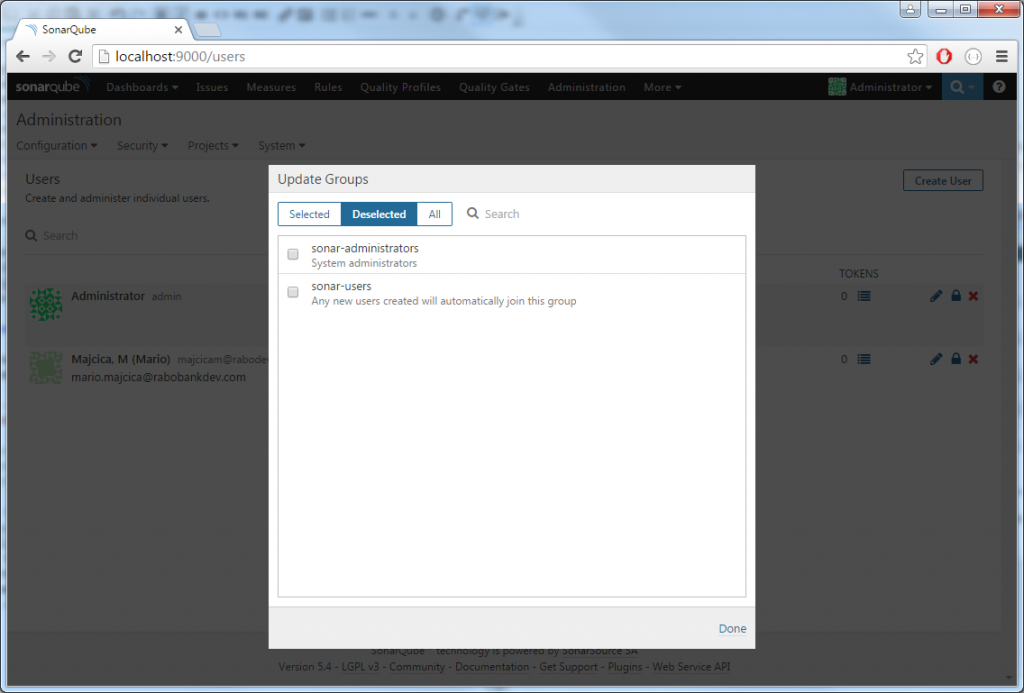
Now close the browser and reopen it. Surprise, surprise, you are logged in again via your user profile but you do not see Administration option in your menu, as you would expect. Once the LDAP is configured, on each login, the membership information will be retrieved and local settings will be overwritten. Thus no group membership we assigned will be persisted. In this case, LDAP/AD becomes the one and only place to manage group membership. In order to do so, we need to create a security group in AD and map it in the SonarQube Security Groups.

Before we create a new group in the SonarQube Security Groups we need to get the groups precise name. Group names are case sensitive and do require the domain to be specified. This is not something we can guess but we can extract it from our log file.

Add your user to the AD security group of choice. Edit sonar.properties configuration file again and set the logging level to a higher setting. In order to do so, find the #sonar.log.level=INFO line, uncomment it and change the level from INFO to DEBUG. You line should now look like sonar.log.level=DEBUG. Restart the service and open the portal.

If you are successfully logged in, open the log file. In the SonarQube directory there is a folder called logs, in my case it is, sonarqube-5.4\logs. Inside you will find a file called sonar.log. Open it with your editor of choice and search for your domain username. Next to your username (probably at the bottom of the log file) you will find a couple of log lines made by web[o.s.p.l.w.WindowsAuthenticationHelper] and in one of those lines you will find written Groups for the user YOURDOMAIN\YOU and a list of security groups you are part of. Find the correct one and copy it, in my case this is sonar@maiolocal. Now log in as admin and open the Groups screen. Create new group by clicking to the Create Group button in top right corner and set the name to your group of choice, in my case sonar@maiolocal.

create-group

Once the group is created, move to Global Permissions screen (always in the Security menu), and assign the desired permissions to just created group. Let’s suppose that this group will list all of the administrators, under Administer System permission, click on groups and select the newly created group.

Now if you close your browser and reopen it pointing to your SonarQube portal, you will get logged in via SSO and you should be able to see the Administration button in the menu. Same can be done for the users.

Conclusion

This is roughly it. There are some details you would probably like to set as SMTP/Email settings and Source Control Manager settings, however all of this is quite trivial as you can find all of the necessary settings in the UI under General Settings. For more details check Notifications – Administration page in SonarQube documentation site, as SCM support page.

Your SonarQube server should now be correctly installed and configured to access LDAP. Ahhh, I almost forgot it, get the logging level back to INFO, otherwise you are risking quite a large log files on your disk.

UPDATE

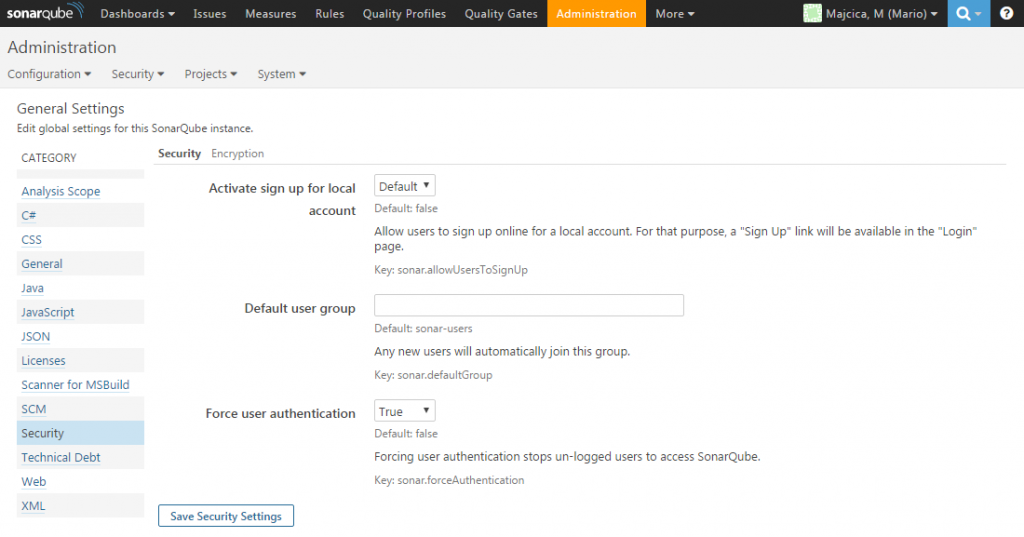
After I published my post I realized that there is a better way of forcing the authentication. As Nicolas Bontoux pointed out this setting should be set in Administration – General Settings – Security pane. Otherwise you do risk encountering a problem during the upgrade of your SonarQube instance to a newer version.

Set the Force user authentication in previously mentioned pane.

security_force

Once done, comment or remove the sonar.forceAuthentication=true line from the sonar.properties configuration file and restart your service.
In this way you will not be bothered during your SonarQube updates.

UPDATE 2

In regard to the proxy settings, since SonarQube 5.5 specifying your proxy address via javaAdditionalOpts is not necessary anymore (and it is not advisable). Now it is sufficient to search in the sonar.properties configuration file the following line #http.proxyHost= and set the proxy parameters as shown here:

http.proxyHost=swg.myproxy.com
http.proxyPort=8080
https.proxyHost=swg.myproxy.com
https.proxyPort=8080

Save your settings and restart the service. Your Update Center should still be working correctly.

Getting started with SpecFlow and CodedUI

Introduction

Often when I approach a new tooling, framework or technology, I tend to be quite excited with the new possibilities or new ways of working.
Unfortunately many times I get quickly disappointed and left to a mercy of Google trying to solve some basic impediments. Obvious things are, at the beginning, not so obvious and I often do get stuck and spend a lot of time trying to solve “beginners” problems. Also, in this kind of situations I do not get to start with an optimal solution as I am eager to get going as quickly as possible and deliver a result.
In my opinion this is also the case when it comes to SpecFlow and CodedUI. In the middle of all getting started guides, there is not a single one tackling this two chaps in a proper way.
With this post I’ll try to spread my two cents on this argument.

Getting started with SpecFlow

SpecFlow is an extension for Visual Studio that gives us the possibility to write behavior specifications using Gherkin language. If the last phrase makes no sense to you, I will advise you to Google around keywords as BDD, ATDD or Specification-By-Example, before continuing reading further.
Out of the box, SpecFlow will add some new item templates to Visual Studio, which we can use for creating our feature files. Once the feature files are added and written, SpecFlow will help us create our binding classes, but even more importantly, it’s designer will create auto generated code that will be associated to our feature file.
Based on our settings, this auto generated code will defer. It will contain the necessary classes and attributes so that the content of our feature files can get executed by your testing framework of choice. SpecFlow supports several unit test framework to execute the acceptance tests, but as you can imagine, CodedUI is not one of them.
In order to make this happen we will need to extend the SpecFlow. If you search for the information on how to do that, you will quickly find that you can define a generatorProvider for your unitTestProvider. It can be a quick fix and there are plenty of articles about this approach. However, reading the SpecFlow documentation you will notice that it reports the following regarding the generatorProvider attribute in the configuration;

Obsolete, will be removed in v2.0. Use <plugins> instead.

So, we should use a plugin instead! Unfortunately if you check the documentation about the plugins you will be welcomed by the following note:

“Note: More information about plugins comes soon!”.

This is a point where this blog post will be useful. I will explain through an example many of the in’s and out’s you need to know about writing plugins for SpecFlow.

Let’s start.

CodedUI as Unit test provider

By CodedUI tests we usually intend the test type that allows us to perform UI automation. Still we need to distinguish a couple of things here. There is the API (the engine) for the UI automation and there is a “driver” that allows us executing our tests (test execution framework). Our execution engine recalls a lot a MS Test unit test engine and it does that with a reason. Underneath they are almost the same thing. This means that our UI automation that is offered by CodedUI framework is wrapped and executed by MS Test engine. Indeed all of the attributes used are the same except the CodedUITestAttribute which again on it’s own is based on TestClassExtensionAttribute, part of Microsoft.VisualStudio.TestTools.UnitTesting.
So why can’t we then just use MSTest provider in order to execute our CodedUI automation? We actually can do that, however in order to make it work properly in this case we need to manage correctly the calls to Playback.Initialize() and Playback.Cleanup() methods. This is not handy and it is given to us for free by applying the correct attribute CodedUITestAttribute on our test class.
Now this is going to be our goal, make sure that SpecFlow applies the CodedUITestAttribute on our designer auto generated class, instead of the one that is applied by using the MS Test provider, the TestClassAttribute.

Creating the SpecFlow plugin

There is not much necessary for SpecFlow to load a plugin, a class that implements IGeneratorPlugin interface, a GeneratorPluginAttribute applied on the assembly level that will mark it as SpecFlow plugin and the registration in the configuration file. In practice, we need to create a class library project and as a first thing add SpecFlow.CustomPlugin Nuget package, which on it’s own, as a prerequisite will pull down also the SpecFlow package.

Nuget_package_SpecFlow_CustomPlugin

Once this is done, you will see that we now do have all the necessary references added to our project. We can now rename our only class (that was added by default and it’s named Class1) to CodedUIProviderPlugin and implement the IGeneratorPlugin interface (part of TechTalk.SpecFlow.Generator.Plugins namespace).
You can see that three methods are brought in by the IGeneratorPlugin interface and these method names are self explanatory; still let’s see what they should be used for:

  • RegisterConfigurationDefaults – If you are planning to intervene at the SpecFlow configuration, this is the right place to get started.
  • RegisterCustomizations – If you are extending any of the components of SpecFlow, you can register your implementation at this stage.
  • RegisterDependencies – In case your plugin is of a complex nature and it has it’s own dependencies, this can be the right place to set your Composition Root.

Our interest will focus on RegisterCustomizations method and we will remove the exceptions that were added automatically by the Visual Studio on interface implementation.
Before we start adding any more code, let’s analyse our plan. We are going to extend MsTest2010GeneratorProvider which at the bottom is the implementation of IUnitTestGeneratorProvider interface. This will be the interface that I am going to register inside the RegisterCustomizations method and assign it to the implementation class that I will name CodedUIGeneratorProvider.
At the end, our plugin class will look like this:

public class CodedUIProviderPlugin : IGeneratorPlugin
{
    public void RegisterCustomizations(ObjectContainer container, SpecFlowProjectConfiguration generatorConfiguration)
    {
        string unitTestProviderName = generatorConfiguration.GeneratorConfiguration.GeneratorUnitTestProvider;

        if (unitTestProviderName.Equals("mstest", StringComparison.InvariantCultureIgnoreCase) ||
            unitTestProviderName.Equals("mstest.2010", StringComparison.InvariantCultureIgnoreCase))
        {
            container.RegisterTypeAs();
        }
    }
        
    public void RegisterDependencies(ObjectContainer container)
    { }

    public void RegisterConfigurationDefaults(SpecFlowProjectConfiguration specFlowConfiguration)
    { }
}

As you can see, I’m checking if the currently selected generation provider is MsTest provider and if so, I am registering my custom type for that given interface. This approach is not rock solid, but it works. For example you cold resolve this interface in the container and check if the returned object is of MsTest2010GeneratorProvider type, then preform the registration, but I am happy with the current solution.
Before I forget I will mark our assembly with the necessary attribute. To do so, open the AssemblyInfo.cs file and add the following attribute:

[assembly: GeneratorPlugin(typeof(CodedUIProviderPlugin))]

All of examples and techniques are valid for SpecFlow 1.9.0. For other versions the procedures may defer.

Extending MsTest2010GeneratorProvider

Instead of implementing the IUnitTestGeneratorProvider we will just slightly alter the MsTest2010GeneratorProvider. This is possible an advised because, as I mentioned above, the test execution framework of CodedUI and MS Test deffer only in one point. MsTest2010GeneratorProvider is the default MS Test provider for SpecFlow and we have a chance to override several methods in order to change/extend the behavior.
In particular I’m interested in SetTestClass method as it is responsible for generating the code of the test class. Before proceeding I need to mention a couple of things on code generation used by SpecFlow. SpecFlow leverages the CodeDom for the necessary code generation.
CodeDom or Code Document Object Model, is a set of classes part of the .Net framework itself and makes possible generation of the source code for .NET languages without knowing the target language beforehand. It’s structure and syntax can be a bit scary at the first sight but after a while you get used to it. There are a couple of concepts you will need to master before being able to understand and work with it, that’s why I encourage you to check some guidelines on web before attempting major changes. The following is one of the posts that may help – “Using CodeDOM to generate CSharp (C#) and VB code“.

Let’s get back on overriding our SetTestClass method and check my full implementation.

public class CodedUIGeneratorProvider : MsTest2010GeneratorProvider
{
    public CodedUIGeneratorProvider(CodeDomHelper codeDomHelper)
        : base(codeDomHelper)
    { }

    public override void SetTestClass(TestClassGenerationContext generationContext, string featureTitle, string featureDescription)
    {
        base.SetTestClass(generationContext, featureTitle, featureDescription);

        foreach (CodeAttributeDeclaration declaration in generationContext.TestClass.CustomAttributes)
        {
            if (declaration.Name == "Microsoft.VisualStudio.TestTools.UnitTesting.TestClassAttribute")
            {
                generationContext.TestClass.CustomAttributes.Remove(declaration);
                break;
            }
        }

        generationContext.TestClass.CustomAttributes.Add(
            new CodeAttributeDeclaration(
                new CodeTypeReference("Microsoft.VisualStudio.TestTools.UITesting.CodedUITestAttribute")));
    }
}

As you can see, as a first thing we are calling the base class implementation of the method so it can work it’s magic. Once the test method is setup, we will iterate through all of the attributes applied on that class and search the one that we are interested in, called TestClassAttribute. Once we found it, we will remove it, as it is going to be replaced with the CodedUITestAttribute in the following step. Also, we can stop cycling our loop as there can be only one occurrence of it. As just mentioned, the next and the last step is to add a new custom attribute on that class, which happens to be CodedUI’s, CodedUITestAttribute.

Job done!

Finishing touches

Before we build our new plugin and start using it, we need to take care of a small SpecFlow problem. In order for SpecFlow to be able to load our plugin, we need to name our assembly in a certain way. I checked the SpecFlow source code once I was unable to make it load and I discovered the following:

public class RuntimePluginLoader : IRuntimePluginLoader
{
	private const string ASSEMBLY_NAME_PATTERN = "{0}.SpecFlowPlugin";

	public IRuntimePlugin LoadPlugin(PluginDescriptor pluginDescriptor)
	{
		var assemblyName = string.Format(ASSEMBLY_NAME_PATTERN, pluginDescriptor.Name);
...

The above example is part of RuntimePluginLoader class, the implementation of the interface IRuntimePluginLoader that is used to load all of the plugins.
As you can see from the code sample it always searches for the assembly name that is composed from the given name in the app.config file plus the suffix “.SpecFlowPlugin”. This means that we need to add that suffix to our assembly in order to be found by SpecFlow loader. Let’s do so:

Assembly_Name_With_Suffix

As shown in the picture above, just add the required suffix to your assembly name in the project properties.

This is very important tip, as if you do not apply this suffix, SpecFlow will not be able to load your plugin!

Now you can compile your library and start using it in your SpecFlow projects.

Practical example

In this small example I will implement, by using CodedUI, a simple scenario (that is similar to the SpecFlow default example in it’s feature item template) of testing Windows calculator.
Once I added the necessary, I will use the plugin we just created and verify that the result is as expected. For completeness I will also implement all steps of our scenario.

Make sure you have installed SpecFlow Visual Studio Extension before continuing.

At this point we need to create a new project in which we will add our feature files and leverage our newly created plugin. We can start by creating a new CodedUI project and adding to that project the SpecFlow Nuget package. Right after we added our new CodedUI project we will get prompted to generate the code for our CodedUI test.

Generate_Code_For_CodedUI_Test

As we are not going to use the test recorder or import our automation from MTM, you can chose Cancel and close this dialog. Once that’s done we can also remove the CodedUITest1.cs file that will not be necessary. As last thing add the SpecFlow Nuget package.

Once this is in place, we can add our feature file.

Adding_Feature_File

I will name our feature file, Add.feature. For this example purposes the default scenario will be just fine. But before implementing our steps, let’s check the auto generated code for the scenario in question.

Inside the solution explorer, expand your features node and select the proposed class.

Solution_Explorer_FeatureFile_Designer_Code

The code that is presented should be similar to the following:

#region Designer generated code
#pragma warning disable
namespace SpecFlowWithCodedUI
{
    using TechTalk.SpecFlow;
    
    
    [System.CodeDom.Compiler.GeneratedCodeAttribute("TechTalk.SpecFlow", "1.9.0.77")]
    [System.Runtime.CompilerServices.CompilerGeneratedAttribute()]
    [NUnit.Framework.TestFixtureAttribute()]
    [NUnit.Framework.DescriptionAttribute("Add")]
    public partial class AddFeature
    {
        
        private static TechTalk.SpecFlow.ITestRunner testRunner;
        
#line 1 "Add.feature"
#line hidden
...

From this you can see that by default, SpecFlow used the NUnit provider to generate our tests. We can change this by indicating the desired provider inside the configuration file (App.config file which is already created by the Nuget package we previously added), open it and add the following:


As soon as you save your app.config file you will be presented with the following dialog:

SpecFlow_Configuration_Change

Answer affirmatively to this dialog and let’s re-check our designer generated code. If all went well, you should see the following:

#region Designer generated code
#pragma warning disable
namespace SpecFlowWithCodedUI
{
    using TechTalk.SpecFlow;
    
    
    [System.CodeDom.Compiler.GeneratedCodeAttribute("TechTalk.SpecFlow", "1.9.0.77")]
    [System.Runtime.CompilerServices.CompilerGeneratedAttribute()]
    [Microsoft.VisualStudio.TestTools.UnitTesting.TestClassAttribute()]
    public partial class AddFeature
    {
        
        private static TechTalk.SpecFlow.ITestRunner testRunner;
        
#line 1 "Add.feature"
#line hidden
...

As you can see the class structure changed and the correct attributes (targeting MS Test) are now used. This means it’s time to start taking advantage of our plugin. I will create a folder on the project level, in which I will place the compiled dll of our previously created library, and I will call it bin.

Once the library is there we need to modify our app.config file in the following way:


Note that the name we used for specifying our plugin defers from the assembly name. This is because of the suffix convention I mentioned earlier. SpecFlow plugin loader will automatically suffix the assembly name with “.SpecFlowPlugin” and then your assembly name will match and will be picked up.
Last thing I want to mention is the path. When it comes to paths, SpecFlow always starts at the project level, so we need to make a step up and get inside the bin folder. The same applies in case you placed your plugin dll in another folder.
Another handy tip about path is about the SpecFlow dependencies. In case you added (as we did) SpecFlow through Nuget package, you do not need to worry as all of the dependencies will be there and will be picked up automatically. In case you do add SpecFlow manually (no Nuget) you will need to provide the generator path in the configuration file and it should look, at example, like this:

...

  
...

After all our hard work, if we now check our designer generated code we should see the following:

namespace SpecFlowWithCodedUI
{
    using TechTalk.SpecFlow;
    
    
    [System.CodeDom.Compiler.GeneratedCodeAttribute("TechTalk.SpecFlow", "1.9.0.77")]
    [System.Runtime.CompilerServices.CompilerGeneratedAttribute()]
    [Microsoft.VisualStudio.TestTools.UITesting.CodedUITestAttribute()]
    public partial class AddFeature
    {
...

As you can see, we achieved the desired result, the CodedUITestAttribute is correctly applied on our feature (test) class.

Again, job done!

CodedUI automation in binding class

We have already created our feature file which contains a scenario. I will now write the necessary code to implement the automation of our steps.
I am not interested to show and explain all of the details of creating a binding class in SpecFlow. This is why I will move quickly through the process till the effective steps implementation. In case you are interested in details check the SpecFlow Getting Started guide.

Before we start, a slightly change is necessary, in order to make our scenario usable with windows calculator:
Open the Add.feature file and adapt the scenario so it matches the following:

Scenario: Add two numbers
	Given I have entered 50 into the calculator
	And I press add
	And I have entered 70 into the calculator
	When I press enter
	Then the result should be 120 on the screen

Then right click inside the editor and from the menu choose Generate Steps Definition:

Generate_Steps_Definition

Once you selected it you will be presented with the following screen. Leave everything defaulted and press generate.

Generate_Steps_Definition_Skeleton

You will be prompted to save this file; do so and place it in the current projects directory. Once done open the file for editing and add the following:

[Binding]
public class AddSteps
{
    private readonly ApplicationUnderTest _aut;

    public AddSteps()
    {
        _aut = ApplicationUnderTest.Launch(@"C:\Windows\System32\calc.exe");            
    }

    [Given(@"I have entered (.*) into the calculator")]
    public void GivenIHaveEnteredIntoTheCalculator(int p0)
    {
        Keyboard.SendKeys(_aut, NumbersToSendKeysString(p0));
    }

    [Given(@"I press add")]
    public void GivenIPressAdd()
    {
        Keyboard.SendKeys(_aut, "{Add}");
    }

    [When(@"I press enter")]
    public void WhenIPressEnter()
    {
        Keyboard.SendKeys(_aut, "{Enter}");
    }
        
    [Then(@"the result should be (.*) on the screen")]
    public void ThenTheResultShouldBeOnTheScreen(int result)
    {
        WinText resultTextBox = new WinText(_aut);
        resultTextBox.SearchProperties[UITestControl.PropertyNames.Name] = "Result";

        Assert.AreEqual(result.ToString(CultureInfo.InvariantCulture), resultTextBox.DisplayText);
    }

    protected string NumbersToSendKeysString(int number)
    {
        StringBuilder result = new StringBuilder();
        char[] numbers = number.ToString(CultureInfo.InvariantCulture).ToCharArray();

        foreach (char c in numbers)
        {
            result.AppendFormat("{{NumPad{0}}}", c);
        }

        return result.ToString();
    }
}

That was about it. Each time the AddSteps class is created (on every scenario run), a new instance of calculator is started. This behavior can be changed and we can start it if necessary, once per feature file or once per test run. I will try to cover this argument in detail in the future posts.
Every step execution will then perform a certain action helped by the automation offered by CodedUI framework.
At the end, we will assert that displayed value equals our expected value, expected result.

Now we can run our test and it should succeed.

Test_Explorer_Test_Run

It’s now on you to continue writing your scenarios and implement steps via CodedUI. All the necessary infrastructure is in place.

Final word

Obviously this is a simplified example. In a real world scenario in your binding classes you will use a POM (Page Object Model), a facade that hides the automation complexity and implementation details. Also, reuse of the application under test should be possible and is usually handled in a base class that can be used inherited by our binding class.

Generation providers are only one of many components we can personalize or substitute. If interested in other components, I will advise you to consult the SpecFlow source code on GitHub.

I attached both projects, the plugin and the example, in two separate downloads, you can find them both here:

During the migration of my blog from the WordPress.org on a self hosted instance, files in question got lost. Still I managed to find Plugin example project on my PC

Plugin example project
SpecFlow project using CodedUI automation

If you have any questions do not hesitate to ask in comments.

Happy coding!