Certificates to DB and Back – Part 2

This is a second part of the article, if you missed the previous post you can find it here:
Certificates to DB and Back – Part  1

Table of contents

Certificates to DB and Back – Part 1

  1. Introduction
  2. Getting started
  3. Creating Certificates

Certificates to DB and Back – Part 2

  1. Loading the Certificate
  2. Decoding RSA Private Key
  3. Creating the X509Certificate2
  4. Demo Application
  5. Further Improvements
  6. License

Loading the Certificate

If only a certificate is a problem, X509Certificate2 class will do the job. With the following code, you can simply load the certificate:

string certificatePath = @"public.cer";
X509Certificate2 clientCertificate = new X509Certificate2(certificatePath);

Or if you want to load it directly from the string:

string publicCertString = "-----BEGIN CERTIFICATE----- MCIISFSDFEESd etc. example";
X509Certificate2 clientCertificate = 
	new X509Certificate2(Encoding.UTF8.GetBytes(publicCertString));

Now, the framework offers already much. But this is not enough. If we want to load a certificate from a certificate file, we can do it. Otherwise, if we want to load the certificate and private key from the pfx or pkcs12 container, we can do it. But what if we want to load dynamically the certificate and private key, choose the encryption password and use our object? The X509Certificate2 doesn’t offer an overload of constructor like X509Certificate2(string certFileName, string privateKeyFile, string password) or the similar overload that will accept a byte array in order to correctly initialize this object. In this case, we need to do some dirty work. So let’s do it.

Decoding RSA Private Key

I will not get into details on how the RSA key is decoded, you have the source code plain of comments, so if interested, read it, it says more than a thousand words. In order to decode the private key, we will use DecodeRsaPrivateKey method which will return RSACryptoServiceProvider instance representing our private key.

Creating the X509Certificate2

As described in the previous chapters, I will use the default X509Certificate2 constructor in order to create the certificate. Afterwards, I will assign the decoded RSA private key as RSACryptoServiceProvider to the X509Certificate2 instance property PrivateKey. If everything went well, we will have the proper instance of X509Certificate2 certificate container, containing both, the certificate and the key, encoded with chosen password. Here is the code sample:

byte[] certBuffer = Helpers.GetBytesFromPEM(publicCert, PemStringType.Certificate);
byte[] keyBuffer  = Helpers.GetBytesFromPEM(privateKey, PemStringType.RsaPrivateKey);

X509Certificate2 certificate = new X509Certificate2(certBuffer, password);

RSACryptoServiceProvider prov = Crypto.DecodeRsaPrivateKey(keyBuffer);
certificate.PrivateKey = prov;

I forgot to mention the helper method GetBytesFromPEM, which “cleans” the string from header and footer information.

Demo Application

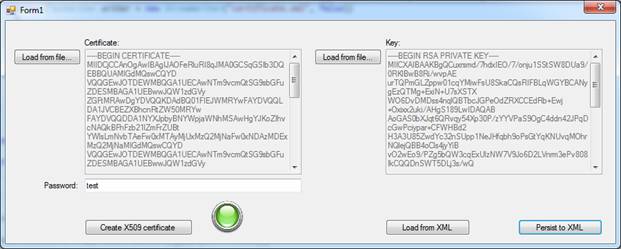
In the demo application, you can see how to load the described components, create the X509 certificate, persist and reload everything. The interface is just an example, because that is rudimental, simple and incomplete. But hey, this is a demo, and for a demo is already too much! The important stuff is under the hood, that’s in what you should be interested.

Here is a screenshot:

Further Improvements

How to improve this code? Well test it, I have some doubts about creating Key Containers, and I will test it too. Any new discovery will be promptly noticed and the article will be updated.

Other things that are on my mind are creating the extension methods to the X509Certificate2 in order to make code look simpler and cleaner.

Perhaps including these methods in your applications’ framework cryptography library? Any idea is welcome so if you have any, feel free to contact me or to post the comment.

License

The idea and realisation are made completely by the author. The method DecodeRsaPrivateKey and all the code used inside were kindly provided by Mr Dan Maser; Dan, thanks for providing the code and for all the support. The way that RSACryptoServiceProvider is initialized is code written by me in order to overcome the encountered problems with .NET 4.0, all the traits-based size stuff and byte alignment are written by Dan Maser, but, speaking with Dan, we came to the following. The core of the ASN.1 parsing code came from a stackoverflow.com article. After analysing the code and after doing further research, I came across what I believe to be its original source, which is http://www.jensign.com/opensslkey/opensslkey.cs. The top of that file does include a standard copyright line “Copyright (C) 2008 JavaScience Consulting”. I didn’t knowingly use any copyrighted information when I originally wrote the code, but now it’s kind of fuzzy. There’s no direct indication I can find about any limitations on using or modifying the code directly on that website. At the bottom of http://www.jensign.com/JavaScience/cryptoutils/index.html, it does say “NOTE: These utilities and sample code are made available as-is with no support or guarantee of performance. They are intended to demonstrate specific technical implementation details with minimal error checking. Use at your own risk.” which does seem to directly suggest that one can use the published utilities, at albeit one’s own risk.

However, I think it is ok, but I guess you never know with the lawyers. If you find out that this code breaks the law, please contact me promptly and all code, as well as the article, will be removed.

If this is not the case, the article, along with any associated source code and files, is licensed under Microsoft Public License (MS-PL).

Joyful programming!
A Simple ASP.NET Flickr Application – Part 1

Foreword

I wrote this article back in 2010. This was my first programming article written in English. Actually it was more a need then a pleasure at the time as I was searching for my first employment here in The Netherlands and one of the companies that at whom I applied, requested a test that at the end with just a bit of extra effort I transformed in this article. As I suppose lately my English got better re-reading my own words make me wish to rewrite many of them, however it will be silly and great waste of time, so I will leave all the text just as it is in it’s original. In order to make it easier to read I will also split the article in n parts.

Let’s keep the conversation going! If any, just comment and will do my best to provide an answer to your doubts.

Download source code – 145 KB

Table of contents

A Simple ASP.NET Flickr Application – Part 1

  1. Introduction
  2. Getting started
  3. The web.config

A Simple ASP.NET Flickr Application – Part 2

  1. Constructing the page
  2. The make up
  3. The result
  4. Notes

Introduction

First of all, I want to thank Sam Judson who created a very useful project and that he shared it to us all. Without his effort, this article will be much longer and tedious. So thanks to him and other people who collaborated on that project. All project details and downloads can be found at this address: http://flickrnet.codeplex.com/.

I also used a light-weight, customizable lightbox plug-in for jQuery 1.3 and 1.4, called ColorBox, for adding a nice effect on the image preview. ColorBox is written by Jack Moore, and thanks to him too; you can find more details here: http://colorpowered.com/colorbox/. The version I’m using is 1.3.3, but you can update your projects with latest versions if you wish. More details about the version history can be obtained here: http://colorpowered.com/colorbox/core/README.

Another essential thing in order to use a Flickr API is creating your own API key and your secret key. If you already have a Yahoo! account, it will be quite simple; otherwise, you should create one. In both cases, you can start from here: http://www.flickr.com/services/api/keys/. For more details about the Flick API, visit http://www.flickr.com/services/api/.

Note that the API key and secret key used in the sample application are fake, they will not work. You’ll get an error message when executing the application. So you should change them, in the web.config, with data you got from Flicker! (Haven’t you created your own key? Bad bad, go to http://www.flickr.com/services/api/keys/ .)

Getting started

Start by creating an empty ASP.NET Web Site. I used Visual Studio 2010 Ultimate, but the same can be accomplished with Visual Studio Express as it can be done with previous versions of Visual studio such as 2008 or 2005.

Using the code

Let’s write some code. Add to your project an ASP.NET folder App_Code and create a new class and call it FlickrBLL. This is the code to be added:

using System;
using System.ComponentModel;
using System.Configuration;
using FlickrNet;

namespace Infrastructure.BLL
{
    /// 
    /// Helper class for confortable pagining and binding
    /// 
    [DataObject(true)]
    public class FlickrBLL
    {
        [DataObjectMethodAttribute(DataObjectMethodType.Select, true)]
        public static PhotosetPhotoCollection GetPagedSet(string setId,
                      int maximumRows, int startRowIndex)
        {
            Flickr flickr = new Flickr(ConfigurationManager.AppSettings["apiKey"],
                ConfigurationManager.AppSettings["shardSecret"]);
            PhotosetPhotoCollection photos = flickr.PhotosetsGetPhotos(setId, GetPageIndex(
                startRowIndex, maximumRows) + 1, maximumRows);

            return photos;
        }

        public static int GetPagedSetCount(string setId)
        {
            Flickr flickr = new Flickr(ConfigurationManager.AppSettings["apiKey"],
                ConfigurationManager.AppSettings["shardSecret"]);
            Photoset set = flickr.PhotosetsGetInfo(setId);
            return set.NumberOfPhotos;
        }

        [DataObjectMethodAttribute(DataObjectMethodType.Select, false)]
        public static PhotosetCollection GetPhotoSetsByUser(string userId)
        {
            Flickr flickr = new Flickr(ConfigurationManager.AppSettings["apiKey"],
                ConfigurationManager.AppSettings["shardSecret"]);

            return flickr.PhotosetsGetList(userId);
        }

        protected static int GetPageIndex(int startRowIndex, int maximumRows)
        {
            if (maximumRows                 return 0;
            else
                return (int)Math.Floor((double)startRowIndex / (double)maximumRows);
        }
    }
}

Let’s analyze some of these methods.

The Fickr.Net library method PhotosetsGetPhotos expects the page index, and not the index of the first record to retrieve, so I created the GetPageIndex helper method for the conversion.

The method GetPhotoSetsByUser returns the result of PhotosetsGetList. Note that this function doesn’t expect as parameter the Flickr user name, but the user id. You can retrieve this data using other methods integrated into the Flicker.Net API or using websites such as http://www.xflickr.com/fusr/.

Don’t get scared by the GetPagedSet method attribute. Components such as the ObjectDataSource control and the ObjectDataSourceDesigner class examine the values of this attribute, if present, to help determine which data method to call at run time. It isn’t necessary, but it simplifies the work. The same attribute is used to indicate that this class is a data object ([DataObject(true)]). I decides to make use of pagination in this example, and it was easy because the API already provides this functionality. The method simply calls the PhotosetsGetPhotos available in the Flicker.Net library, and uses the opportune overload.

The Count method needed for paging uses GetPagedSetCount, which gets the requested set’s info and returns the number of items in the set.

The web.config

In order to acquire authentication data and other parameters that may vary, we need to create an appSettings section in our web.config.


apiKey and sharedSecret are dummy values. You need to register and replace them to obtain a full functionality, but you can still use the default user and the default page size. If you are using a different layout, you can change the number of photos shown on each page, by simply varying this value.

continue…

Download source code – 145 KB

Recently, there have been rumors of Amazon considering of accepting cryptocurrency as a payment method, but they didn’t seem to confirm it at the time. Now, I am hearing that Amazon is planning to add cryptocurrency as an option, just like it does for other digital payment methods. This is great news for a lot of Amazon customers, and this is in addition to the fact that Amazon (and other online retailers) now have more discounts available to those who visit here to get all the information.

How To Buy Bitcoin With Amazon Gift Cards – Super Easy | hedgewithcrypto

With the current discussion about crypto-anarchism taking place, many people tend to be scared and do not believe in it at all, but at the same time, many people also do not know of any companies that accept the cryptocurrency and they are looking for options. While this may be true, there are plenty of companies that do not accept any cryptocurrency, and most of the times, these companies are also huge online retailers like Amazon. They should consider of these points:
Cryptocurrency requires a huge amount of infrastructure to develop, which is an unnecessary expense for an online retail giant like Amazon. It will take them only a month or two to develop and then they will be able to add the option of cryptocurrency. For more info you can visit DC Forecasts here.
A well-known company like Amazon can quickly become a leader in cryptocurrency technology. These companies usually already have millions of users and a huge online presence. While Amazon is probably the biggest player, many other companies will try to expand their user base. Cryptocurrency technology can also be considered as the future of online shopping. Currently, online shoppers are presented with several different options such as Amazon, eBay, Paypal, and many others. The next generation of shopping is going to be built around cryptocurrencies. Bitcoin offers a wide variety of potential to retailers and buyers. Here is the Trading Terminal For Crypto that one can check to get started. The currency can be traded against traditional currencies, or used to pay for goods and services. For example, Amazon.com, a huge online retailer, accepts Bitcoin. For Amazon, it is the perfect form of payment and allows the company to remain a major player in the online world. For consumers, the cryptocurrency offers the possibility of a more secure shopping experience with many more options. As more websites accept Bitcoin as a payment method, it is inevitable that more and more merchants will start accepting it for their services. These businesses will also enjoy an influx of more customers that will gladly pay for goods and services with the currency.

However, Bitcoin has also created another problem for its competitors. At this point, many people have lost trust in the currency. Bitcoin is not regulated in any way. Anyone can open an account to buy and sell the currency. Although there are limits on how many Bitcoins can be stored in each wallet, the value of each Bitcoin is supposed to be as immutable as gold. There has been no central authority that sets prices, controls the money supply or decides how to handle the transactions.