Signing Git Commits

What does it mean to sign a Git commit and why would you like to do that?

From Latin, signāre, or putting a mark.

As the word itself says, signing, putting a mark, ensures that the commit you made and the code contained can’t be tempered.
Git is cryptographically secure, but it’s not foolproof. In order to ensure the repository integrity, Git can sign tags and commits with a GPG key.

In this post, I’ll show you how to set up all of the necessary toolings in order to be able to sign your git commits. Aside from having the latest version of Git installed, you’ll need also the GnuPG. So let’s start.

GPG Introduction

GnuPG, also known as GPG, is a complete and free implementation of the OpenPGP standard. All of the details about OpenPGP are defined in RFC4880 (also known as PGP).
First of all, you need to download GPG, configure it and create/add your personal key.
On the following address https://www.gnupg.org/download/index.html and under “GnuPG binary releases” under windows section choose “Simple installer for the current GnuPG” and download the installer.
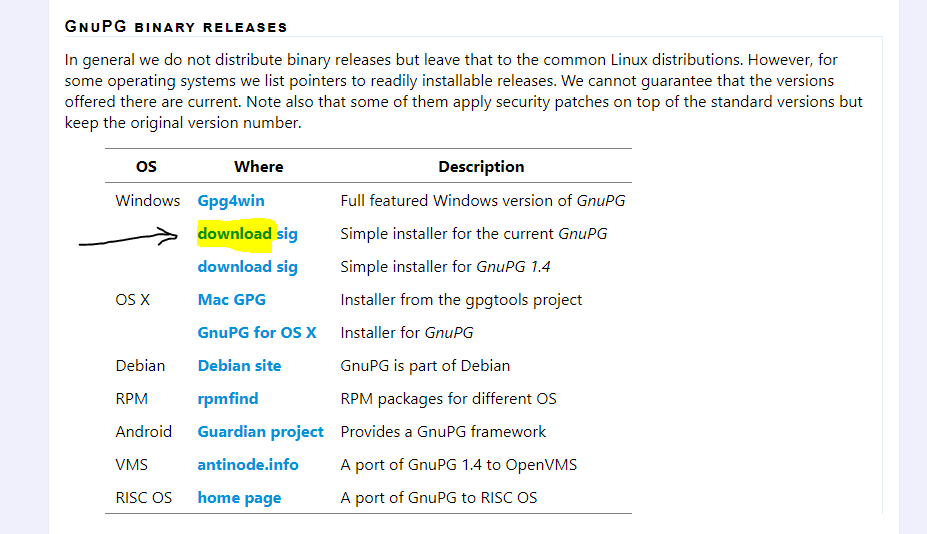
When downloaded, please install the application. The installation procedure is a simple one as no particular options are available.
Once installed you are ready to create a new key, which is the fundamental thing in getting to sign our commit.

In command prompt issue the following command gpg --full-generate-key At this point, you will be asked several questions you will need to answer before your key is going to be created. Check the following example:
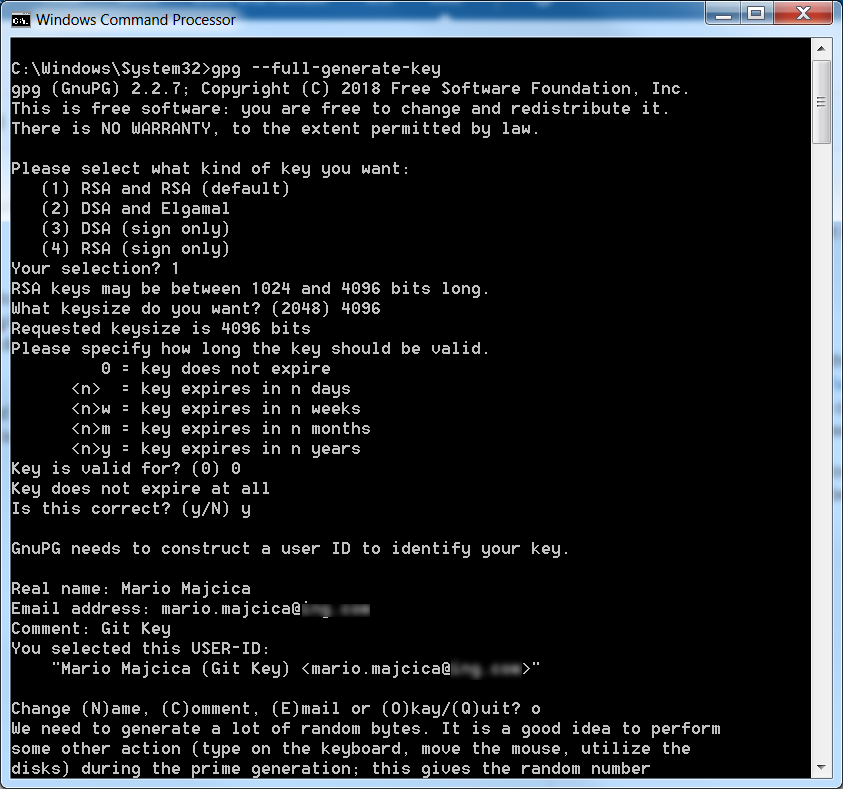
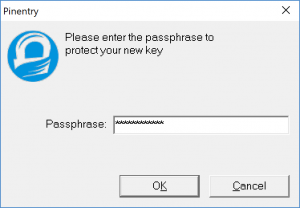
At the end of the process you will be asked, in a pop-up window, for a password that needs to be assigned to this key, please provide one.
Once the key is created you need to let Git know about it. First issue the following command gpg --list-secret-keys --keyid-format LONG which will list the necessary information about the newly created key. You should see something like this.
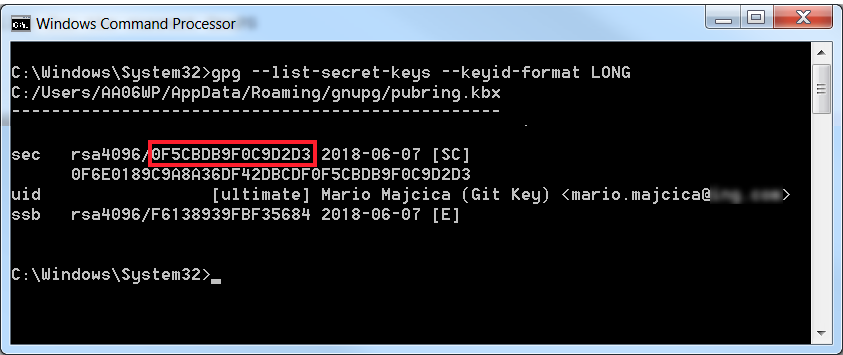
Now copy the value that is highlighted in red (key id) and issue the following command git config --global user.signingkey 0F5CBDB9F0C9D2D3 (where 0F5CBDB9F0C9D2D3 is your key id).

This is necessary so that Git knows what key it should use in order to sign your commits.

However, we are still not ready to go and sign our first commit. What we are missing is to set the `gpg.program` setting in our global git config. To do so we first need to retrieve the path of our gpg executable. The easiest way to do so is to run the where gpg command. It will return you the path on where gpg was installed. Now we can set the configuration by running the git config --global gpg.program "C:\Program Files (x86)\GnuPG\bin\gpg.exe" command (obviously in case your path differs from this one, you should adjust it).

Also, before proceeding make sure that the git user.name and user.email are set. In case this was not yet initialized try with, git config --global user.name "Mario Majcica" and git config --global user.email your@yemail.com.

Now we are ready to sign our first commit. Initialize a new git repository, add a file and run git commit -S -m "signed commit". At this point you should be prompted for the password of your key, the one you have chosen during the creation of the key itself:
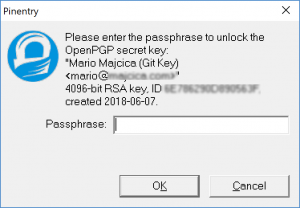
Once you enter your password, your commit will be made and it is going to be signed, e.g.
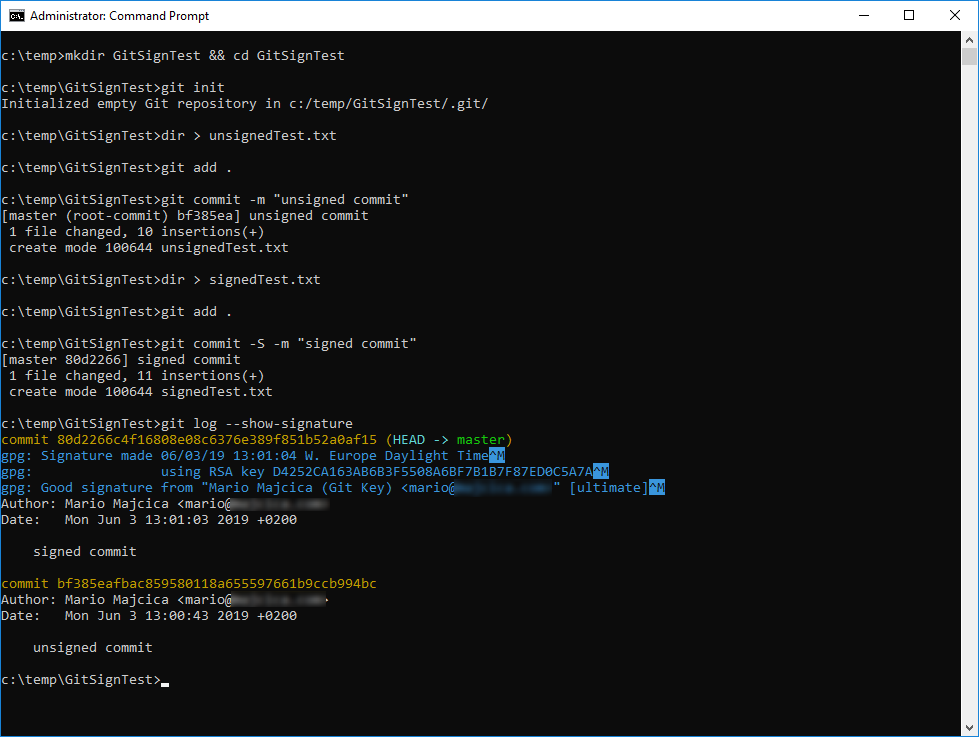
Let’s now verify that are signature is there. In order to achieve that issue the following command git log --show-signature -1 or a in a more kind of overview printout git log --pretty="format:%h %G? %aN %s".

You can learn more about Git and the available command regard signing commits here https://git-scm.com/book/en/v2/Git-Tools-Signing-Your-Work.

Export/Import

Next step is to export our key. Why would we do that? Well, an example, so that you can import it on another machine of yours, or import it to services like Github who can then validate your signature.

Let’s first export our public key. To do so, use the following command: gpg --export -a 0F5CBDB9F0C9D2D3> publicKey.asc
Obviously, 0F5CBDB9F0C9D2D3 is my key id in this case, sobstitute this value with your key id.
This command will create a file called publicKey.asc in the current folder of yours. Edit this file with a text editor of choice. The content of it will be necessary information for your Github account. Now open your Github.com page and log in. Under the settings, you will find a menu called “SSH and GPG keys”. Open this menu then choose “New GPG Key”:
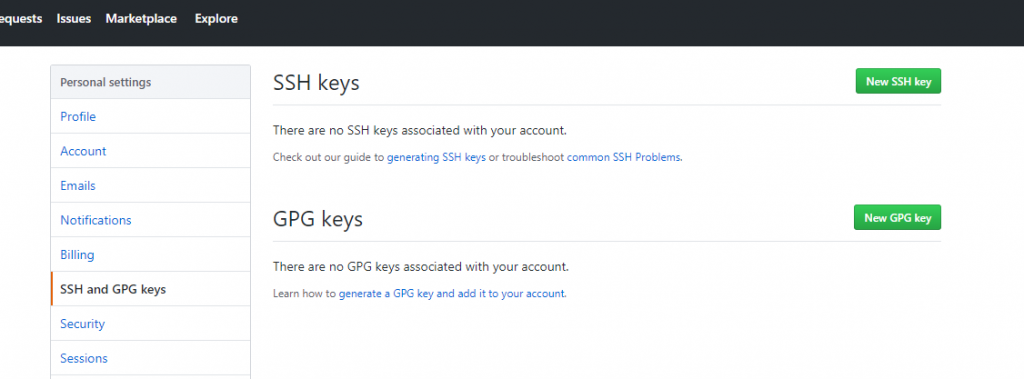
Now, copy the content of publicKey.asc and paste it in the page on GitHub, then just click “Add GPG Key”.
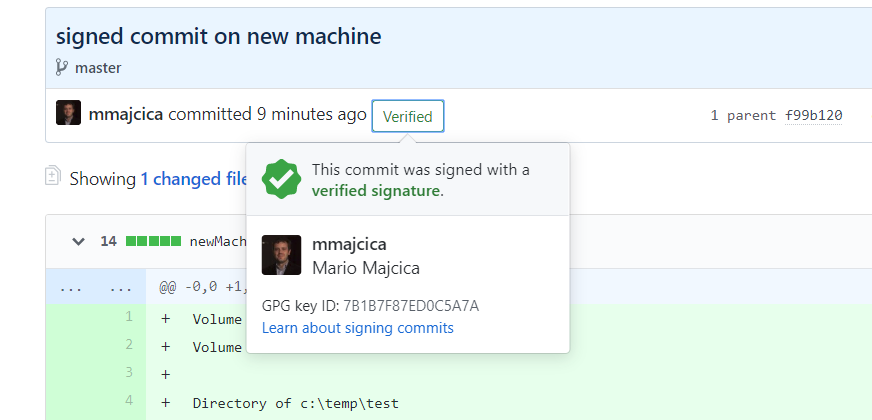
Once done, you should see your new key listed in the GitHub page “SSH and GPG keys” under the GPG Keys. I’ll now edit one of the projects in GitHub and push a signed commit. As you can see, it is now listed that the commit is verified.
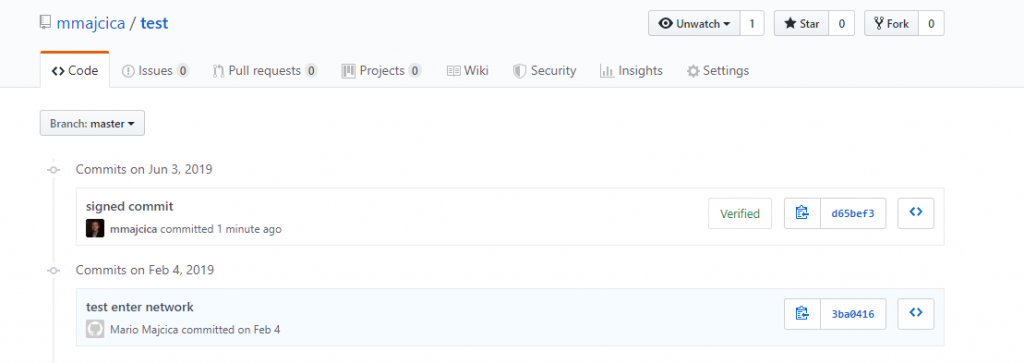
In case you click on the Verified icon you will be able to see the details about the signature:
Before we move to the import part, let me show you a trick on how to automate this in a popular IDE, Visual Studio Code.
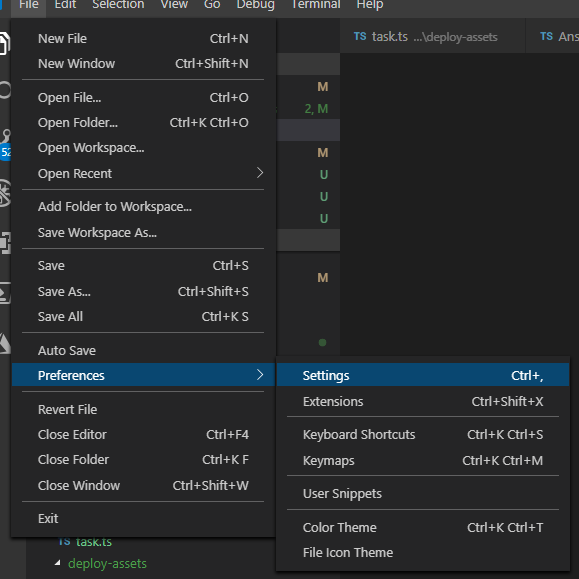
Now that we are all set up, we can instruct Visual Studio Code, to sign the commits that are made from the IDE. To do that, open the settings page in Visual Studio Code
then search for ‘git signing’ and the relevant setting should be listed:
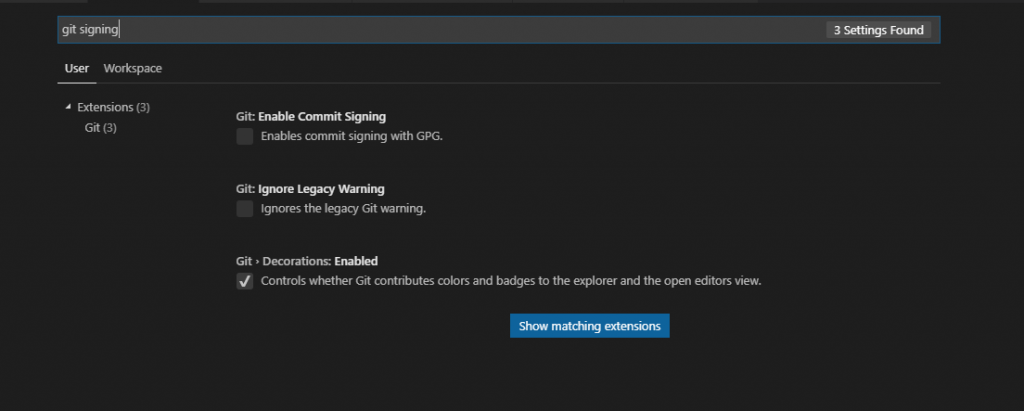
The setting in question is ‘Enable Commit Signing’. Check it, then make a new commit. List your commit log and you’ll see that now also the commits made directly from Visual Studio Code are now signed.

However, the export doesn’t end here. We need to export the private key in order to be able to import it and use it on another machine. To do so run the following command, gpg --export-secret-keys -a 0F5CBDB9F0C9D2D3 > privateKey.asc (where 0F5CBDB9F0C9D2D3 should be your key id). Store this file carefully and do not expose it to the public. It is protected by the password, still, however, in this case, the password itself becomes the weak link.

It is now time to import it. For that, it is sufficient to issue the following command gpg --import privateKey.asc. You do not need to import the public key, the private key always contains the public key. One last thing, if imported on another machine, you need to indicate the level of trust towards the newly imported key. You can easily achieve that with the command gpg --edit-key 0F5CBDB9F0C9D2D3 trust quit where 0F5CBDB9F0C9D2D3 is again the key id of the key on that machine. After you issue the command you will see the following screen:
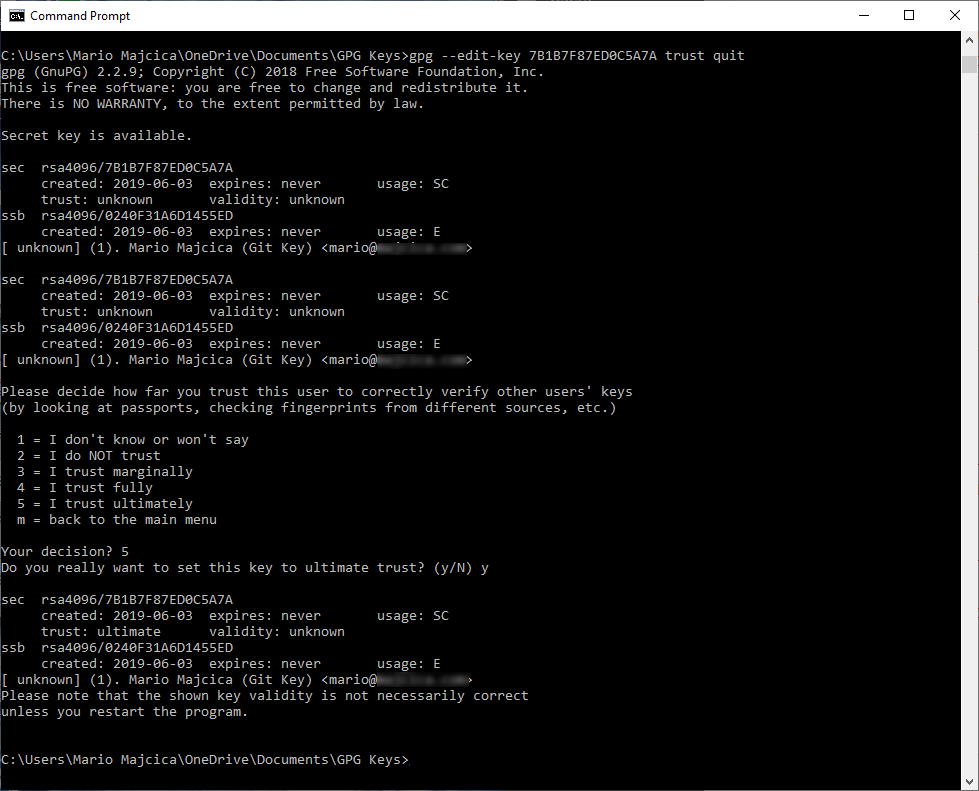
and at this stage, you will be asked for a decision. Hit 5 to indicate you trust ultimately the given key and your job is done.
If the key already existed on the new machine, the import will fail to say ‘Key already known’. You will have to delete both the private and public key first (gpg –delete-keys and gpg –delete-secret-keys).

Conslusion

Aside from the commits, you can also sign tags. If you are not familiar with public key cryptography, check this video on YouTube, it is one of the simplest explanations that I heard.
Some of the useful commands in our case:
gpg --list-keys and gpg --list-secret-keys, both will list your keys, public and private ones and the trust state.
git config --list --show-origin will show you all of the git settings so that you can check if the necessary is already set.

To configure your Git client to sign commits by default for a local repository, in Git versions 2.0.0 and above, run git config commit.gpgsign true. To sign all commits by default in any local repository on your computer, run git config --global commit.gpgsign true.

To store your GPG key passphrase so you don’t have to enter it every time you sign a commit, I recommend using Gpg4win.

That’s all folks, don’t forget to sign your work!

Using Git with self-signed certificate at the user level

Introduction

Some time ago I wrote about Installing self-signed certificates into Git cert store.
With the advent of Visual Studio 2017 and updates of the Git client I noticed the limitation of this approach. Also, updates of Visual Studio brought updates to a git client and after each update, my self signed certificate was gone. As this fact annoyed me quite a bit, I looked for a better approach.

A better approach

In order to solve this issue, I needed to move my certificate authority file to a place where it will not be rewritten by installing a new version of Git client. I went moving it to my users directory, which on my PC equals to C:\Users\majcicam. So after adding my self signed certificate into ca-bundle.crt file that is located, again, in my case at C:\Program Files\Git\mingw64\ssl\certs, I moved it to the C:\Users\majcicam. You can read more about adding your self signed certificate into the ca-cert file in my previous post at Installing self-signed certificates into Git cert store.

After I moved my file, I needed to indicate to the Git client that he should use this file to verify certificates. This can be done by issuing the following command:

git config --global http.sslCAInfo C:/Users/majcicam/ca-bundle.crt

This command will add the new path into a Git global config file which is a place where all of the user wide settings are stored and it is not subjective to the installation of Git or a particular repository.

Note that I used a slashes in the path instead of back-slashes.

This means that now we can update our Git client and that these settings will be maintained. As a standard on Windows platform, it is located in your user folder, in my case the global config file is at C:/Users/majcicam/.gitconfig. You can verify the values of all the Git config files and their location by issuing the following command:

git config --list --show-origin

This simple trick should make your lazy developer life a bit easier.

Happy coding

TFS Tips from the Trenches

In the recent past I came across several interesting techniques to solve a non every day challenges with TFS. Not only that I would like to share those with you, also I would like to leave a trace about this as a note to my future self. I will list several short tips without a particular order.

Let’s start.

Proxy squared

I already wrote about allowing TFS to get the internet access via a proxy server in one of the past articles, TFS 2015 behind a proxy. It is not a very common situation to have a TFS server behind a proxy still in many enterprises it may be the case. My previous post shows how to let the TFS web application to access the web through proxy for TFS 2015 and it is also valid for the TFS 2017. However I missed to mention that there is another component on the application tier that also needs to be set and that is TFS Job Agent. You may ask yourself, why would TFS Job Agent have a need to access the internet? Well if you are trying to set up a web hook in your service hooks and your system needs to communicate with a machine that is out of your network, then the TFS Job Agent needs to be able to do so as it is him that actually sends the request generated by the chosen event. Luckily things are quite simple, move to the C:\Program Files\Microsoft Team Foundation Server 15.0\Application Tier\TFSJobAgent folder and open the TfsJobAgent.exe.config file. The following section needs to be added pointing to your proxy server

</configuration>
  ...   
  <system.net>
    <defaultProxy>
      <proxy usesystemdefault="True" proxyaddress="http://your.proxy.server.com:8080" bypassonlocal="True" />
    </defaultProxy>
  </system.net>
</configuration>

Once you saved these changes, you need to restart the TFS Job Agent. That can be easily done by executing the following from the command prompt with full administrator permissions:

net stop tfsjobagent

followed by

net start tfsjobagent

Now your web hook requests to an external party should succeed.

Browsing TFS from the AppTier machine fails in: ‘Unauthorized: Logon Failed’ error

In case you are not using the machine name to access your TFS server (by using an CNAME in DNS or accessing it via an A-Record that may lets say point to the NLB Virtual IP) you may discover a strange behavior of you Application tier server once it tries to access the service on the localhost. It is not an issue strictly related to the TFS and it has to do with the loopback check security feature that is designed to help prevent reflection attacks on your computer. You can read more about it at KB896861. This also can present an issue in case of TFS 2015 or earlier once you try to setup the Notification URL. A solution to this issue is quite simple and adding a value in the registry will solve it. The following PowerShell command will do the trick:

New-ItemProperty HKLM:\System\CurrentControlSet\Control\Lsa\MSV1_0 -Name “BackConnectionHostNames” -Value “your.tfs.com”,”tfs.yourcompany.com” -PropertyType multistring

You need to set the Value to the URL you have chosen for your DNS entries. A server may require a restart in order to make the changes effective.

TFS DB’s under a SQL AlwaysOn replica

Obviously this is not a guide on how to setup an AlwaysOn replica on SQL Server and move your databases under the replication. That is a topic for a much longer post. What I would like to show you here, is what is necessary purely on TFS side in order to get your Application Tier to connect via the SQL Availability Group Listener to the cluster.

Following commands will make that happen:

TFSConfig RegisterDB /SQLInstance:TFS_LISTENER,10010 /databaseName:Tfs_Configuration

and

TFSConfig RemapDBs /DatabaseName:TFS_LISTENER,10010;Tfs_Configuration /SQLInstances:TFS_LISTENER,10010 /AnalysisInstance:TFSAS /AnalysisDatabaseName:Tfs_Analysis

TFSConfig command must be run from an elevated Command Prompt, even if the running user has administrative credentials. To open an elevated Command Prompt, click Start, right-click Command Prompt, and then click Run as Administrator.
TFSConfig tool is installed in the Tools directory – by default, this will be

  • TFS 2017: %programfiles%\Microsoft Team Foundation Server 15.0\Tools
  • TFS 2015: %programfiles%\Microsoft Team Foundation Server 14.0\Tools
  • TFS 2013: %programfiles%\Microsoft Team Foundation Server 12.0\Tools
  • TFS 2012: %programfiles%\Microsoft Team Foundation Server 11.0\Tools
  • TFS 2010: %programfiles%\Microsoft Team Foundation Server 2010\Tools

With the first command we will update the name of the server that hosts the TFS configuration database. SQL Instance parameter is pointing to the Availability Group Listener and not the actual instance of the server. 10010 is just the port on which the listener will replay (a non standard port in my case). In case you are on a version of TFS prior to 2017 you will need to include the /usesqlalwayson parameter, which on the TFS2017 is not anymore necessary.
For the second command we will redirect team project collection databases to be accessed via the SQL Availability Group Listener. Again if you are not running the TFS 2017 you will need to specify the /usesqlalwayson parameter at the end.
Make sure that you also specify correctly your analysis server as it is not accessible thought the SQL Availability Group Listener.
Once done do some failover tests and verify the correct functioning of your TFS instance.

More information about the TFSConfig tool can be found at Manage TFS server configuration with TFSConfig page.

Restore permissions for project administrators on Service Hooks

In case you upgraded your TFS instance from TFS 2013 or any previous version to TFS 2015/2017 it may happen in certain cases that the Project Administrators, a role which should have rights in creating and editing Service Hooks, will not be in place. You can add these permissions manually or you can use a tool provided by Microsoft to check the current situation and correct it is necessary. I made some changes to this tool giving you the opportunity to do that for all of the projects and collections on your instance. A fork of the tool can be found on GitHub at https://github.com/mmajcica/vsts-integration-samples.
Once you have downloaded and compiled the code, just run the command line tool with /Server parameter and specify the full path towards your service, like http://mytfs:8080/tfs. This will be sufficient for it to check and, if necessary, correct the missing rights. Same can be done for only a specific collection by using /collection parameter and passing in the path towards the desired collection, like http://mytfs:8080/tfs/DefaultCollection

Controlling and debugging TFS Jobs from DB

Often when you are checking your jobs and you realize that something went wrong, you need to analyze your issues in detail and retry failing jobs. This is usually done via a web services, however, it can also be done directly by querying the DB. I find the second approach often quicker and easier. Let me show you a couple of tricks and where is the necessary data located.

First thing first. Before we are able to do anything further we need to find the Id of the Job that we are looking to operate with. Let’s assume that I’m looking for ‘Reporting Service Path Rename’ Job, which in my case is failing.

Jobs can be defined in the Collection database as they can be defined in the Tfs_Configuration database. This specific one is on the collection level, so I will execute the following query on the collection DB.

SELECT JobId FROM tbl_JobDefinition WHERE JobName like '%report%'

At this point you should get back the JobId which we will use later for obtaining the execution history and to put a new job in the queue.
In my case the above query returned the following GUID: 6322B69A-04BD-47DF-9390-C3185ED59287

Now, on the Tfs_Configuration database you can now check the state of the above job with the following query:

SELECT * FROM tbl_JobHistory WHERE JobId = '6322B69A-04BD-47DF-9390-C3185ED59287' AND NOT Result = 0 ORDER BY StartTime DESC

This will bring us all of the failed runs for the given job in the chronological order. You can get valuable information from the result of this query. In particular I need to get the information about the JobSource which indicates the collection for which this job is failing
In order to get the collection ID <=> Collection Name mappings, you can check the follwoing table:

SELECT * FROM tbl_ServiceHost ORDER BY Name

Let’s get to the point, lets trigger again the job from my example that was failing. This is the query that will create a new run for the given job:

DECLARE @jobSource UNIQUEIDENTIFIER
DECLARE @jobs typ_GuidInt32Table
SELECT  @jobSource = 'C64929FF-9329-4123-BF82-F021DDCBE0C3'
INSERT INTO @jobs VALUES('6322B69A-04BD-47DF-9390-C3185ED59287', '1')

EXEC prc_QueueJobs @jobSource, @jobs, 15, 0

As you can see, we used the job id that we retrieved earlier and the collection for which this is going to be triggered (as it is a collection specific job). Last thing left for us to do is to verify the state of the run and we can do that by checking on the tbl_JobQueue for all of the running jobs:

SELECT * FROM tbl_JobQueue WHERE JobState = '1'

Now that you know the tables and SP’s in play, you can try it and proceed on your own.

Be very careful with modifying TFS DB! It is for sure a non recommended practice! 🙂

Conclusion

These are only some of many issues solved in the past for which I haven’t found a solution by simply asking Google. I hope these information will let you avoid spending hours in finding a valid solution to your TFS challenges.