Signing Git Commits

What does it mean to sign a Git commit and why would you like to do that?

From Latin, signāre, or putting a mark.

As the word itself says, signing, putting a mark, ensures that the commit you made and the code contained can’t be tempered.
Git is cryptographically secure, but it’s not foolproof. In order to ensure the repository integrity, Git can sign tags and commits with a GPG key.

In this post, I’ll show you how to set up all of the necessary toolings in order to be able to sign your git commits. Aside from having the latest version of Git installed, you’ll need also the GnuPG. So let’s start.

GPG Introduction

GnuPG, also known as GPG, is a complete and free implementation of the OpenPGP standard. All of the details about OpenPGP are defined in RFC4880 (also known as PGP).
First of all, you need to download GPG, configure it and create/add your personal key.
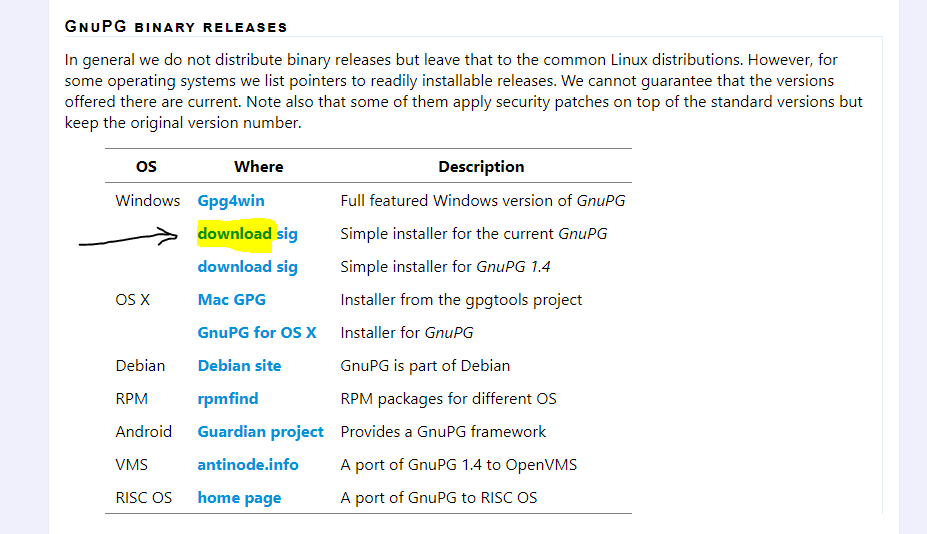
On the following address https://www.gnupg.org/download/index.html and under “GnuPG binary releases” under windows section choose “Simple installer for the current GnuPG” and download the installer.

When downloaded, please install the application. The installation procedure is a simple one as no particular options are available.
Once installed you are ready to create a new key, which is the fundamental thing in getting to sign our commit.

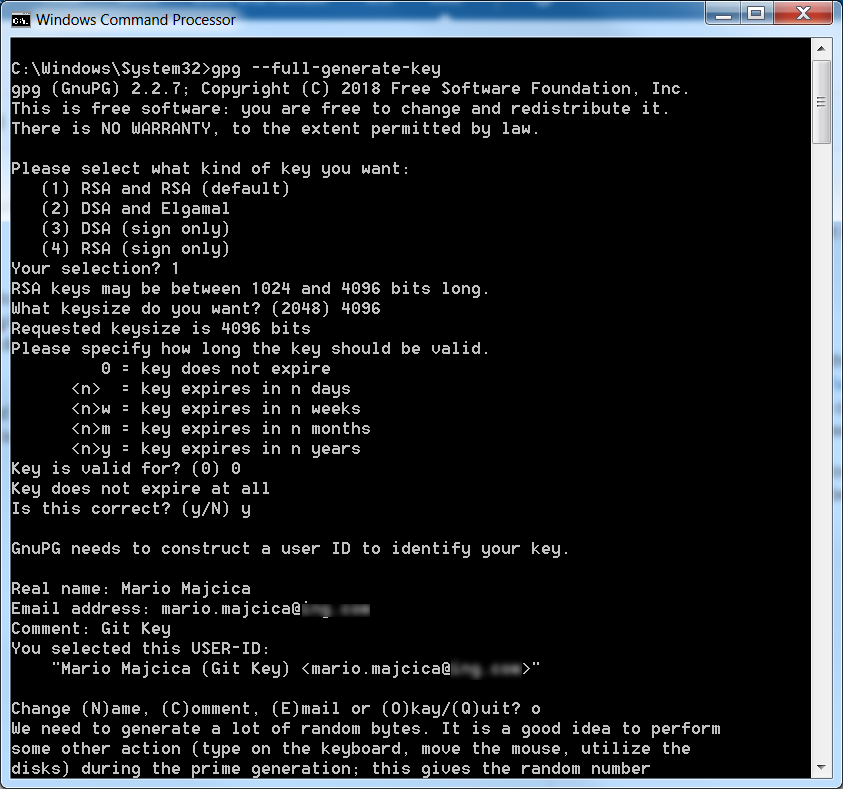
In command prompt issue the following command gpg --full-generate-key At this point, you will be asked several questions you will need to answer before your key is going to be created. Check the following example:

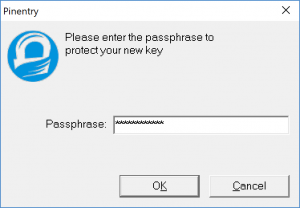
At the end of the process you will be asked, in a pop-up window, for a password that needs to be assigned to this key, please provide one.

Once the key is created you need to let Git know about it. First issue the following command gpg --list-secret-keys --keyid-format LONG which will list the necessary information about the newly created key. You should see something like this.

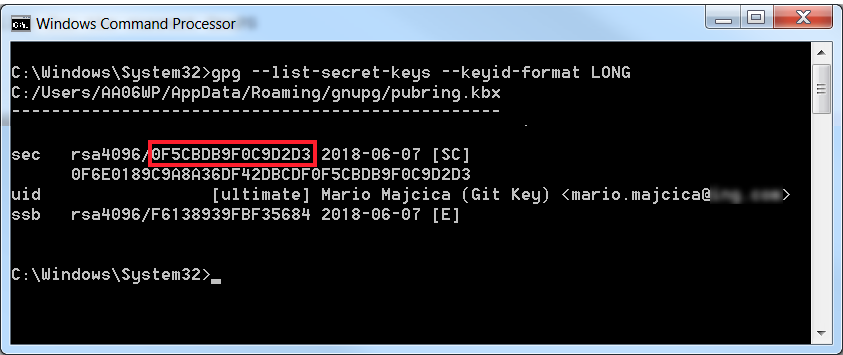
Now copy the value that is highlighted in red (key id) and issue the following command git config --global user.signingkey 0F5CBDB9F0C9D2D3 (where 0F5CBDB9F0C9D2D3 is your key id).

This is necessary so that Git knows what key it should use in order to sign your commits.

However, we are still not ready to go and sign our first commit. What we are missing is to set the `gpg.program` setting in our global git config. To do so we first need to retrieve the path of our gpg executable. The easiest way to do so is to run the where gpg command. It will return you the path on where gpg was installed. Now we can set the configuration by running the git config --global gpg.program "C:\Program Files (x86)\GnuPG\bin\gpg.exe" command (obviously in case your path differs from this one, you should adjust it).

Also, before proceeding make sure that the git user.name and user.email are set. In case this was not yet initialized try with, git config --global user.name "Mario Majcica" and git config --global user.email your@yemail.com.

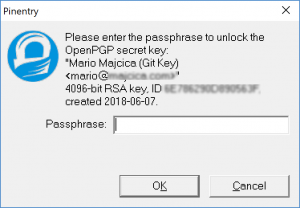
Now we are ready to sign our first commit. Initialize a new git repository, add a file and run git commit -S -m "signed commit". At this point you should be prompted for the password of your key, the one you have chosen during the creation of the key itself:

Once you enter your password, your commit will be made and it is going to be signed, e.g.

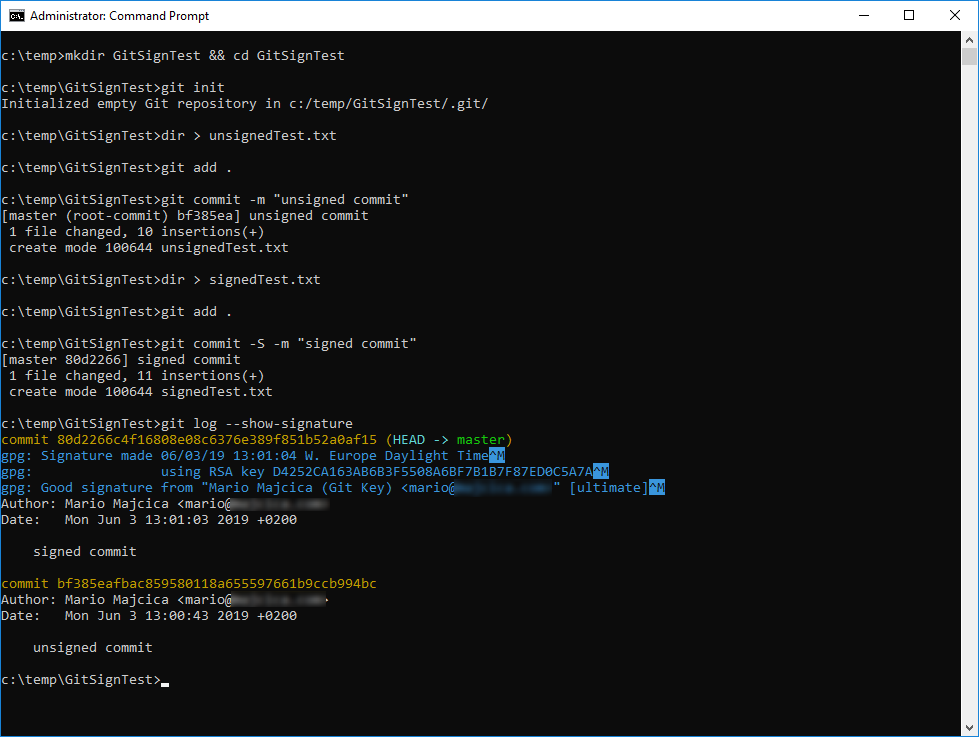
Let’s now verify that are signature is there. In order to achieve that issue the following command git log --show-signature -1 or a in a more kind of overview printout git log --pretty="format:%h %G? %aN %s".

You can learn more about Git and the available command regard signing commits here https://git-scm.com/book/en/v2/Git-Tools-Signing-Your-Work.

Export/Import

Next step is to export our key. Why would we do that? Well, an example, so that you can import it on another machine of yours, or import it to services like Github who can then validate your signature.

Let’s first export our public key. To do so, use the following command: gpg --export -a 0F5CBDB9F0C9D2D3> publicKey.asc
Obviously, 0F5CBDB9F0C9D2D3 is my key id in this case, sobstitute this value with your key id.
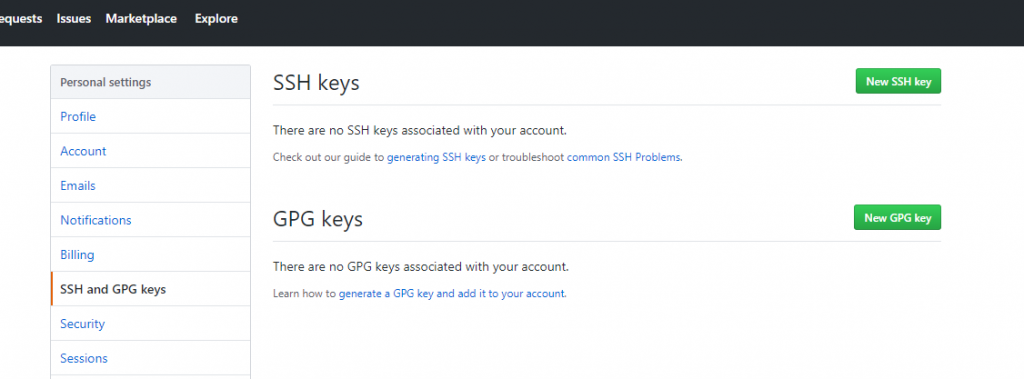
This command will create a file called publicKey.asc in the current folder of yours. Edit this file with a text editor of choice. The content of it will be necessary information for your Github account. Now open your Github.com page and log in. Under the settings, you will find a menu called “SSH and GPG keys”. Open this menu then choose “New GPG Key”:

Now, copy the content of publicKey.asc and paste it in the page on GitHub, then just click “Add GPG Key”.
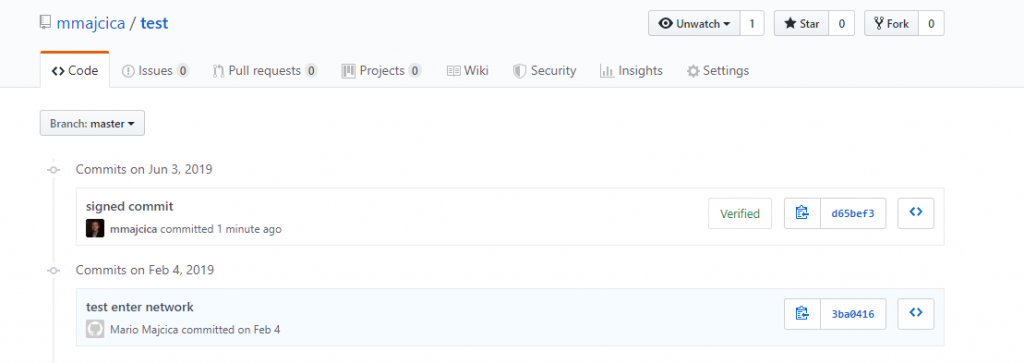
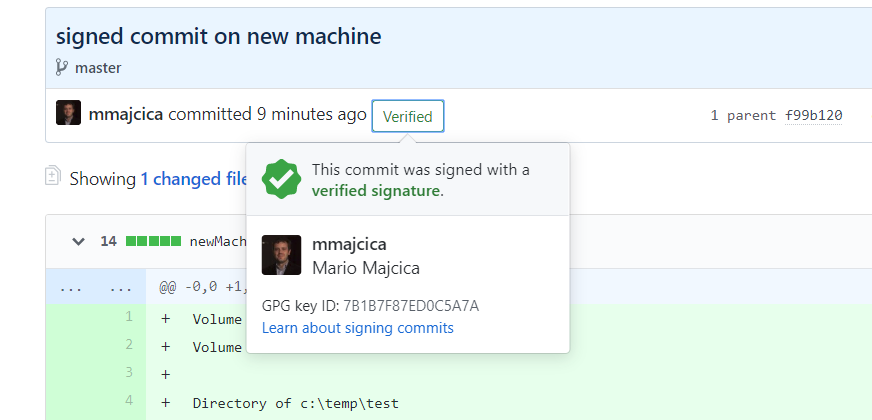
Once done, you should see your new key listed in the GitHub page “SSH and GPG keys” under the GPG Keys. I’ll now edit one of the projects in GitHub and push a signed commit. As you can see, it is now listed that the commit is verified.

In case you click on the Verified icon you will be able to see the details about the signature:

Before we move to the import part, let me show you a trick on how to automate this in a popular IDE, Visual Studio Code.
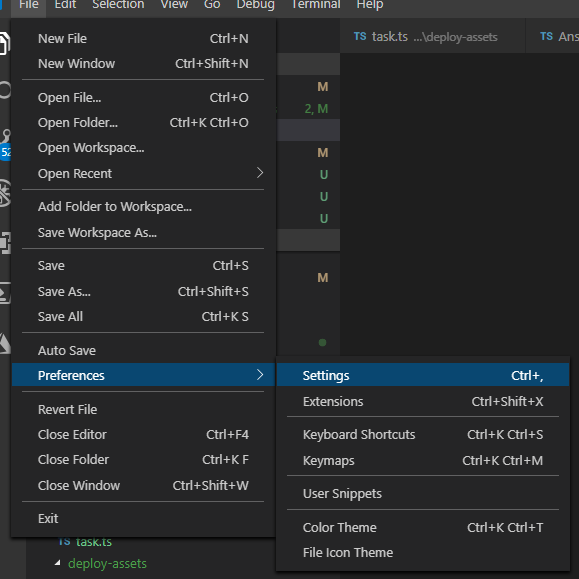
Now that we are all set up, we can instruct Visual Studio Code, to sign the commits that are made from the IDE. To do that, open the settings page in Visual Studio Code

then search for ‘git signing’ and the relevant setting should be listed:

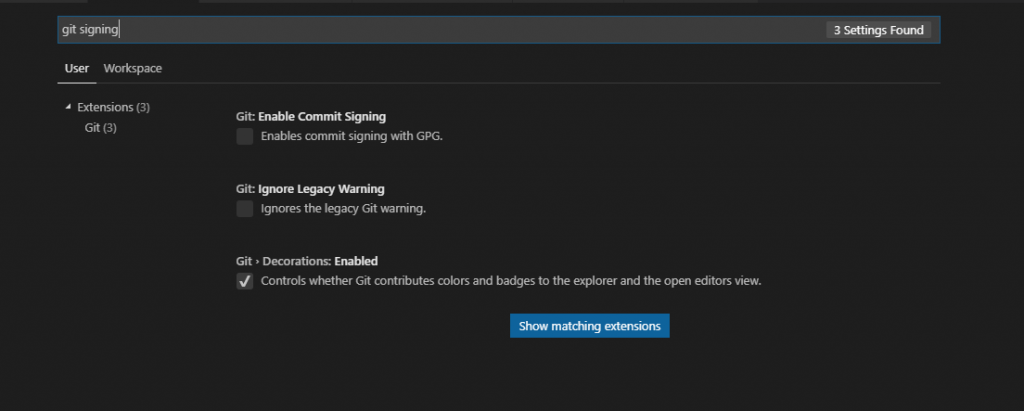
The setting in question is ‘Enable Commit Signing’. Check it, then make a new commit. List your commit log and you’ll see that now also the commits made directly from Visual Studio Code are now signed.

However, the export doesn’t end here. We need to export the private key in order to be able to import it and use it on another machine. To do so run the following command, gpg --export-secret-keys -a 0F5CBDB9F0C9D2D3 > privateKey.asc (where 0F5CBDB9F0C9D2D3 should be your key id). Store this file carefully and do not expose it to the public. It is protected by the password, still, however, in this case, the password itself becomes the weak link.

It is now time to import it. For that, it is sufficient to issue the following command gpg --import privateKey.asc. You do not need to import the public key, the private key always contains the public key. One last thing, if imported on another machine, you need to indicate the level of trust towards the newly imported key. You can easily achieve that with the command gpg --edit-key 0F5CBDB9F0C9D2D3 trust quit where 0F5CBDB9F0C9D2D3 is again the key id of the key on that machine. After you issue the command you will see the following screen:

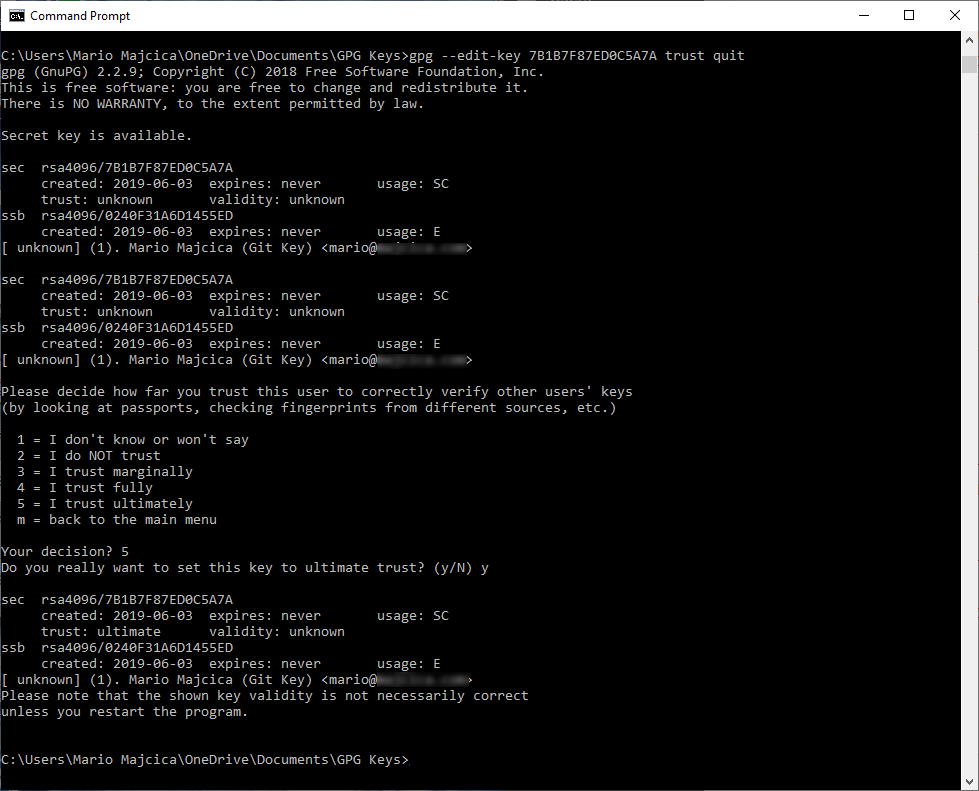
and at this stage, you will be asked for a decision. Hit 5 to indicate you trust ultimately the given key and your job is done.
If the key already existed on the new machine, the import will fail to say ‘Key already known’. You will have to delete both the private and public key first (gpg –delete-keys and gpg –delete-secret-keys).

Conslusion

Aside from the commits, you can also sign tags. If you are not familiar with public key cryptography, check this video on YouTube, it is one of the simplest explanations that I heard.
Some of the useful commands in our case:
gpg --list-keys and gpg --list-secret-keys, both will list your keys, public and private ones and the trust state.
git config --list --show-origin will show you all of the git settings so that you can check if the necessary is already set.

To configure your Git client to sign commits by default for a local repository, in Git versions 2.0.0 and above, run git config commit.gpgsign true. To sign all commits by default in any local repository on your computer, run git config --global commit.gpgsign true.

To store your GPG key passphrase so you don’t have to enter it every time you sign a commit, I recommend using Gpg4win.

That’s all folks, don’t forget to sign your work!

XL Deploy and TFS 2015 – Building, Importing and Deploying Packages

Recently XebiaLabs released a build task for Microsoft Visual Studio Team Services (VSTS) and Team Foundation Server (TFS) 2015 that facilitates the integration of the vNext build pipeline with their product, XL Deploy. The new build task is capable of creating a deployment archive (DAR package), importing it to an instance of XL Deploy, and eventually, if requested, triggering the deployment of the newly added package. It also contains some other interesting options that will ease the process of versioning the deployment package.

In the following post I will show you how to build an ASP.NET MVC application, create the deployment package, and deploy it via XL Deploy. Let’s start.

Prerequisites

Before we start, make sure that you have all of the necessary items in place. First of all, your build agent needs to be capable of building your application. In the case of on-premises TFS 2015, this means that you need to have installed Visual Studio on your build server.

You also need to install the XL Deploy build task; if you haven’t done so already, refer to Install the XL Deploy build task. As a prerequisite for the XL Deploy build task, your XL Deploy instance needs to be of version 5.0.0 or later; earlier versions are not supported.

Once you ensure that these criteria are met, you can continue reading.

Building your web application

First things first. Create a new empty build definition in your project. If you are not familiar with how to do this, refer to the MSDN article Create a build definition.

Set the repository mappings accordingly before proceeding any further; again, refer to the MSDN article Specify the repository for more information about doing so. For this example I am going to use TFVC; however, all of the techniques I am going to describe do work also with Git repository.

Now you can specify the necessary build steps to compile and publish the web application.

Add a Visual Studio Build build task.

add-task-vsb

Once added, you need to set the necessary parameters. The first mandatory setting is the path to the solution file in source control. Click the button with three dots and locate your solution file in the version control tree. Once found and confirmed, the Solution box will be populated with the correct path. In my case, that is $/XL Deploy Showcase/AwesomeWebApp/AwesomeWebApp.sln. This is the solution that will be built in the build definition.

Next you need to use the MSBuild Arguments setting to indicate that all of the built items should be delivered in the build staging directory. This is an important step because when the XL Deploy build task starts creating the deployment archive (DAR package), it will search for items to include in it, starting from this directory (considering the build staging directory as root). That’s why I am going to set MSBuild Arguments to /p:OutDir=$(build.stagingDirectory). This is a common way for MSBuild to pass a parameter; I’m using a variable that will resolve in a specific path when the build is run. A list of available variables and their usage is explained in the MSDN article Use variables. For now, I will not change any other setting. Make sure that Restore NuGet Packages is selected and that the correct version of Visual Studio is listed.

vsbuild-task

Save the build definition. Enter a relevant name and optionally set the comment.

save-definition

Now, you can test the build. Queue a new build and check the results. If everything went well, you will get a ‘green’ build.

first-build

Now you are sure that the project builds correctly and we can continue with our next task, which is deploying the application via XL Deploy.

You can find more information about build steps on MSDN at Specify your build steps.

XL Deploy build task

In order to continue, you need to have a valid XL Deploy manifest file checked in to our source control. You can read about creating a manifest file at XL Deploy manifest format. I checked in the following manifest:

<?xml version="1.0" encoding="utf-8"?>
<udm.DeploymentPackage version="1.0.0.0" application="AwesomeWebApp">
  <deployables>
	<iis.WebContent name="website-files" file="_PublishedWebsites\AwesomeWebApp">
	  <targetPath>C:\inetpub\AwesomeWebApp</targetPath>
	</iis.WebContent>
	<iis.ApplicationPoolSpec name="AwesomeWebApp">
	  <managedRuntimeVersion>v4.0</managedRuntimeVersion>
	</iis.ApplicationPoolSpec>
	<iis.WebsiteSpec name="AwesomeWebApp-website">
	  <websiteName>AwesomeWebApp</websiteName>
	  <physicalPath>C:\inetpub\AwesomeWebApp</physicalPath>
	  <applicationPoolName>AwesomeWebApp</applicationPoolName>
	  <bindings>
	<iis.WebsiteBindingSpec name="AwesomeWebApp/8088">
	  <port>8088</port>
	</iis.WebsiteBindingSpec>
	  </bindings>
	</iis.WebsiteSpec>
  </deployables>
</udm.DeploymentPackage>

As you can see, I specified the required IIS application pool, a web site, and, most importantly, WebContent. The WebContent element indicates that the files that do represent the web site.

An attribute called file is present on the deployable element iis.WebContent. This attribute is very important, as it will guide the build task in creating the deployment archive. A relative path is set as the value and indicates the folder that needs to be included in the DAR package. This relative path assumes that the root folder is the build staging directory; it will search this directory for the folders specified here. If they are not present, packaging will fail. Now you understand why I delivered the build output in the staging folder. Although this behavior can be overridden in the advanced settings of the XL Deploy build task, I would advise you not to change it if it is not necessary and until you became confident and sufficiently experienced with TFS 2015 builds.

The manifest file also indicates that I expect MSBuild to package the web application under a default folder called _PublishedWebsites. This is standard behavior for MSBuild.

After the manifest file is correctly checked in, you can continue and edit the recently created build definition by adding another build step. This time, go to the Deploy group and select XL Deploy.

add-task-xld

The first mandatory parameter that you need to set is the path to the manifest file. As you did previously for the solution file, click the button with three dots and select the manifest file in source control. In my case, that will be $/XL Deploy Showcase/AwesomeWebApp/deployit-manifest.xml.

Secondly, you need to set the endpoint, which is a definition of the URL and credentials for the XL Deploy server that you intend to use in this deployment. If no XL Deploy endpoints are defined, click Manage and define one. For information about doing so, refer to Add an endpoint in Team Foundation Server 2015. After you are done, click Refresh and your newly added endpoint will appear.

Versioning the package

As you can see, there is a Version option available on the XL Deploy build task. If selected, the deployment package version will be set to the build number format during the process. The build number format is a value that you can set in the General tab of the build definition.

When composing the build number, you can choose between constants and special tokens that are available for that purpose. In Specify general build definition settings, you can read about the available tokens and ways of setting the build number format.

If you are using a different pattern for versioning your deployment package and your build number format has a different use, you can override this behavior by setting a custom value in Version value override parameter under Advanced options.

For this example, I will set this option and then set the build number format to a simple ‘1.1.1$(Rev:.r)’.

Automated deployment

You have the option to automatically deploy the newly imported package to the environment of your choice. If you select the Deploy check-box on the XL Deploy build task, a new field called Target Environment will be available. Here, you need to specify the fully qualified name of the environment defined in XL Deploy. In my case, it is called Test. You can also allow the deployment to be rolled back in case of failure by selecting Rollback on deployment failure.

Note that this requires that you have correctly defined the environment in XL Deploy, with the relevant infrastructure and components. For more information, refer to Create an environment in XL Deploy.

Ready to roll

After you set all of the parameters and save the build definition, you are ready to trigger the new build. Make sure that you set all of the necessary parameters as shown in the picture.

xld-task

You can now trigger the new build. In the build console you should now see the information relevant to the process of creating and versioning the package.

final-build

In case of problems, you can add a new build definition variable named system.debug and set the value to true. Then, in the build log, you will see more detailed messages about all of the actions preformed by the tasks (note that this is not shown in the console). It should be sufficient to diagnose the issue.

Conclusions

This was a small practical example about taking advantage of the new XL Deploy build task. I haven’t covered all of the available options; you can read more about them at Introduction to the Team Foundation Server 2015 plugin. However, this example is sufficient to get started. You can combine other build tasks in your build definition with the XL Deploy build task; but it is important that you invoke the XL Deploy build task after all of the elements that will compose your deployment package are available.

Running XL TestView as a service

Introduction

If you started working with XL TestView you may have noticed in the user manual the following: ‘To run XL TestView as a service on Microsoft Windows, use a service runner.’. This differs quite a bit from other products of XebiaLabs that you may have used, as XL Deploy, where a yajsw (Yet Another Java Service Wrapper) is provided. Yet Another Java Service Wrapper will take care of adding the service into your system and handling all of the necessary. This is however not the case with XL TestView. I’m going to show you a proven way of running XL TestView as a service via NSSM.

The Non-Sucking Service Manager

NSSM – the Non-Sucking Service Manager is a tool which allows any application/executable to run as a windows service without much hassles. As an advantage above other tools of this kind is the fact that it handles failure of the application running as a service. Also the users are helped with a graphic interface during the configuration.
In order to start, download NSSM and extract the content of the zip file in a folder that we are going to create in program files, like C:\Program Files\NSSM. NSSM should work under Windows 2000 or later. Specifically, Windows 7 and Windows 8 are supported. 32-bit and 64-bit binaries are included in the download and I will use for this example the 64 bit version. For installing NSSM correctly the last thing left to do is to add the NSSM path to the system path.
Open Control Panel > System and Security > System and choose Advanced System Settings. This will open the System Properties window.

SystemProperties

In System Properties window choose Environment Variables and the namesake window will open.

EnvironmentVariables

In lower part of that window you will find system variables. Search for the system variable called Path, select it and choose edit. Now, this is the part which defers in between different versions of Windows. In Windows 10 and Windows Server 2016 you will be presented with an editor and previous versions will show all of the variables in a text box. I will show you how this is done on Windows 10, however on earlier versions of Windows get at the end of the string in the text box, and add ;C:\Program Files\nssm\win64. Notice that the semicolon at the beginning is not a typo. Multiple items in that string are separated by semicolon. In case of Windows 10 just choose New and add the path to the list.

EditEnvironmentVariables

In order to verify that is all setup correctly, open the command prompt and execute the following command, nssm. You should see something similar to what shown in the following figure.

CommandNSSM

If this is the case, you installed NSSM correctly.

Creating the service

Before proceeding any further make sure that you are able to run XL TestView interactively as indicated in the user manual. Once XL TestView is installed correctly and capable of starting, stop it (CTRL+C).
Now execute the following command, nssm install xltv. This will launch NSSM graphic interface which will allow you to create a new service called xltv. You should see the following

NSSMInstaller

Fill in the path to the server.cmd (starting point for XL TestView) in the path box as in the picture, and start-up directory will get preset by NSSM. Select then the second tab named Details and set the values as indicated in the following figure:

NSSMInstallerDetails

As you can see, I have chosen a friendlier display name for my service and a meaningful description.

In case you would like to set other parameters, as specific user to run the service or specify dependencies, you can do so in other tabs. Once done it is sufficient to choose Install service and in case everything went fine, you will receive the following message:

NSSMInstalled

You can now check in the Services panel, that a new service is present. In case it hasen’t been started, you can start it and verify that XL TestView is up and running.

Services

Be aware that XL TestView can take a bit to start. I would suggest also to set the startup type to Automatic (Delayed start) and this can be done directly from the service properties.

I you would like to modify the NSSM setup, run nssm edit xltv. In case you would like to remove the service, try nssm remove xltv.

That’s all folks, now also XL TestView runs as a service!