Azure DevOps extension for XL Deploy

XL Deploy and Microsoft development process improvement tools are long date friends. XL Deploy started supporting TFS since the 2010 version. Initially, the integration came in form of custom build activities for XAML templates. With TFS 2015, Microsoft introduced a simpler task and script-driven cross-platform build system and XL Deploy followed up with an extension that delivered the custom tasks that will integrate operations in between our build/releases and XL Deploy. The newly introduced extension was named ‘VSTS extension for XL Deploy’ which was published to the VSTS Marketplace so that all the customers can easily integrate it on their systems. You can find more information on the argument on XebiaLabs blog, for example V7.0 Plugin Adds Fine-Grained Control to Microsoft TFS/VSTS Deployments.

Today XebiaLabs released a new version of the above-mentioned extension. The version number is 8.5 and it brings a lot of interesting improvements.

What’s new?

First of all, the name. The extension is renamed to follow up on Microsoft new naming. The name is “Azure DevOps extension for XL Deploy”.

One of the major changes is laying under the hood. Tasks delivered by the extension are no more implemented with PowerShell, instead, they are based on NodeJs. This allows us to run all of them also on cross-platform agents. This, however, will require the agent version 2.117.0 or newer.

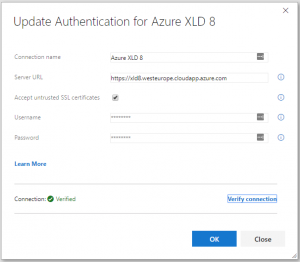
There is an improved endpoint definition. You can now test your connection directly from the endpoint definition window. Also, there is better and more precise handling of the self-signed certificate that you can now ignore by selecting “Accept untrusted SSL certificates” flag on the endpoint service.

Also, “Deploy with XL Deploy” task was simplified by letting you specify an advanced search pattern that will look for your deployment archive.

How will this impact the customers using it?

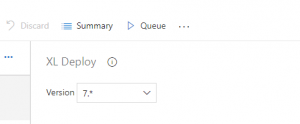
If you are already using ‘VSTS extension for XL Deploy’ extension, you can upgrade it with “Azure DevOps extension for XL Deploy”. Once the upgrade is done, your builds/releases will still continue using the old version of the tasks, until you do not modify them and manually upgrade to the new, version 7, of the task.

In case you encounter any issues with the new version, you can always rollback the task to the previous version.

This is a typical path of the major version update for tasks in Azure DevOps Services, same as many of the out-of-the-box tasks have shown us.

You can find the nex extension here Azure DevOps extension for XL Deploy on Visual Studio Marketplace.

Uploading XL Deploy DAR package via TypeScript

Another day, another language, another challenge

In past I already wrote about multipart/form-data requests that are used to upload files. It was about PowerShell and leveraging .Net libraries to achieve this task. Now it is the turn of TypeScript.

I had a need to implement the file upload to XL Deploy which requires multipart/form-data standard in order to do so. I wrote about the same thing in the past, using PowerShell to upload DAR package to XL deploy. This time, however, I needed to use NodeJs/TypeScript.

This is not meant to be a guide about the TypeScript, I do suppose you already have some knowledge about it. I just would like to show you how did I achieve it, hoping to help others not to go through the same discovery process that brought me to result.

First of all, I will be making my HTTP calls via typed-rest-client. This library is again based on the plain NodeJs http.ClientRequest class. This also means that if you do not plan to use this library, you can still follow the method I’m suggesting.
Creating the multipartform-data message structure and adding the necessary headers will be done with form-data package. It is one of the most popular libraries used to create “multipart/form-data” streams. Yes, I just mentioned the keyword, streams, and yes, we are going to use streams to achieve this and allow us not to saturate resources on our client host in case of large files upload.

Enough talking now, let’s see some code.

Sending multipartform-data messages in Typescript

Before we start, make sure that you install the following packages:

npm install typed-rest-client
npm install form-data
npm install @types/form-data

This is all we need. Note I also installed typings for the form-data library so that we can comfortably use it in TypeScript and make sure that “typed-rest-client” library is at least of version 1.0.11.

Code wise, first of all, we need to create an instance of our client.

import { BasicCredentialHandler } from "typed-rest-client/Handlers";
import { RestClient } from "typed-rest-client/RestClient";

async function run() {
    const requestOptions = { ignoreSslError: true };
    const authHandler = [new BasicCredentialHandler("user", "password")];

    const baseUrl: string = "https://myXLServer:4516";

    const client = new RestClient("myRestClient", baseUrl, authHandler, requestOptions);
}

I will skip commenting on the necessary imports and quickly analyze the remaining code.

I need to create request options and set the ignoreSslError property. This is so to allow my self-signed certificate to be accepted.
Then I do create a basic authentication handler and pass in the requested username and password. Once I have all of the necessary, I create an instance of the RestClient.

You spotted well, it is a RestClient and above I talked about the HttpClient. Do not wary, it is a wrapper around it, helping me to deserialize the response body, verify the status code, etc.

Let’s now prepare our form data.

...
import FormData from "form-data";
import fs from "fs";

async function run() {
	...
	const formData = new FormData();
	formData.append("fileData", fs.createReadStream("C:\\path\\to\\myfile.dar"));
}

We need a couple of extra imports and once that is sorted out, we just do create an instance of the FormData class. Once we have it, we will call the append method, pass in the file name and the stream that points to my file of choice. In order to get my file that is on the disk, I’m using createReadStream function from fs library which is a very common way to setup a stream.

At this point, we are ready to make our HTTP call.

async function run() {
	...
	const response = await client.uploadStream(
		"POST", `deployit/package/upload/myfile.dar`,
		formData,
		{ additionalHeaders: formData.getHeaders() });

	console.log(response.result.id);
}

As you can see, we are invoking the upload stream method from the rest client and passing in the following parameters.
HTTP method to use, POST in our case (XL Deploy), second, rest resource URL that needs to be triggered. Bear in mind that actual URL will be composed with the base you passed in the constructor of the RestClient. Then, the stream containing the body. This is going to be the instance of our FormData class, which is of type stream, and as the fourth parameter, we need to pass the additional headers. The additional headers we are specifying are overriding the content-type as for multipart/form-data it needs to be set to multipart/form-data and contains the correct boundary value. That’s what getHeaders will do, return the necessary content-type header with the necessary correct boundary value.

Once the call has been made, the upload of the file will start. As the response from XL Deploy on a successful import we will receive a message in form of JSON where one of the fields do report the ID of the package, and that’s what I’m printing in the console on my last line.

This may be specific for XL Deploy, however, you can easily adapt this code for any other service where multipart/form-data upload is necessary.

Following the complete code sample.

import FormData from "form-data";
import fs from "fs";
import { BasicCredentialHandler } from "typed-rest-client/Handlers";
import { RestClient } from "typed-rest-client/RestClient";

async function run() {
    const requestOptions = { ignoreSslError: true };
    const authHandler = [new BasicCredentialHandler("user", "password")];

    const baseUrl: string = "https://myXLServer:4516";

    const client = new RestClient("myRestClient", baseUrl, authHandler, requestOptions);

    const formData = new FormData();
    formData.append("fileData", fs.createReadStream("C:\\path\\to\\myfile.dar"));

    const response = await client.uploadStream<any>(
        "POST", `deployit/package/upload/myfile.dar`,
        formData,
        { additionalHeaders: formData.getHeaders() });

    // tslint:disable-next-line:no-console
    console.log(response.result.id);
}

run();

Good luck!
XL Deploy in VSTS/TFS build/release pipelines

Introduction

Circa a year ago I showed you how to use XebiaLabs Team Foundation Server 2015 XL Deploy plugin to create, import and deploy, XL Deploy Deployment Archives, on TFS and VSTS. With a new version of the plugin, that is now renamed into VSTS extension for XL Deploy, XebiaLabs delivers two more build/release tasks. This tasks are supported both by build and release pipelines in VSTS and Team Foundation Server. This will allow us to be more granular and chose to perform only certain operations at each stage, in our pipelines. We can at example choose to create our XL Deploy Deployment Archive during the build and later on, in our release definition, deploy the same artifact in different environments, using XL Deploy.
In the following post, I’ll show you an example on how to achieve this by using our two new tasks, respectively, Package with XL Deploy build task and Deploy with XL Deploy build task.

Building the artifact

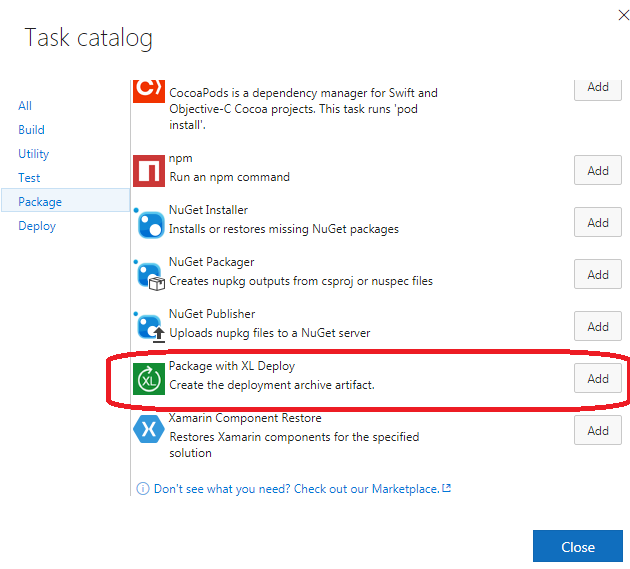
As in my previous post, we will keep our Visual Studio Build, however, instead of using the XL Deploy build task, we will add Package With XL Deploy task which you can find in the Package category in the Task Catalog

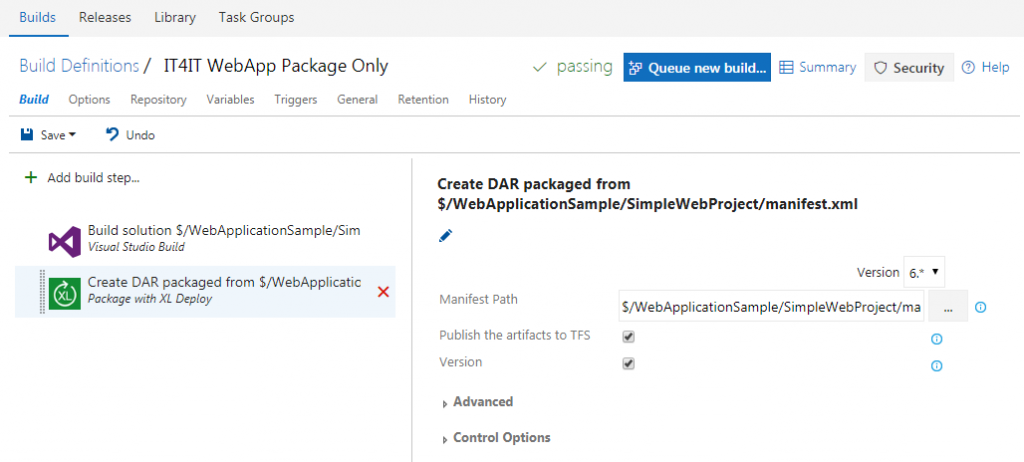
Once added, we need to point it to the right manifest path, chose if we want the task to set the version of the created package based on the build number and, in our case, Publish the artifact to TFS. In this way once the package is created, it will be uploaded to TFS and associated as an artifact to the current build. At the end the result should be similar to the following.

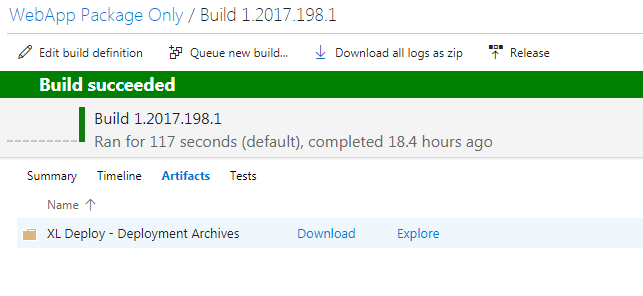
You can now try your build and at the end, if successful, you should see our DAR package under the build artifacts.

If you can see your artifact uploaded, we can move to the next step.

Deploying from the VSTS Release Management

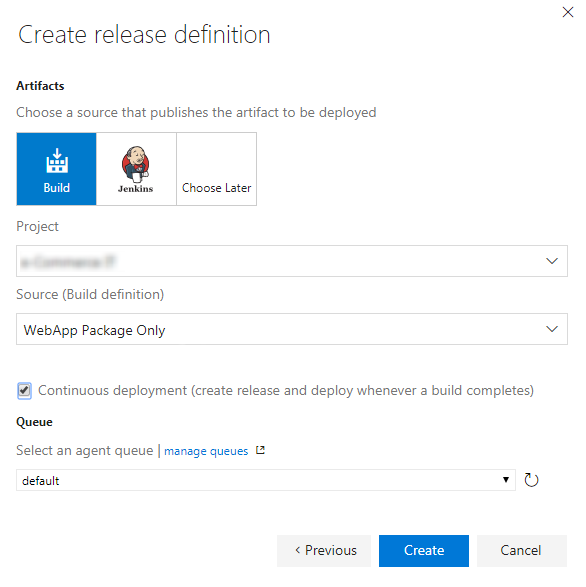
We are going now to create a new release definition and start with an empty template. As artifact source we are going to indicate a build and select from the relevant drop-down, build definition that we created in our previous step. You also may choose to select a continuous deployment option and a specific build queue for this build.

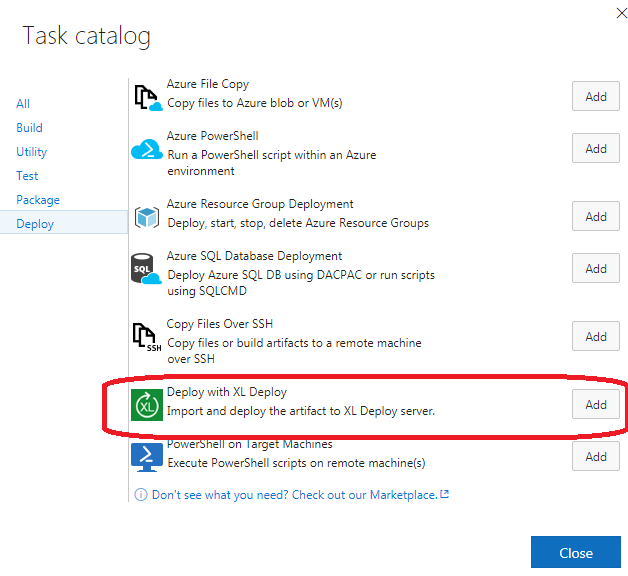
Once the release definition is created, for your initial Environment, choose Add task and select Deploy with XL Deploy from the task catalog.

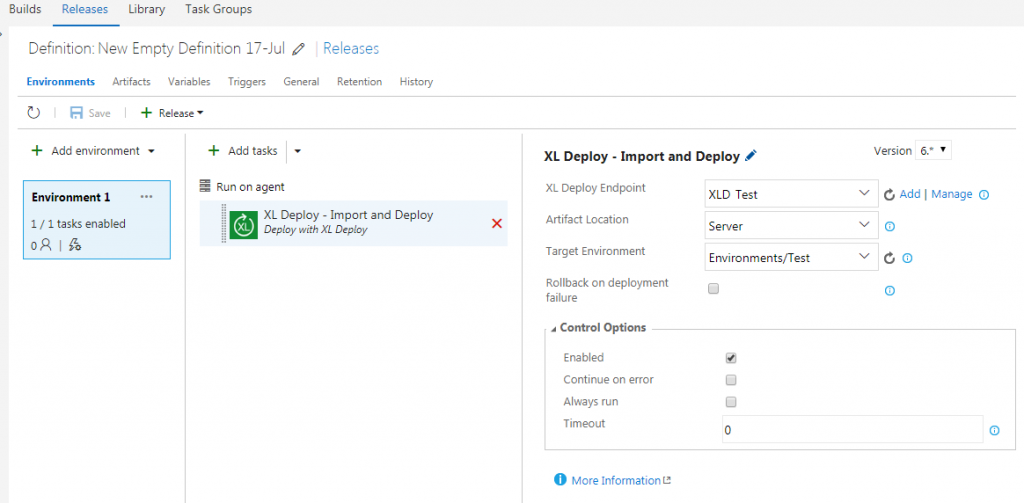
This task will allow us to import the DAR package into XL Deploy and trigger the deployment for the desired environment. Bare in mind that it will check if the package is already in XL Deploy and, if so, will skip the import. This means that if you are using it multiple times for different environment definitions, it will behave as efficiently as possible.

Now we need to select the XL Deploy Endpoint, which indicates the instance of XL Deploy we are using for this deployment and fill in the necessary indications about the artifact location and the name of our target environment. For what concerns the XL Deploy Endpoint you can get further information in Add an XL Deploy endpoint in Visual Studio Team Services document. Artifact can be ‘picked up’ from the Server, it means that it will be made available by the release itself, or it can be retrieved from the file share. In our case it will be delivered by the release which will gets it from the associated build.

That’s all! Now we can create a new release and let our task delegate the deployment to XL Deploy.

Conclusion

We saw how can we leverage the new build/release tasks to interact with XL Deploy in different phases of our Build/Release process.

You can find more VSTS specific information at the following link or more information about the VSTS extension for XL Deploy here.