This post is about my most successful Azure DevOps extension. Before I tell you more about the newest version, let me tell you something more about the history of it.
Several years ago, just after the TFS 2015 was released, this was one of the first build tasks I built. I had a team who demanded it as not all of the projects they were running were based on MSBuild. Also, the necessary script to perform this action was quite simple, thus, a great practice ground to start writing a custom build task (I emphasise build as the release was back then not there yet).
It turned out to be very useful, however, considering its simplicity, I never thought it may be of interest to others. It was until I wrote and published the Deploy SSIS extension that I realized that may be handy to publish this task as an extension. It is not that I suddenly changed my mind, it just made sense to describe the whole process of building and deploying SSIS projects in a blog post and I missed a building part. It turns out I was wrong a big time as this is the most used extension I wrote with over a thousand downloads from the Azure DevOps Marketplace.
What’s new in version 2
My initial implementation stayed untouched for quite some time. In the end, it is a simple task that just worked. However, some users made me notice an obvious flaw. In the project was set to be built, all of the projects in the containing solution would be built. Strangely enough the same is stated in the help page of the tool itself, it just that I never noticed it.
The first argument for devenv is usually a solution file or project file.
You can also use any other file as the first argument if you want to have the
file open automatically in an editor. When you enter a project file, the IDE
looks for an .sln file with the same base name as the project file in the
parent directory for the project file. If no such .sln file exists, then the
IDE looks for a single .sln file that references the project. If no such single
.sln file exists, then the IDE creates an unsaved solution with a default .sln
file name that has the same base name as the project file.
I address this issue by adding a separate filed for the solution and for the project. As this is a breaking change for the existing users, I published a new major version of the task.
Some minor improvements are also now included in the new version.
The first issue ever to be reported was actually a feature request. It was asked if the search for the solution file can be performed so that the wildcards can be used as parameters for the solution input field. This is now addressed.
Also, all of the dependency libraries are now updated to the latest available version. These are ‘Task Library’ which is now v0.11.0 and ‘VSSetup library’ that was boosted to v2.2.5. This also bring some changes to the retrieval of the path of the DevEnv come to accommodate the newly added Visual Studio 2019 option.
What’s next
Although the task is focusing on windows tooling and needs windows only tooling to be present on the build agent, the PowerShell implementation is somewhere limiting. The next step will be rewriting the task in TypeScript. Not a huge added value, however, it is making this extension easier to maintain in the future.
Truly my hopes are in Microsoft basing all of their projects on MSBuild (as they recently did for SSRS projects) and making this extension obsolete. However, for time being, this is one of the puzzle pieces, that could help you in automating your MS BI pipelines.
It is a common need to inject variables in your release. When it comes to a build, it was always an easy task, however, the release didn’t support such a thing out of the box. In case you are using Azure DevOps (service and server), you are good to go, as this is now possible after you do mark a variable as ‘Settable at the release time’. But what about those who are stuck to previous versions of TFS? Well, there are some tricks that I’ll illustrate in this post.
Leveraging Draft release
There are two ways of achieving our goal. The first one is to create a new release and do not trigger the deployment in the environments that are set to deploy on the release creation, set the variables then trigger the deployments. This is a more laborious and complicated way. Second method is to create a draft release, then populate the draft with the necessary variables and then start the release. I’ll show you the necessary steps to achieve this via the REST API which you can try for free. In the upcoming cmdlets I’ll focus on achieving a goal, which is to create a draft release, add a variable and start the release. So if you find code not really reusable or not framework like, please consider that was out of my goal and it would take way more effort to write. First of all I need a couple of helper functions that I will use in order to authenticate and get the right release id based on the release name.
The above is to get the necessary authentication header and resolve the Release Definition name into the id that we are going to use across all of our other calls. As you can see, my release definition is called “Test1”.
Before we start a draft release, we need to collect some relevant information and that is information about the artifacts that we would like to use with the new release. Often this is a pain point for those with less experience with TFS. However, the following cmdlets should do the trick:
In case you are interested in using non the latest artifacts, you can explore further the response and implement the necessary logic do provide the ones to use in the next stage.
Now it’s time to create our draft release. This is easily achieved with the following cmdlet.
As you can notice, with the above script, you can start not only a draft release, but also an ‘ordinary’ one.
At this point we are ready to set our variables. I’ll set both, one on the release level, another one on the environment scope, then update the release.
The above cmdlets will make things easier. In case the variable is already declared, the value will be overwritten with the one that you set at this stage. You can also see that I’m setting a variable on a release level and on an environment level. Environments are set to be an array, so to find out the desired one by name, you’ll need to search for it first. In this example, I’m just setting it on the first (and in my demo case, only) environment in the list. As mentioned earlier, last but not least, we will update the release.
Unfortunately, we can’t update the variables and start the release in the same call. The above call will update the variables in that specific release (not in the release definition) and the following will start the release.
That’s it. We now started our release with variables that are injected into it.
Azure DevOps
As mentioned before, this is not necessary anymore in Azure DevOps, or to be more precise, since version 5.0 of the REST API. In case you are looking for an example on how to achieve the same with the Azure DevOps, the following script will do.
Important changes compared to the previous version of the cmdlet are to be found in the extra parameter called Variables and the URL api-version parameter now set to 5.0.
Be however aware that you need create the variables in your release definition and mark them as ‘Settable at the release time’.
In case your variable is not defined, your API call will fail with the following error:
“Variable(s) another do not exist in the release pipeline at scope: Release. New variables cannot be added while creating a release. Check the scope of the variable(s) or remove them and try again.”
Previously described technique will still work, even with the Azure DevOps if adding variables dynamically in the release is what you want. However, I would always advise you to define them, so that they are present and do not “materialize” from nowhere.
I hope I covered the necessary. Let me know in comments if any.
XL Deploy and Microsoft development process improvement tools are long date friends. XL Deploy started supporting TFS since the 2010 version. Initially, the integration came in form of custom build activities for XAML templates. With TFS 2015, Microsoft introduced a simpler task and script-driven cross-platform build system and XL Deploy followed up with an extension that delivered the custom tasks that will integrate operations in between our build/releases and XL Deploy. The newly introduced extension was named ‘VSTS extension for XL Deploy’ which was published to the VSTS Marketplace so that all the customers can easily integrate it on their systems. You can find more information on the argument on XebiaLabs blog, for example V7.0 Plugin Adds Fine-Grained Control to Microsoft TFS/VSTS Deployments.
Today XebiaLabs released a new version of the above-mentioned extension. The version number is 8.5 and it brings a lot of interesting improvements.
What’s new?
First of all, the name. The extension is renamed to follow up on Microsoft new naming. The name is “Azure DevOps extension for XL Deploy”.
One of the major changes is laying under the hood. Tasks delivered by the extension are no more implemented with PowerShell, instead, they are based on NodeJs. This allows us to run all of them also on cross-platform agents. This, however, will require the agent version 2.117.0 or newer.
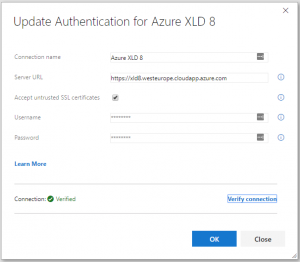
There is an improved endpoint definition. You can now test your connection directly from the endpoint definition window. Also, there is better and more precise handling of the self-signed certificate that you can now ignore by selecting “Accept untrusted SSL certificates” flag on the endpoint service.
Also, “Deploy with XL Deploy” task was simplified by letting you specify an advanced search pattern that will look for your deployment archive.
How will this impact the customers using it?
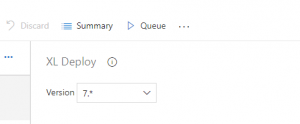
If you are already using ‘VSTS extension for XL Deploy’ extension, you can upgrade it with “Azure DevOps extension for XL Deploy”. Once the upgrade is done, your builds/releases will still continue using the old version of the tasks, until you do not modify them and manually upgrade to the new, version 7, of the task.
In case you encounter any issues with the new version, you can always rollback the task to the previous version.
This is a typical path of the major version update for tasks in Azure DevOps Services, same as many of the out-of-the-box tasks have shown us.