Securing access to the Cisco routers

This article is a translation of my original post written in Italian by the end of 2008 and published on areanetworking.it. As you may know, my working experience and specialized studies have provided me with knowledge and skills in the analysis, implementation, optimization, troubleshooting and documentation of LAN/WAN network systems with strong “hands on” technical knowledge. However in that period I was programming only and it was a long time that I didn’t seriously configured a router. One of my old customers commissioned a configuration of three routers, one in the main office and other two in branches. It was for me something new and challenging because I never before configured fully mashed VPN connection so I wanted to get a bit further and configure also other aspects in a more detailed way. I checked my previous configurations an no one of them satisfied me completely. So I pulled down all the documentation I found and started studying. The following lines are the result of that.

Let´s start, first thing that I did is to separate the virtual terminal lines in two groups, the first one will be reserved for the connections from external networks meanwhile the second will be used for the connections from internal networks. From the external networks will be only possible to connect via SSH where from the internal networks telnet will also be an option.
To achieve this I have given the following commands:

line vty 0 1
line vty 2 4

In this post I will not get in depth about SSH protocol, if you are interested in different version of the protocol, you will find many information’s by Googleing the keywords. If you yet do not know anything about it, it is a way to connect to the terminal where all the data exchanged between client and server are encoded. To achieve that let´s give the following commands:

line vty 0 1
    transport input ssh
line vty 2 4
     transport input telnet ssh

Now we need to make sure that we set up the hostname and the domain name, otherwise, generating the cryptography key will fail. If there is the default hostname set, it would be advisable to change it. Both can be set with the following commands:

hostname MyRouter
ip domain-name majcica.com

Following task is generating the cryptography key base on whom the SSH connection will be secured (will be used to encrypt the data).

crypto key generate rsa

Once you issue this command you will be asked to choose the key size. I will suggest you to leave the default value (512) which is more than enough for 99% of cases. When this operation is over, you will receive the message that SSH is activated and that the current version is 1.5. Unfortunately there is no SSH 1.5 and you may be confused, however this is the way Cisco indicates that SSH version 1 is active. You can always check the current active version by the following command:

show ip ssh

In case it says 1.99 it means that both SSH1 and SSH2 are enabled, meanwhile if the result is 2.0 it means that only the version 2 is enabled.

In order to prevent the access to a virtual terminal interfaces that accepts the telnet connection let’s suppose that our internal network is 10.10.10.024 (10.10.10.x network with a mask 255.255.255.0). Because of that we will create an access list that accepts the traffic only from internal network and block the traffic from all other sources. In order to achieve this is sufficient issuing the following command:

access-list 15 permit 10.10.10.0 0.0.0.255 log

and then apply this access list to a proper virtual terminal interface:

line vty 2 4
   access-class 15 in

If we try now to access the router via telnet from a network that is different than our internal, the request will time out. But if we try to access it from an external network via SSH the router will replay and we will be able to establish a connection.
Next step is setting the time out (60 seconds is a reasonable value), enabling SSH version 2, setting the interface from which route will replay to SSH request (outside interface, in our case are ATM0.1 – ADSL connection) and a maximum authentication retries.

ip ssh time-out 60
ip ssh authentication-retries 5
ip ssh source-interface ATM0.1
ip ssh version 2

Initially I tough that this is sufficient but once I configured logging, I found that, meanwhile testing, there was no trace about the who and when connected to the router. As I believe that this are information’s that we should log, I made a little research and found the following commands:

login on-failure log
login on-success log

First one enable logs on failed attempts meanwhile the second one enables the log on successful log in’s.
Till here everything was fine until couple of days later I consulted the log files and found that someone was attempting brute force log in attacks on my router. I needed a solution for this problem, and limiting the access via ACL was not an option as I often connect to the router via a dynamically obtained IP address. At the end I found that we can set a dynamic block for the users who fails authenticating a certain amount of time in a determinate time interval. Basically if we want to prevent that user receive a response from SSH service for 300 seconds in case he misses the password three times in 30 sec, we need to issue the following command:

login block-for 300 attempts 3 within 30

This for me was sufficient, and it seems a decent practice, however if you feel paranoid you can still change the default SSH port, apply restrictive ACL, etc.
Following you will find an example extract from syslog showing a brute force attack and the quite mode in action.

2009-01-27 08:28:48	Local7.Warning	10.10.10.254	81: 000086: Jan 27 08:28:47.028 Berlin: %SEC_LOGIN-4-LOGIN_FAILED:
Login failed [user: nagios] [Source: 210.192.123.204] [localport: 22] [Reason: Login Authentication Failed]
at 08:28:47 Berlin Tue Jan 27 2009

2009-01-27 08:28:53	Local7.Warning	10.10.10.254	82: 000087: Jan 27 08:28:52.194 Berlin: %SEC_LOGIN-4-LOGIN_FAILED:
Login failed [user: user] [Source: 210.192.123.204] [localport: 22] [Reason: Login Authentication Failed]
at 08:28:52 Berlin Tue Jan 27 2009

2009-01-27 08:28:57	Local7.Warning	10.10.10.254	83: 000088: Jan 27 08:28:57.169 Berlin: %SEC_LOGIN-4-LOGIN_FAILED:
Login failed [user: test] [Source: 210.192.123.204] [localport: 22] [Reason: Login Authentication Failed]
at 08:28:57 Berlin Tue Jan 27 2009

2009-01-27 08:28:57	Local7.Alert	10.10.10.254	84: 000089: Jan 27 08:28:57.169 Berlin: %SEC_LOGIN-1-QUIET_MODE_ON:
Still timeleft for watching failures is 19 secs, [user: test] [Source: 210.192.123.204] [localport: 22]
[Reason: Login Authentication Failed] [ACL: sl_def_acl] at 08:28:57 Berlin Tue Jan 27 2009

2009-01-27 08:33:58	Local7.Notice	10.10.10.254	85: 000104: Jan 27 08:33:57.083 Berlin: %SEC_LOGIN-5-QUIET_MODE_OFF:
Quiet Mode is OFF, because block period timed out at 08:33:57 Berlin Tue Jan 27 2009

I didn’t went in detail on all steps supposing that you have basic knowledge on how to operate on Cisco IOS. All the information’s I got from Cisco.com. Also this procedure where valid by the end of 2008 when the original article was written. However it should not be drastically changed in the newest version of IOS. If so, check the documentation on cisco.com and eventually post your question’s in the comments.

Joyful configuring!
Natural sort order comparison – Part 1

Introduction

One of the things that are at the origin of my passion for programming is the surprise factor. No matter how many experience and studies you make any new assignment brings something new, something not completely explored.
My excursions to the UI are not so frequent and because of that I do not encounter so often some of classical problems that usually are related to UI, in particular sorting cases.
Recently I worked on a project that in UI lists different versions of one well defined entity. The main property of the entity is the version number and it is type of string. Mentioned property, along with others, is shown inside a ListView control. Sorting the list using the standard string comparison was not an option. By using a standard string comparison, numerical part of the string is not treated as a number, instead is treated as a string, which gives that the string “v1.9” comes after “v1.10”. Actually, if we consider a dot as a decimal separator, this is a correct result. However, in our case we need to consider a dot as a major-minor separator and as this we need to treat the minor part as an integer. In order to make the example easier, we will use only major number as version indicator. The entity we are going to list will contain 13 different versions, from “v1” to “v13”. Using a standard string comparison, once we order our list on version field, the result will be the following:

v1
v10
v11
v12
v13
v2

v9

Actually this is correct result if we consider the numbers as ASCII characters, but if we, as usually humans do, would like to consider the numeric part as an integer, this is an undesirable result. What we are expecting to have is the following:

v1
v2

v9
v10
v11
v12
v13

You will find a similar behavior in your Windows Explorer each time you order the files by name.

Now how do we solve this task?

Getting started

In the front of a similar problem, I don’t like just to Google a couple of keywords and use the first solution that appears on the search list. Also, the application is flexible enough so we can easily encounter different user settings and the sorting requirements may change. In order to see a bigger picture I decided to explore this area a bit more in detail.
At the end I found two viable approaches to this problem

  • Using a StrCmpLogicalW function via P/Invoke
  • Writing a custom class that implements IComparer interface and a custom comparison algorithm
    Both methods are valid, each one with its own pros and cons. So let’s see them both in detail.

StrCmpLogicalW via P/Invoke

Inside the shlwapi.dll you will find a method called StrCmpLogicalW, which, as said in method’s description, “Compares two Unicode strings. Digits in the strings are considered as numerical content rather than text.”. This is a pretty handy method, it is easy to implement and it is fast. However it has couple of cons that can make you choose different approach, as example it shows different behavior on Windows XP instead of Windows Vista. Also it is not implemented in Windows 2000 and numerical content is always treated as integer. However, it is very unlikely that you will find yourself in any of listed situations and that the standard functionalities offered by StrCmpLogicalW will be a limitation.

The implementation

For the less experienced programmers, I will show a decent way to create a class that implements IComparer interface and uses the StrCmpLogicalW class in order to calculate the comparison result.
As first we should declare a helper class that will make the calls to the StrCmpLogicalW easier.

[SuppressUnmanagedCodeSecurity]
internal static class SafeNativeMethods
{
    [DllImport("shlwapi.dll", CharSet = CharSet.Unicode)]
    public static extern int StrCmpLogicalW(string psz1, string psz2);
}

Actually there is not a lot to say about this class. It is an internal (the class can be accessed by any code in the same assembly, but not from another assembly) and is declared as static (indicating that it contains only static members). SuppressUnmanagedCodeSecurity attribute is primarily used to increase performance, for further details consult the following page http://msdn.microsoft.com/en-us/library/ms182311(v=vs.80).aspx.
Now we have all the necessary in order to implement the following class

public sealed class NaturalOrderComparerNative : IComparer, IComparer
{
    public int Compare(string a, string b)
    {
        return SafeNativeMethods.StrCmpLogicalW(a, b);
    }
 
    public int Compare(object x, object y)
    {
        string a = x as string;
        string b = y as string;
 
        return Compare(a, b);
    }
}

Implementing the IComparer interface is straight forward as it requires only Compare method to be coded. Compare method has the following signature public int Compare(object x, object y), it compares given objects and returns a value indicating whether first is less than, equal to, or greater than the second one. In case that x is less than y it will return -1, if x equals y will return 0 (zero) and in case x is greater than y will return 1.
I also implemented a generic version of this interface, IComparer. I think that there are no more explanations to do about this small piece of code. If not, just comment under the article and I will try to do my best in order to make this clear.
So let’s summarize:

PROS CONS
Performances Platform dependent
Simple implementation Non customizable
Proven algorithm

In the second part of this article (blog post) we will see how to implement a custom algorithm and some usage examples, together with full source code in C# and VB.

Follow us so you can be notified about the new posts.

Certificates to DB and Back – Part 1

Foreword

I wrote this article at the beginning of 2011. As I was developing a WCF client application which was using Message Security with Mutual Certificates Exchange and because of a particular application request, I developed this part of code in order to facilitate maintenance and deployment of the interested application.

Now, if you are trying just simply to import/export the complete certificate and not recreate the certificate base on the his signature and the private key, framework will do already everything you need.

// Create new cert from the file and export it to a byte array
X509Certificate2 cert = new X509Certificate2(@"Cert.pfx", "password",
    X509KeyStorageFlags.Exportable);
byte[] originalExported = cert.Export(X509ContentType.Pfx, "password");

// Create new cert and import it from the byte array
X509Certificate2 clonedCert = new X509Certificate2();
clonedCert.Import(originalExported, "password", X509KeyStorageFlags.Exportable);

// export the cloned certificate with a differenet password
byte[] exported = clonedCert.Export(X509ContentType.Pfx, "newpassword");

// save the new certificate to a file
using (Stream stream = File.Create(@"E:\ClonedCert.pfx"))
{
    stream.Write(exported, 0, exported.Length);
}

So if you do not need to combine your private.key and public.cer on the runtime you do not need to read further, otherwise continue and you may find the solution to your challenge.

You can download the source code here.

Table of contents

Certificates to DB and Back – Part 1

  1. Introduction
  2. Getting started
  3. Creating Certificates

Certificates to DB and Back – Part 2

  1. Loading the Certificate
  2. Decoding RSA Private Key
  3. Creating the X509Certificate2
  4. Demo Application
  5. Further Improvements
  6. License

Introduction

In today’s applications, the use of web services is constantly growing. In the web services panorama, there are different ways of managing the authentications. One of the common methods is mutual certificates exchange.

Imagine that your application uses a web service that needs a customer’s certificate in order to correctly authenticate with the endpoint. Now, you can explain to your customer how to create the certificate, by generating one, the RSA key, and then creating a pfx container, positioning pfxcontainer file in the suggested folder, then inserting in your application the correct path to the pfx file. Hmm, it is a lot of work and is quite complicated. And what if you need to deploy it on many PCs for the same customer and your service is accessed directly from the client? If you exclude tricks, there is a lot of extra work.

What if you store only the pem strings of your certificate and private key, together with the password in database? Nice, but creating a valid X509Certificate object that contains the private key on .NET is not a trivial task. Don’t worry, this guide can help you.

In case some of the terms used in this introduction are not clear or known to you, but you still want to follow this guide, you will find some answers that will help you at the links given below:

Getting Started

In order to start and try the solution proposed in this guide, you need Microsoft Visual Studio 2010 in any of his many versions. This code will work even on previous versions of Visual Studio editions as 2008 or even 2005, but you’ll need to set up the project on your own, based on the code I suggested.

In order to create your own certificate, you can use your favourite tools but I will suggest you OpenSSL. You can download it from the following address:

Before installing OpenSSL, assure that you have installed the proper version of Visual C++ 2008 Redistributables. Once you have installed these libraries, you can proceed by installing OpenSSL.

Creating Certificates

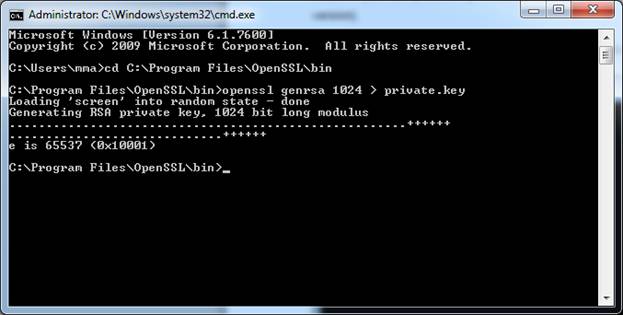
Before creating a certificate, we need to generate the private key. Achieving this with OpenSSL is really simple. Open your command prompt window and get yourself into the bin directory under the folder where you installed OpenSSL (usually C:Program FilesOpenSSL).

Now execute the following command:

opensslgenrsa 1024 > private.key

Once executed, you should see something like this:

Check in that folder, there should be a new file called private.key. It is the RSA key on which the certificate will be based. Now let’s create the certificate. Execute the following command.

opensslreq -new -x509 -nodes -sha1 -days 1100 -key private.key > public.cer

As soon as you hit enter, you will be prompted for a couple of questions about the details with whom the certificates attributes will be populated. Once finished, you’ll see the following:

Congratulations! Your certificate is done!

Certificate is represented as Base64 encoded DER certificate, enclosed between “—–BEGIN CERTIFICATE—–” and “—–END CERTIFICATE—–“. Same is for the RSA signature key. For more details, consult:

Now, we can use a PKCS format file container in order to store both, public certificate and private key. This is not the goal of our project, but for the completeness I’ll show you how to do that via OpenSSL.

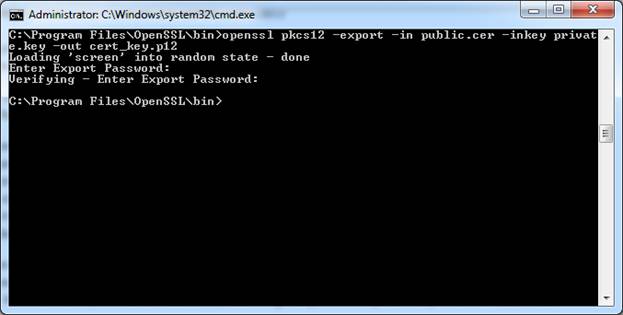
With the following command, you will create the required:

openssl pkcs12 -export -in public.cer -inkeyprivate.key –out cert_key.p12

After executing this command, you will get prompted about the Export password, this password will be used to encrypt your private key, so make it complex and unique.

Now you can load it to the X509Certificate2object:

string certificatePath = @"cert_key.p12";
string certificatePassword = "password";
X509Certificate2 clientCertificate = new X509Certificate2(certificatePath, certificatePassword);

You can download the source code here.

In the next steps, we will replicate this behavior directly from code.
continue…