Provisioning WebDeploy in VSTS/TFS release via DSC script

It’s been a while since we got at our disposition some great tooling for the provisioning of our machines. Unfortunately, it is not as used as I would like it to be. For us working on Microsoft platform, there is a tool that can do the job, available out of the box, for free, on every modern windows machine. Obviously, I’m talking about the Windows PowerShell Desired State Configuration or for short, DSC. Although not truly a provisioning tool and more as Microsoft defines it, “a management platform in PowerShell that enables you to manage your IT and development infrastructure with the configuration as code”, it will get easily job done when it comes to provisioning tooling and features.

After this long introduction lets cut the chase. In this post I’m going to show you how to write a DSC script which will make sure that the desired IIS components are installed on a given machine, check for Microsoft WebDeploy and eventually install all of those if not present. Once the script is ready, I’ll show you how to execute it during the deployment of your project in a VSTS/TFS Release. I will not get in details of how does DSC work, how to write DSC configuration functions or create your custom DSC Configuration Resources. I’ll focus on a big picture, on how to combine all of the necessary to actually get the work done. When it comes to the details, it’s quite easy to find the necessary technical guidance by just googling the desired terms.

I wrote a script that, given a machine name, will make sure a DSC configuration is applied to it.

param(
    [parameter(Mandatory=$true)]
    [string]
    $ServerName
)

$ConfigurationData = @{
    AllNodes = @(
        @{
            NodeName=$ServerName
            PSDscAllowPlainTextPassword=$true
            RebootNodeIfNeeded = $true
         }
   )
}

Configuration DashboardProvisioning
{
 	Import-DscResource -ModuleName 'PSDesiredStateConfiguration'
     
	Node $AllNodes.NodeName 
     {
        WindowsFeature IIS
        {
            Ensure = "Present"
            Name = "Web-Server"
        }

        WindowsFeature IISManagementTools
        {
            Ensure = "Present"
            Name = "Web-Mgmt-Tools"
            DependsOn='[WindowsFeature]IIS'
        }

        WindowsFeature IISAspNet45
        {
            Ensure = "Present"
            Name = "Web-Asp-Net45"
            DependsOn='[WindowsFeature]IIS'
        }

        WindowsFeature WebManagementService
        {
            Ensure = "Present"
            Name = "Web-Mgmt-Service"
            DependsOn='[WindowsFeature]IIS'
        }

        Package WebDeploy
        {
             Ensure = "Present"
             Path  = "\\MyShareServer\Software\WebDeploy_amd64_en-US.msi"
             Name = "Microsoft Web Deploy 3.6"
             LogPath = "$Env:SystemDrive\temp\logoutput.txt"
             ProductId = "6773A61D-755B-4F74-95CC-97920E45E696"
             Arguments = "LicenseAccepted='0' ADDLOCAL=ALL"
        }
    }
}

DashboardProvisioning -ConfigurationData $ConfigurationData

Start-DscConfiguration -Path .\DashboardProvisioning -Wait -Force -Verbose

The configuration part will make sure that three Windows features are installed and those are all IIS components, necessary for my website to run. The last part, package configuration entry, is making sure that WebDeploy is present, more precisely version 3.6 of WebDeploy. In case it is not installed on the given machine it will run the installer that is located in this particular case on a share at “\\MyShareServer\Software\WebDeploy_amd64_en-US.msi“. You will need to adjust this setting and adapt it to the path where you have placed the msi installer of WebDeploy 3.6. The agent that executes this configuration script will need to have the sufficient rights to access and read that path.

You can manually test this script from your local PC in order to make sure that is working as expected. Once ready we will execute this script in our deployment pipeline.

An example of the invocation is shown in the following screenshot:
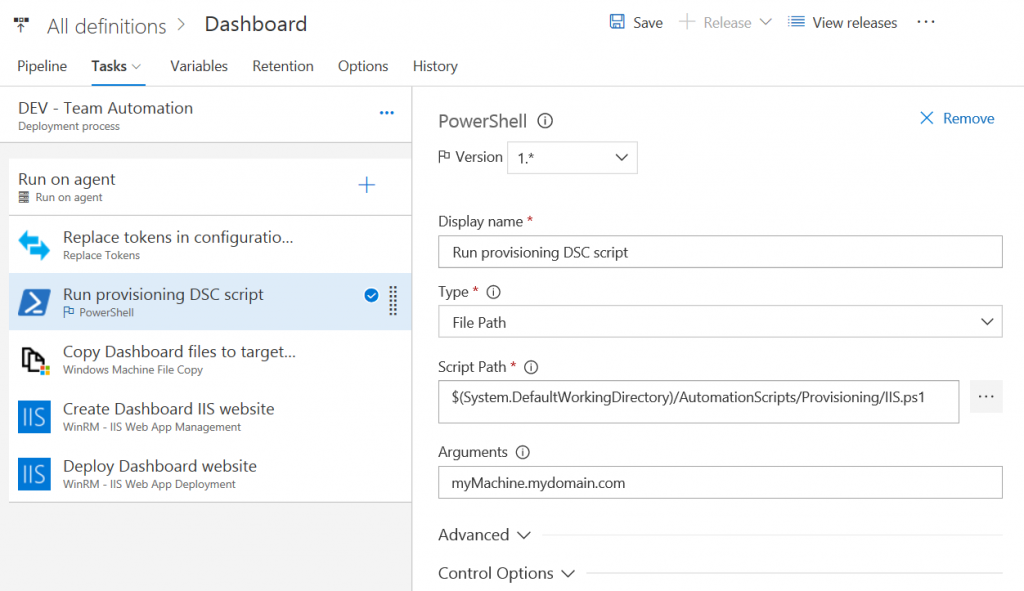
As you can see, I’m using the simple PowerShell build task to run my script and as the argument, I’m passing in the machine name, FQDN of my web server in that particular environment. It is that simple! Now, before I do try to copy my files, create and deploy my website, I’m sure that all of the prerequisites are in place so that my deployment can succeed. This step takes a very short time to execute in case the configuration that I specified is already in place. A major benefit is that I can start with a clean machine and my deployment will take care that all of the necessary is in place before proceeding with the actual deployment. In a more complex environment, this will bring consistency in the configuration between different machines and environments and reduce the manual interventions regarding the configuration to a bare minimum.

Once you start testing, make sure that Windows Management Framework of at least version 4 is installed on both your build server and the destination machine and that WinRM is set up, again, for both of these machines.

Once successful I’ll encourage you to extend this script with all of your custom configuration settings, necessary for your application to run.

Cheers!
Detailing TFS configuration – IIS

One of the most annoying things when it comes to accessing the TFS portal is that you need to specify the context path /tfs. In other words, if you just type http://mytfs.com:8080 you will not get redirected to your application, which has the full path of http://mytfs.com:8080/tfs. Same if SSL is used, often and by default you are obliged to indicate the https or even worst in case SSL is made mandatory, you will get a nice 403.

Well this is a bit of shame. Many people standing behind and supporting TFS are often not keen to set this details up. This can be because of the leak of knowledge, “fear” of the unknown, negligence, character. It is such a simple operation that shows that you do care. So let’s check a couple of things you can do in order to make this happen.

The Beauty Is In the Details

There are several improvements that we can make on IIS that is running our TFS instance. I will try to make you a couple of suggestion, if some of them can’t apply on your case by any reason, it is not mandatory to set them. Following are just suggestions on how to tide up your default TFS installation.

The cleanup

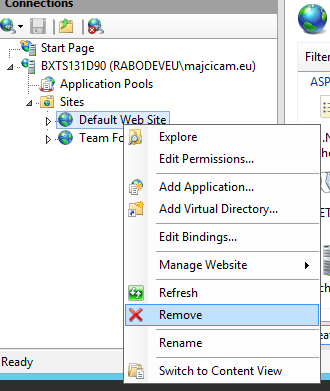
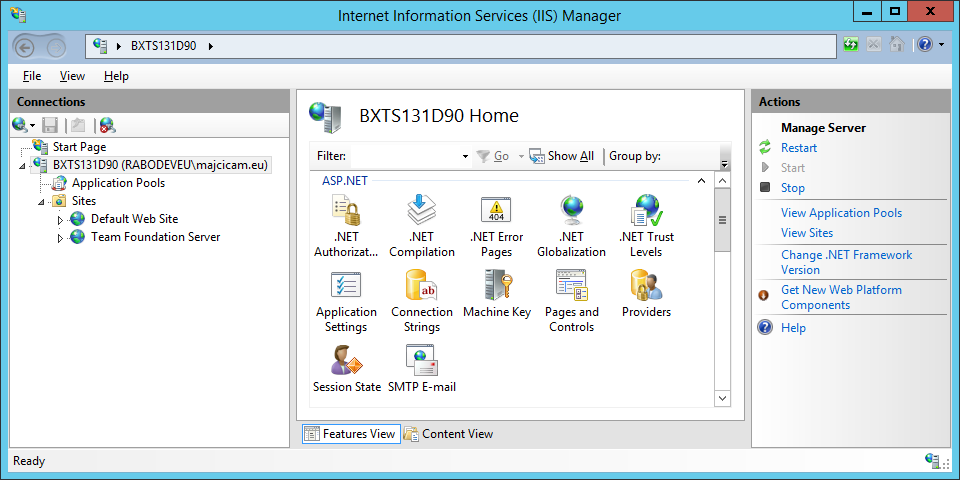
Often I do see on the IIS of TFS server a Default Web Site. In 99,9% of the cases it is not used. If that is also your case (running only TFS on that machine) you are safe to remove it.

iis-initial

As you can see, aside of the Team Foundation Server site, there is the Default Web Site in my case. I will just right click it and choose Remove.

remove-default

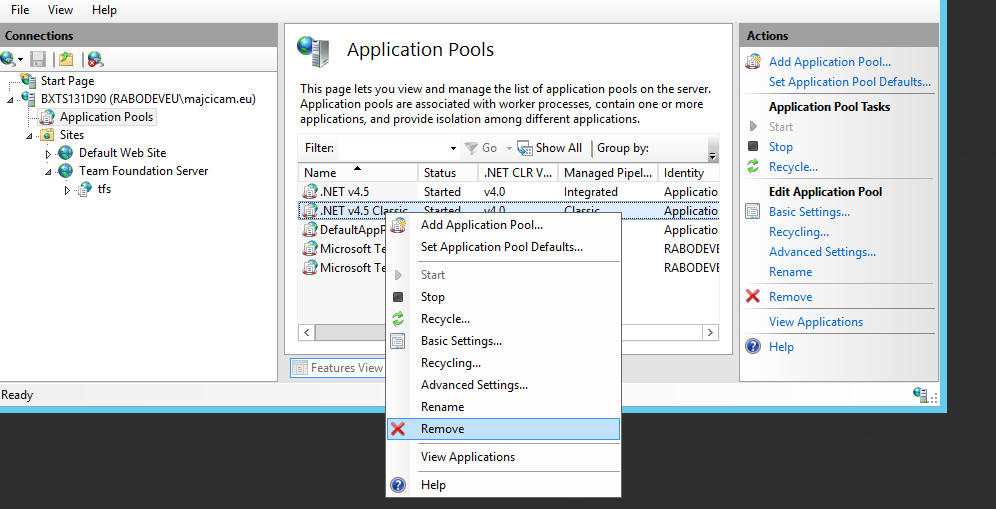
After you removed the Default Web Site, you can do the same for all unused Application pools.

app-pool-remove

As from the image, get to the Application Pools and remove all of the pools which name doesn’t start on per Microsoft Team Foundation.

The redirect

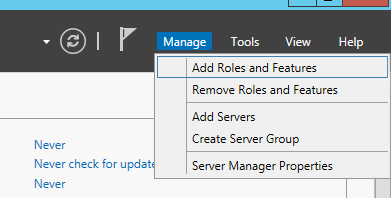
It will be handy that in the browser you do not need to type over and over the context path of /tfs. In order to set this up we can leverage the Http Redirect feature of IIS. By default it is not installed thus we will need to add it. Open Server Manager and choose Manage -> Add Roles and Features.

server-manager-add-role

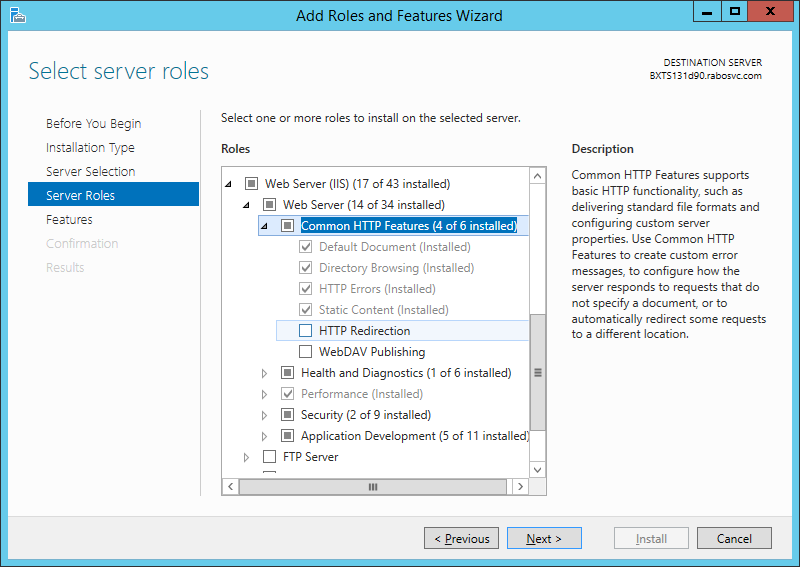
Now get to the Server Roles and under Web Server (IIS) – Web Server – Common HTTP Features select the HTTP Redirects.

add-roles-http-redirection

Conclude the installation procedure and restart the IIS Manager.
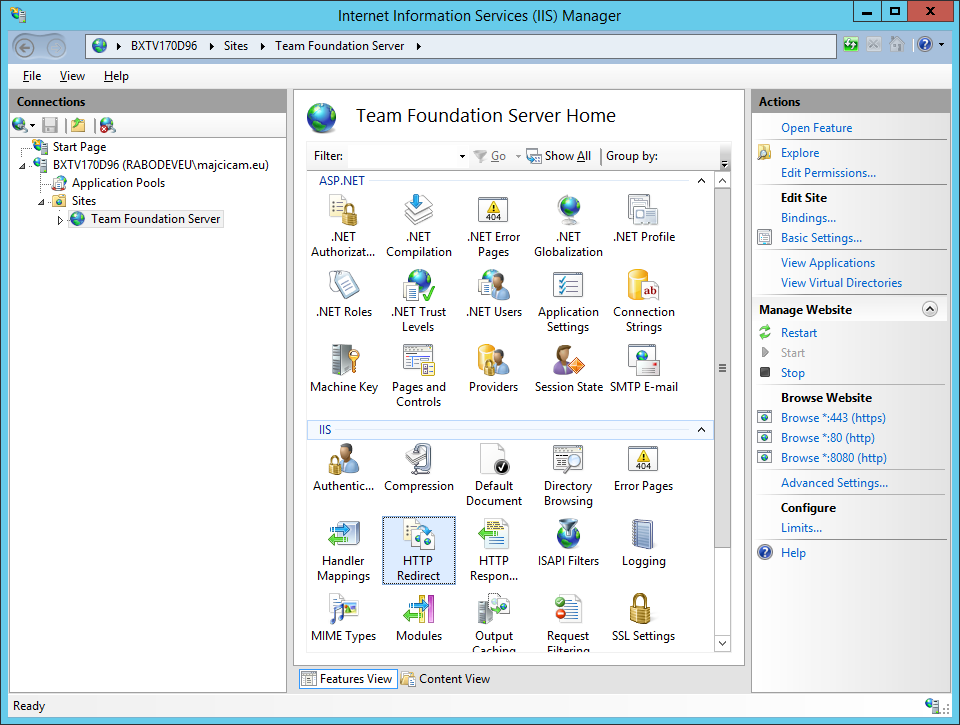
Now after selecting your Team Foundation Server site, you will see the HTTP Redirect feature.

http-redirect

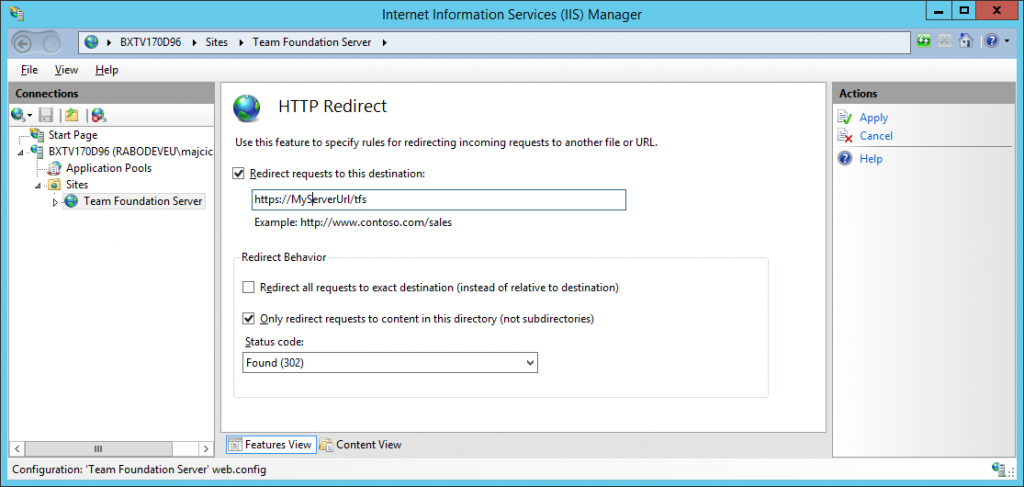
Select this option by double clicking it and enable the Redirect Requests as set on the following image.

set-redirect

In the text box you will need to enter the full URL of your TFS comprehensive of the context path. Now, once the IIS recieves a request towards the root of your application it will redirect it towards your TFS application, called tfs. Make sure before Applying these settings that the Only redirect requests to content in this directory (not subdirectories) is selected, otherwise all of your calls will result in an recursive redirect. Apply these settings and try calling your server without the context path. If you are monitoring your web calls with tools like Fiddler, you will see that your first call is redirected by the server towards the URL we specified under the Redirect request option.

This technique is only working with your portal and browser. You will always need to specify the full URL in your Visual Studio or any other tooling that requires the TFS path. This is because they are not able to understand the redirect and act in the way your browser does. Keep this in mind.

Connecting people

By default TFS will set it’s default port to 8080. Again if it is the only application on your server it is a shame being in need to specify the port for the each call. What about letting it replay also to a port 80, which is the default http port and doesn’t need to be specified?
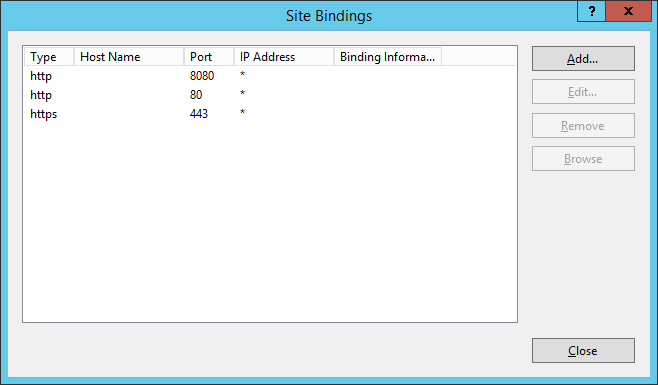
Welcome bindings. Select your Team Foundation Server and chose in between the available actions the one called Bindings. You will be presented with the following screen.

site-bindings

Make sure that aside the http binding to port 8080 there is the one that binds the requests to the port 80. If it is not there, first edit the current binding of port 8080 and change it to port 80. Then add a new one and make it replay to port 8080. Click close and try calling your TFS without specifying the port 8080. Your IIS should replay correctly.

The result of this change will work with all of the tooling accessing TFS, like Visual Studio. You are now not anymore obliged to specify the port 8080.

Talking under four eyes

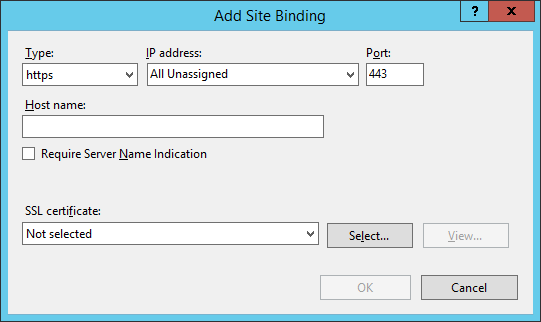
It may be a good idea or a necessity to use transport layer security. Enabling HTTPS on you web site is fairly simple. How to create and import a certificate is out of the scope of this post. Given that you have correctly imported a certificate into the IIS certificate store, open the site binding and add a new one.

add-site-binding-ssl

As a type choose https and select the certificate that you intend to use for TFS.
From now on, you can point to https://yourTFS/tfs and you will be using a secure connection. In case you omit the context path, you will end up on a non protected connection. To sort that out, change your redirect and make it point to the secure version of link.

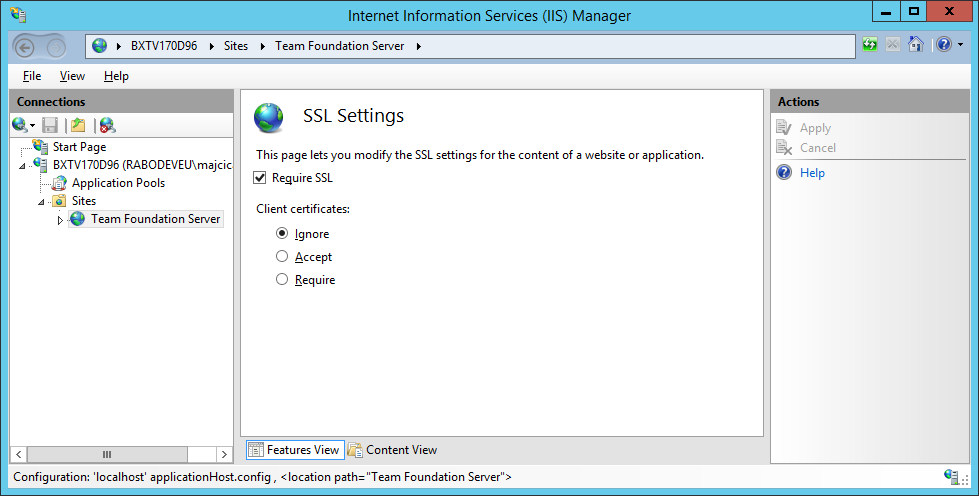
Also you may desire to make the HTTPS mandatory. If that is the case, you could simply enable Require SSL option under SSL Settings for your TFS Web Site.

require-ssl

If you do so, pointing to a non SSL version of your site will result in a 403 Forbidden response. Although it is self explanatory as a message it is not nicely handled. It would be nicer if you would be redirected to the https version of your request. For that, we can use a trick. Open Error pages pane and edit the 403 page.

custom-error-403

Set the Respond with a 302 redirect and set your desired https URL. Now, instead of showing a Forbidden message, your browser will be automatically redirected to a correct link.

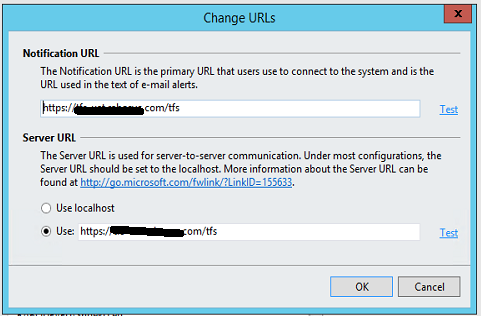
Note that in case you set the SSL mandatory, you need to do it for both the WebSite and the Virtual folder usually called tfs. After you set both of them to be required, you will need to open the TFS Administration console and on Application Tier screen, choose the Change URL’s action:

change-urls2

Make sure that Notification and server URL are correctly set to point to the new link, otherwise you may experience some issues with TFS Administration console and some other local tooling.

Conclusion

I showed you a couple of tips on how to set you TFS IIS in order to be more friendly in responses and to remove the unnecessary things. There are other tips I may have on this argument, however they do fall in a maintenance domain, such as managing log files, etc. Soon I will publish a separate, more detailed blog post about this argument.

Cheers