Signing Git Commits

What does it mean to sign a Git commit and why would you like to do that?

From Latin, signāre, or putting a mark.

As the word itself says, signing, putting a mark, ensures that the commit you made and the code contained can’t be tempered.
Git is cryptographically secure, but it’s not foolproof. In order to ensure the repository integrity, Git can sign tags and commits with a GPG key.

In this post, I’ll show you how to set up all of the necessary toolings in order to be able to sign your git commits. Aside from having the latest version of Git installed, you’ll need also the GnuPG. So let’s start.

GPG Introduction

GnuPG, also known as GPG, is a complete and free implementation of the OpenPGP standard. All of the details about OpenPGP are defined in RFC4880 (also known as PGP).
First of all, you need to download GPG, configure it and create/add your personal key.
On the following address https://www.gnupg.org/download/index.html and under “GnuPG binary releases” under windows section choose “Simple installer for the current GnuPG” and download the installer.
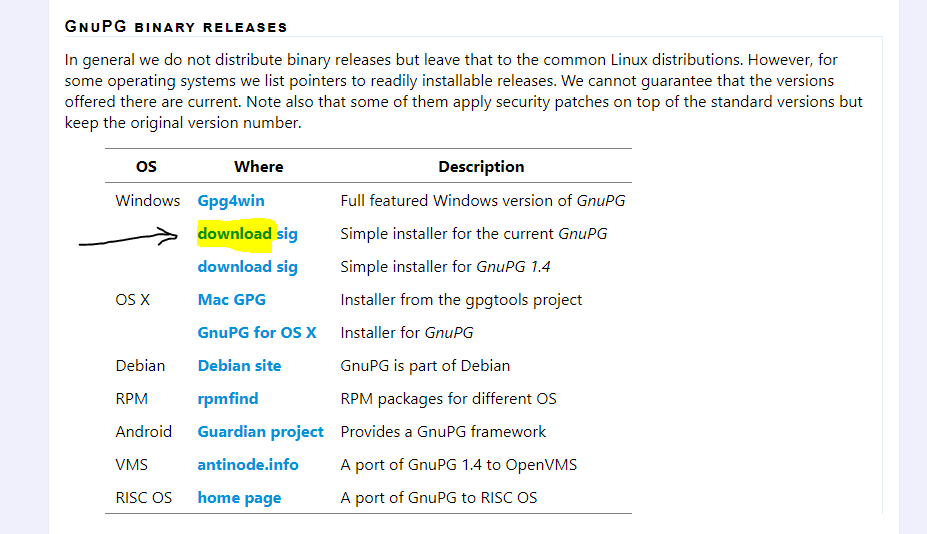
When downloaded, please install the application. The installation procedure is a simple one as no particular options are available.
Once installed you are ready to create a new key, which is the fundamental thing in getting to sign our commit.

In command prompt issue the following command gpg --full-generate-key At this point, you will be asked several questions you will need to answer before your key is going to be created. Check the following example:
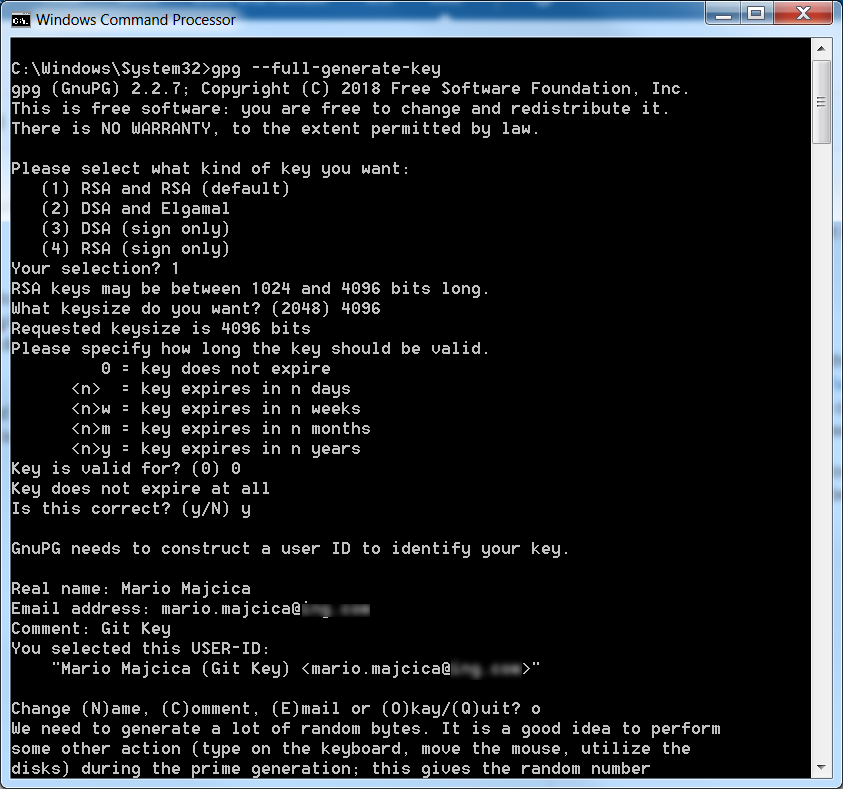
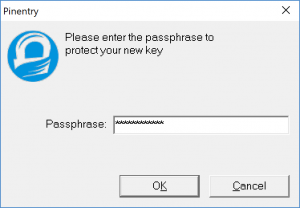
At the end of the process you will be asked, in a pop-up window, for a password that needs to be assigned to this key, please provide one.
Once the key is created you need to let Git know about it. First issue the following command gpg --list-secret-keys --keyid-format LONG which will list the necessary information about the newly created key. You should see something like this.
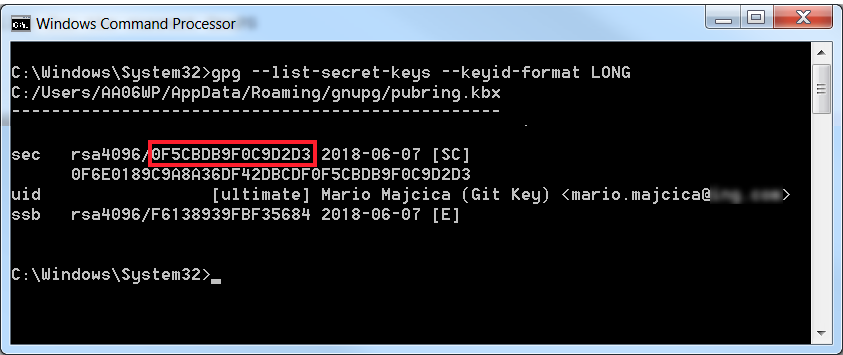
Now copy the value that is highlighted in red (key id) and issue the following command git config --global user.signingkey 0F5CBDB9F0C9D2D3 (where 0F5CBDB9F0C9D2D3 is your key id).

This is necessary so that Git knows what key it should use in order to sign your commits.

However, we are still not ready to go and sign our first commit. What we are missing is to set the `gpg.program` setting in our global git config. To do so we first need to retrieve the path of our gpg executable. The easiest way to do so is to run the where gpg command. It will return you the path on where gpg was installed. Now we can set the configuration by running the git config --global gpg.program "C:\Program Files (x86)\GnuPG\bin\gpg.exe" command (obviously in case your path differs from this one, you should adjust it).

Also, before proceeding make sure that the git user.name and user.email are set. In case this was not yet initialized try with, git config --global user.name "Mario Majcica" and git config --global user.email your@yemail.com.

Now we are ready to sign our first commit. Initialize a new git repository, add a file and run git commit -S -m "signed commit". At this point you should be prompted for the password of your key, the one you have chosen during the creation of the key itself:
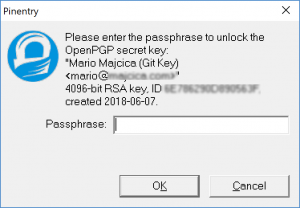
Once you enter your password, your commit will be made and it is going to be signed, e.g.
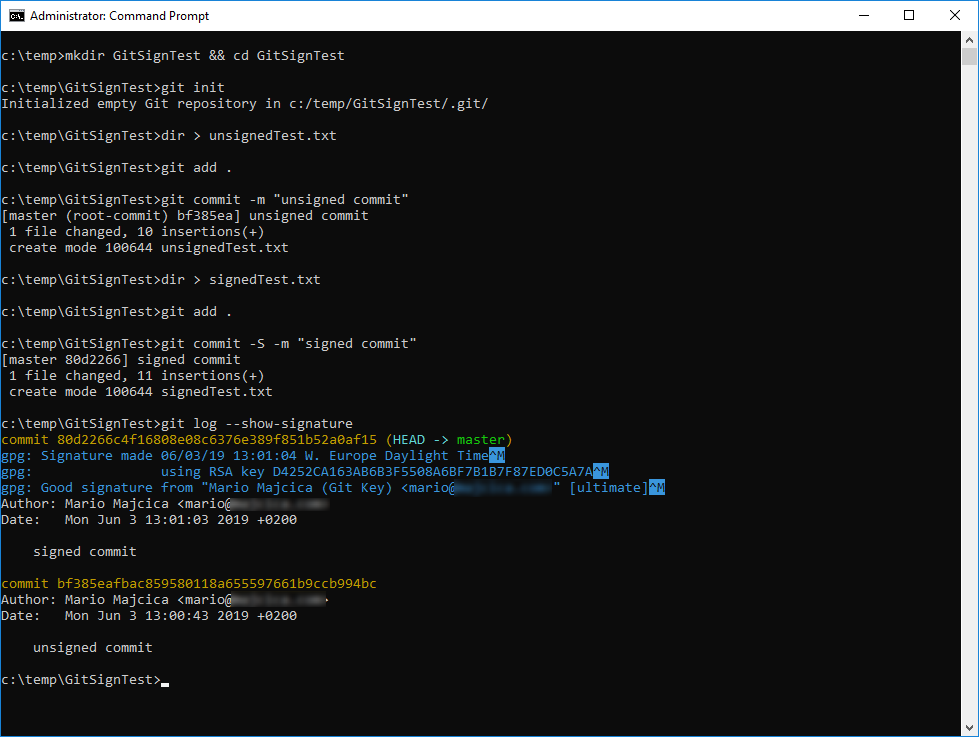
Let’s now verify that are signature is there. In order to achieve that issue the following command git log --show-signature -1 or a in a more kind of overview printout git log --pretty="format:%h %G? %aN %s".

You can learn more about Git and the available command regard signing commits here https://git-scm.com/book/en/v2/Git-Tools-Signing-Your-Work.

Export/Import

Next step is to export our key. Why would we do that? Well, an example, so that you can import it on another machine of yours, or import it to services like Github who can then validate your signature.

Let’s first export our public key. To do so, use the following command: gpg --export -a 0F5CBDB9F0C9D2D3> publicKey.asc
Obviously, 0F5CBDB9F0C9D2D3 is my key id in this case, sobstitute this value with your key id.
This command will create a file called publicKey.asc in the current folder of yours. Edit this file with a text editor of choice. The content of it will be necessary information for your Github account. Now open your Github.com page and log in. Under the settings, you will find a menu called “SSH and GPG keys”. Open this menu then choose “New GPG Key”:
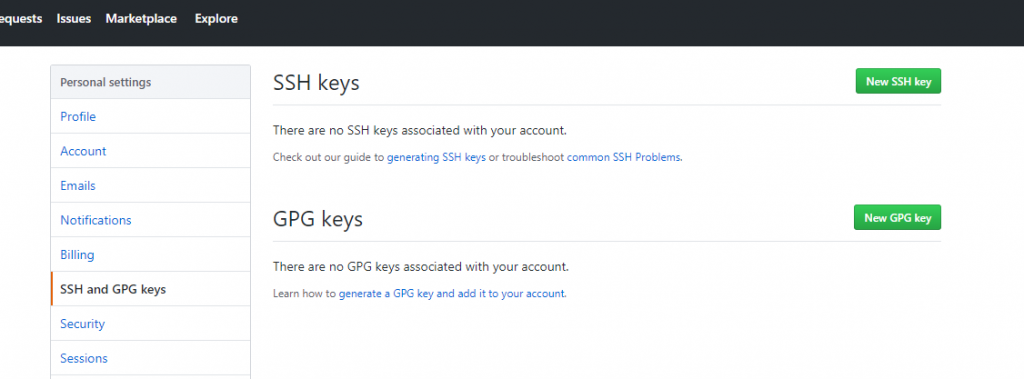
Now, copy the content of publicKey.asc and paste it in the page on GitHub, then just click “Add GPG Key”.
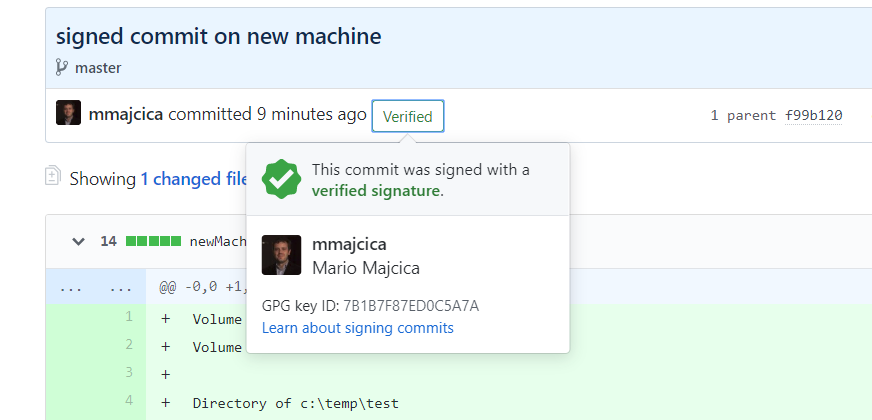
Once done, you should see your new key listed in the GitHub page “SSH and GPG keys” under the GPG Keys. I’ll now edit one of the projects in GitHub and push a signed commit. As you can see, it is now listed that the commit is verified.
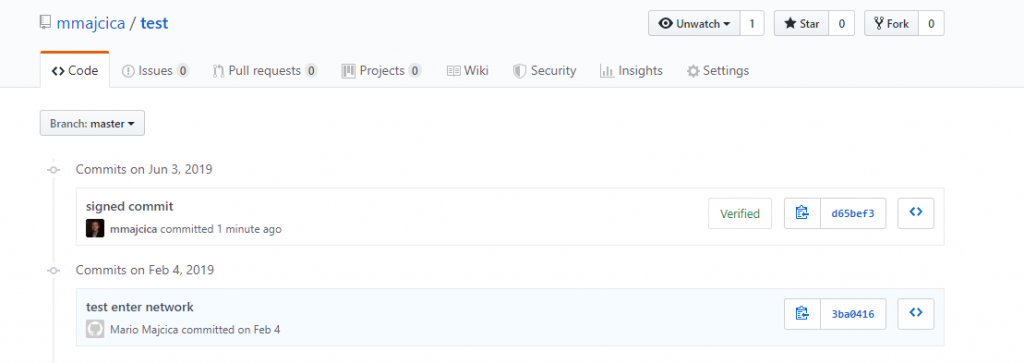
In case you click on the Verified icon you will be able to see the details about the signature:
Before we move to the import part, let me show you a trick on how to automate this in a popular IDE, Visual Studio Code.
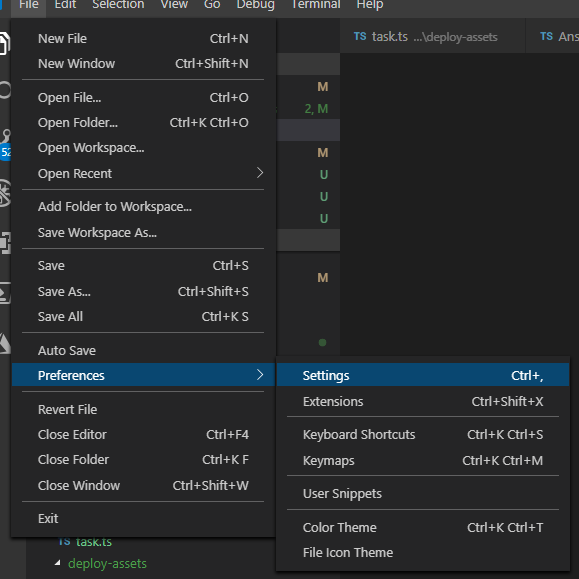
Now that we are all set up, we can instruct Visual Studio Code, to sign the commits that are made from the IDE. To do that, open the settings page in Visual Studio Code
then search for ‘git signing’ and the relevant setting should be listed:
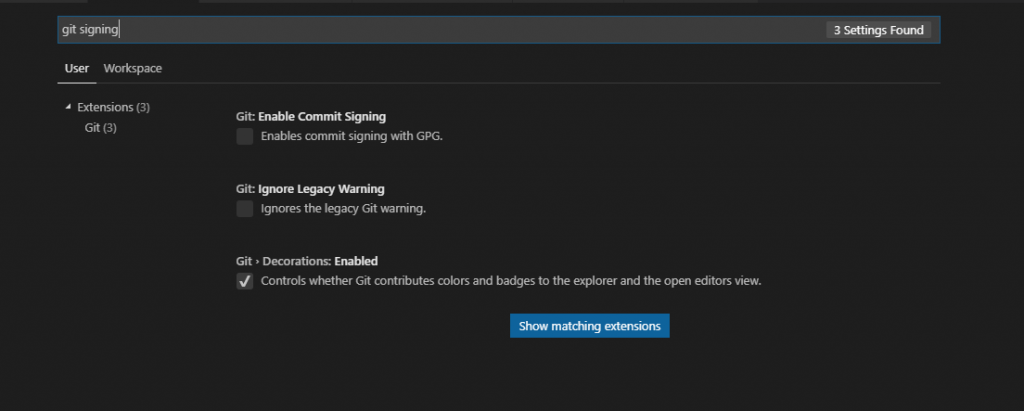
The setting in question is ‘Enable Commit Signing’. Check it, then make a new commit. List your commit log and you’ll see that now also the commits made directly from Visual Studio Code are now signed.

However, the export doesn’t end here. We need to export the private key in order to be able to import it and use it on another machine. To do so run the following command, gpg --export-secret-keys -a 0F5CBDB9F0C9D2D3 > privateKey.asc (where 0F5CBDB9F0C9D2D3 should be your key id). Store this file carefully and do not expose it to the public. It is protected by the password, still, however, in this case, the password itself becomes the weak link.

It is now time to import it. For that, it is sufficient to issue the following command gpg --import privateKey.asc. You do not need to import the public key, the private key always contains the public key. One last thing, if imported on another machine, you need to indicate the level of trust towards the newly imported key. You can easily achieve that with the command gpg --edit-key 0F5CBDB9F0C9D2D3 trust quit where 0F5CBDB9F0C9D2D3 is again the key id of the key on that machine. After you issue the command you will see the following screen:
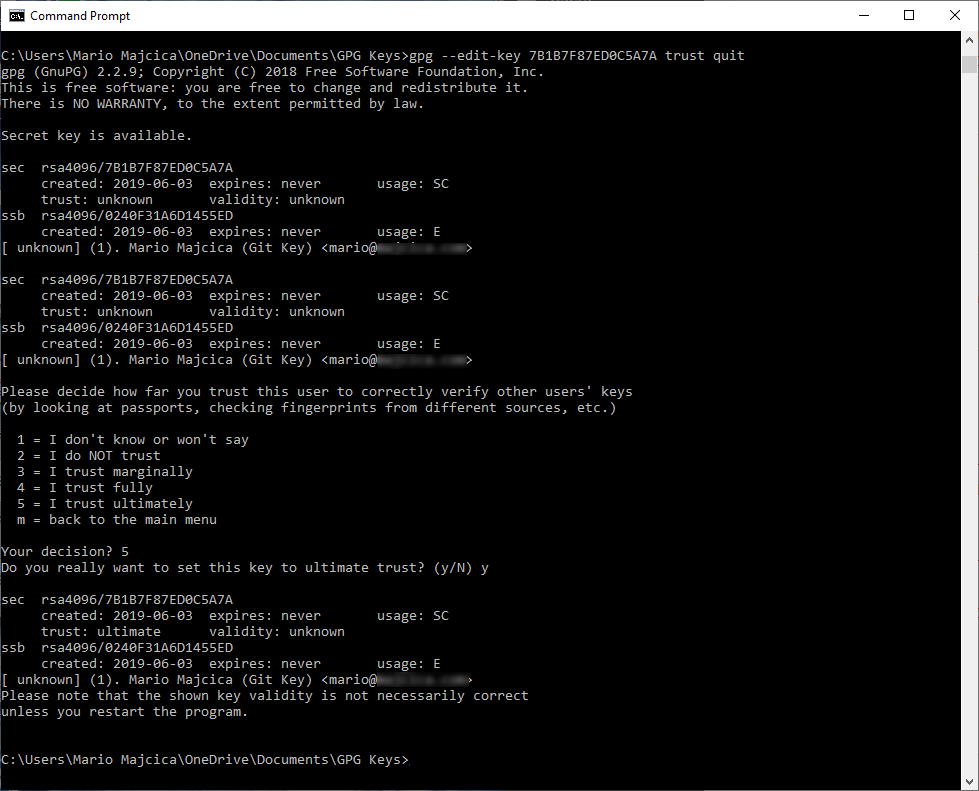
and at this stage, you will be asked for a decision. Hit 5 to indicate you trust ultimately the given key and your job is done.
If the key already existed on the new machine, the import will fail to say ‘Key already known’. You will have to delete both the private and public key first (gpg –delete-keys and gpg –delete-secret-keys).

Conslusion

Aside from the commits, you can also sign tags. If you are not familiar with public key cryptography, check this video on YouTube, it is one of the simplest explanations that I heard.
Some of the useful commands in our case:
gpg --list-keys and gpg --list-secret-keys, both will list your keys, public and private ones and the trust state.
git config --list --show-origin will show you all of the git settings so that you can check if the necessary is already set.

To configure your Git client to sign commits by default for a local repository, in Git versions 2.0.0 and above, run git config commit.gpgsign true. To sign all commits by default in any local repository on your computer, run git config --global commit.gpgsign true.

To store your GPG key passphrase so you don’t have to enter it every time you sign a commit, I recommend using Gpg4win.

That’s all folks, don’t forget to sign your work!

Starting a TFS release via REST API

Intro

It is a common need to inject variables in your release. When it comes to a build, it was always an easy task, however, the release didn’t support such a thing out of the box. In case you are using Azure DevOps (service and server), you are good to go, as this is now possible after you do mark a variable as ‘Settable at the release time’. But what about those who are stuck to previous versions of TFS? Well, there are some tricks that I’ll illustrate in this post.

Leveraging Draft release

There are two ways of achieving our goal. The first one is to create a new release and do not trigger the deployment in the environments that are set to deploy on the release creation, set the variables then trigger the deployments. This is a more laborious and complicated way. Second method is to create a draft release, then populate the draft with the necessary variables and then start the release. I’ll show you the necessary steps to achieve this via the REST API which you can try for free
In the upcoming cmdlets I’ll focus on achieving a goal, which is to create a draft release, add a variable and start the release. So if you find code not really reusable or not framework like, please consider that was out of my goal and it would take way more effort to write.
First of all I need a couple of helper functions that I will use in order to authenticate and get the right release id based on the release name.

$pat = '6yhymn3foxuqmsobktekvukeffhqifjt4yeldfj33v6wk4kr4idq'
$url = "https://myTest.tfs.local/tfs/DefaultCollection"
$project = "MarioTest"

function Get-PatHeader {
    [CmdletBinding()]
    param
    (
        [Parameter(Mandatory = $true)] [string]$Pat
    )
    BEGIN { }
    PROCESS {
        $encodedCredentials = [System.Convert]::ToBase64String([System.Text.Encoding]::ASCII.GetBytes(":$pat"))
        $header = @{ }
        $header.Authorization = "Basic $encodedCredentials"

        return $header
    }
    END { }
}

function Get-ReleaseDefinitionId {
    [CmdletBinding()]
    param
    (
        [Parameter(Mandatory = $true)] [string]$CollectionUrl,
        [Parameter(Mandatory = $true)] [string]$Project,
        [Parameter(Mandatory = $true)] [string]$Name,
        [Parameter(Mandatory = $true)] [string]$Pat
    )
    BEGIN { }
    PROCESS {
        $headers = Get-PatHeader $Pat
        $reponse = Invoke-RestMethod "$CollectionUrl/$Project/_apis/release/definitions?searchText=$Name" -Headers $headers

        return $reponse.value.id
    }
    END { }
}

$releaseDefinitionId = Get-ReleaseDefinitionId $url $project "Test1" $pat

The above is to get the necessary authentication header and resolve the Release Definition name into the id that we are going to use across all of our other calls. As you can see, my release definition is called “Test1”.

Before we start a draft release, we need to collect some relevant information and that is information about the artifacts that we would like to use with the new release. Often this is a pain point for those with less experience with TFS. However, the following cmdlets should do the trick:

function Get-ReleaseArtifacts {
    [CmdletBinding()]
    param
    (
        [Parameter(Mandatory = $true)] [string]$CollectionUrl,
        [Parameter(Mandatory = $true)] [string]$Project,
        [Parameter(Mandatory = $true)] [int]$ReleaseDefinitionId,
        [Parameter(Mandatory = $true)] [string]$Pat
    )
    BEGIN { }
    PROCESS {
        $headers = Get-PatHeader $Pat
        $reponse = Invoke-RestMethod "$CollectionUrl/$Project/_apis/Release/artifacts/versions?releaseDefinitionId=$ReleaseDefinitionId" -Headers $headers

        return $reponse
    }
    END { }
}

function Get-DefaultReleaseArtifacts {
    [CmdletBinding()]
    param
    (
        [Parameter(Mandatory = $true)] $ReleaseArtifacts
    )
    BEGIN { }
    PROCESS {
        $artifacts = @()

        foreach ($artifactVersion in $ReleaseArtifacts.artifactVersions) {
            $artifact = [PSCustomObject]@{ }

            $artifact | Add-Member -MemberType NoteProperty -Name "alias" -Value $artifactVersion.alias
            $artifact | Add-Member -MemberType NoteProperty -Name "instanceReference" -Value $artifactVersion.defaultVersion
        
            $artifacts += $artifact
        }

        return $artifacts
    }
    END { }
}

$releaseArtifacts = Get-ReleaseArtifacts $url $project $releaseDefinitionId $pat
$defaultArtifacts = Get-DefaultReleaseArtifacts $releaseArtifacts

As in the Web UI, you are asked to specify the version of artifacts to use for the release that you are creating. The same is asked by the REST API. The above cmdlets will allow you to retrieve the list of all the available artifacts and pick the last (default) one. You can see further examples here https://docs.microsoft.com/en-us/azure/devops/integrate/previous-apis/rm/releases?view=azure-devops-2019#create-a-release

In case you are interested in using non the latest artifacts, you can explore further the response and implement the necessary logic do provide the ones to use in the next stage.

Now it’s time to create our draft release. This is easily achieved with the following cmdlet.

function New-Release {
    [CmdletBinding()]
    param
    (
        [Parameter(Mandatory = $true)] [string]$CollectionUrl,
        [Parameter(Mandatory = $true)] [string]$Project,
        [Parameter(Mandatory = $true)] [string]$Pat,
        [Parameter(Mandatory = $true)] $ReleaseArtifacts,
        [Parameter(Mandatory = $true)] [int]$ReleaseDefinitionId,
        [Parameter()] [string]$ReleaseDescription,
        [Parameter()] [bool]$IsDraft = $false,
        [Parameter()] [string[]]$ManualEnvironments
    )
    BEGIN { }
    PROCESS {
        $requestBody = @{ }
        $requestBody.definitionId = $ReleaseDefinitionId
        $requestBody.isDraft = $IsDraft
        $requestBody.description = $ReleaseDescription
        $requestBody.reason = "manual"
        $requestBody.manualEnvironments = $ManualEnvironments
        $requestBody.artifacts = $ReleaseArtifacts
        
        $headers = Get-PatHeader $Pat
        $body = $requestBody | ConvertTo-Json -Depth 10
        $body = [System.Text.Encoding]::UTF8.GetBytes($body);

        return Invoke-RestMethod "$CollectionUrl/$Project/_apis/release/releases?api-version=4.1-preview.6" -Method Post -Headers $headers -Body $body -ContentType "application/json"
    }
    END { }
}

$release = New-Release $url $project $pat $defaultArtifacts $releaseDefinitionId "desc" $true

As you can notice, with the above script, you can start not only a draft release, but also an ‘ordinary’ one.

At this point we are ready to set our variables. I’ll set both, one on the release level, another one on the environment scope, then update the release.

function Add-ReleaseVariable {
    [CmdletBinding()]
    param
    (
        [Parameter(Mandatory = $true)] [object]$ReleaseVariables,
        [Parameter(Mandatory = $true)] [string]$VariableName,
        [Parameter(Mandatory = $true)] [string]$VariableValue
    )
    BEGIN { }
    PROCESS {
        $value = [PSCustomObject]@{ value = $VariableValue }
        $ReleaseVariables | Add-Member -Name $VariableName -MemberType NoteProperty -Value $value -Force

        return $ReleaseVariables
    }
    END { }
}

$release.variables = Add-ReleaseVariable $release.variables "var1" "value"
$release.environments[0].variables = Add-ReleaseVariable $release.environments[0].variables "MarioInDraftEnv" "value1"

The above cmdlets will make things easier. In case the variable is already declared, the value will be overwritten with the one that you set at this stage. You can also see that I’m setting a variable on a release level and on an environment level. Environments are set to be an array, so to find out the desired one by name, you’ll need to search for it first. In this example, I’m just setting it on the first (and in my demo case, only) environment in the list. As mentioned earlier, last but not least, we will update the release.

function Update-Release {
    [CmdletBinding()]
    param
    (
        [Parameter(Mandatory = $true)] [string]$CollectionUrl,
        [Parameter(Mandatory = $true)] [string]$Project,
        [Parameter(Mandatory = $true)] [int]$ReleaseId,
        [Parameter(Mandatory = $true)] [object]$Release,
        [Parameter(Mandatory = $true)] [string]$Pat
    )
    BEGIN { }
    PROCESS {
        $headers = Get-PatHeader $Pat

        $body = $Release | ConvertTo-Json -Depth 10
        $body = [System.Text.Encoding]::UTF8.GetBytes($body);

        $reponse = Invoke-RestMethod "$CollectionUrl/$Project/_apis/release/releases/$($ReleaseId)?api-version=4.1-preview.6" -Method Put -Body $body -ContentType 'application/json' -Headers $headers

        return $reponse
    }
    END { }
}

$release = Update-Release $url $project $release.id $release $pat

Unfortunately, we can’t update the variables and start the release in the same call. The above call will update the variables in that specific release (not in the release definition) and the following will start the release.

function Start-Release {
    [CmdletBinding()]
    param
    (
        [Parameter(Mandatory = $true)] [string]$CollectionUrl,
        [Parameter(Mandatory = $true)] [string]$Project,
        [Parameter(Mandatory = $true)] [int]$ReleaseId,
        [Parameter(Mandatory = $true)] [string]$Pat
    )
    BEGIN { }
    PROCESS {
        $patch = '{ "status": "active" }'

        $headers = Get-PatHeader $Pat
        $reponse = Invoke-RestMethod "$CollectionUrl/$Project/_apis/release/releases/$($ReleaseId)?api-version=4.1-preview.6" -Method Patch -Body $patch -ContentType 'application/json' -Headers $headers

        return $reponse
    }
    END { }
}

$release = Start-Release $url $project $release.id $pat

That’s it. We now started our release with variables that are injected into it.

Azure DevOps

As mentioned before, this is not necessary anymore in Azure DevOps, or to be more precise, since version 5.0 of the REST API. In case you are looking for an example on how to achieve the same with the Azure DevOps, the following script will do.

function New-Release {
    [CmdletBinding()]
    param
    (
        [Parameter(Mandatory = $true)] [string]$CollectionUrl,
        [Parameter(Mandatory = $true)] [string]$Project,
        [Parameter(Mandatory = $true)] [string]$Pat,
        [Parameter(Mandatory = $true)] $ReleaseArtifacts,
        [Parameter(Mandatory = $true)] [int]$ReleaseDefinitionId,
        [Parameter()] $Variables,
        [Parameter()] [string]$ReleaseDescription,
        [Parameter()] [bool]$IsDraft = $false,
        [Parameter()] [string[]]$ManualEnvironments
    )
    BEGIN { }
    PROCESS {
        $requestBody = @{ }
        $requestBody.definitionId = $ReleaseDefinitionId
        $requestBody.isDraft = $IsDraft
        $requestBody.description = $ReleaseDescription
        $requestBody.reason = "manual"
        $requestBody.manualEnvironments = $ManualEnvironments
        $requestBody.artifacts = $ReleaseArtifacts
        $requestBody.variables = $Variables

        $headers = Get-PatHeader $Pat
        $body = $requestBody | ConvertTo-Json -Depth 10
        $body = [System.Text.Encoding]::UTF8.GetBytes($body);

        return Invoke-RestMethod "$CollectionUrl/$Project/_apis/release/releases?api-version=5.0" -Method Post -Headers $headers -Body $body -ContentType "application/json"
    }
    END { }
}

$variables = [PSCustomObject]@{ }
$variables = Add-ReleaseVariable $variables "var2" "value"

$release = New-Release $url $project $pat $defaultArtifacts $releaseDefinitionId $variables "desc" $false

Important changes compared to the previous version of the cmdlet are to be found in the extra parameter called Variables and the URL api-version parameter now set to 5.0.

Be however aware that you need create the variables in your release definition and mark them as ‘Settable at the release time’.

In case your variable is not defined, your API call will fail with the following error:

“Variable(s) another do not exist in the release pipeline at scope: Release. New variables cannot be added while creating a release. Check the scope of the variable(s) or remove them and try again.”

Previously described technique will still work, even with the Azure DevOps if adding variables dynamically in the release is what you want. However, I would always advise you to define them, so that they are present and do not “materialize” from nowhere.

I hope I covered the necessary. Let me know in comments if any.

Uploading XL Deploy DAR package via TypeScript

Another day, another language, another challenge

In past I already wrote about multipart/form-data requests that are used to upload files. It was about PowerShell and leveraging .Net libraries to achieve this task. Now it is the turn of TypeScript.

I had a need to implement the file upload to XL Deploy which requires multipart/form-data standard in order to do so. I wrote about the same thing in the past, using PowerShell to upload DAR package to XL deploy. This time, however, I needed to use NodeJs/TypeScript.

This is not meant to be a guide about the TypeScript, I do suppose you already have some knowledge about it. I just would like to show you how did I achieve it, hoping to help others not to go through the same discovery process that brought me to result.

First of all, I will be making my HTTP calls via typed-rest-client. This library is again based on the plain NodeJs http.ClientRequest class. This also means that if you do not plan to use this library, you can still follow the method I’m suggesting.
Creating the multipartform-data message structure and adding the necessary headers will be done with form-data package. It is one of the most popular libraries used to create “multipart/form-data” streams. Yes, I just mentioned the keyword, streams, and yes, we are going to use streams to achieve this and allow us not to saturate resources on our client host in case of large files upload.

Enough talking now, let’s see some code.

Sending multipartform-data messages in Typescript

Before we start, make sure that you install the following packages:

npm install typed-rest-client
npm install form-data
npm install @types/form-data

This is all we need. Note I also installed typings for the form-data library so that we can comfortably use it in TypeScript and make sure that “typed-rest-client” library is at least of version 1.0.11.

Code wise, first of all, we need to create an instance of our client.

import { BasicCredentialHandler } from "typed-rest-client/Handlers";
import { RestClient } from "typed-rest-client/RestClient";

async function run() {
    const requestOptions = { ignoreSslError: true };
    const authHandler = [new BasicCredentialHandler("user", "password")];

    const baseUrl: string = "https://myXLServer:4516";

    const client = new RestClient("myRestClient", baseUrl, authHandler, requestOptions);
}

I will skip commenting on the necessary imports and quickly analyze the remaining code.

I need to create request options and set the ignoreSslError property. This is so to allow my self-signed certificate to be accepted.
Then I do create a basic authentication handler and pass in the requested username and password. Once I have all of the necessary, I create an instance of the RestClient.

You spotted well, it is a RestClient and above I talked about the HttpClient. Do not wary, it is a wrapper around it, helping me to deserialize the response body, verify the status code, etc.

Let’s now prepare our form data.

...
import FormData from "form-data";
import fs from "fs";

async function run() {
	...
	const formData = new FormData();
	formData.append("fileData", fs.createReadStream("C:\\path\\to\\myfile.dar"));
}

We need a couple of extra imports and once that is sorted out, we just do create an instance of the FormData class. Once we have it, we will call the append method, pass in the file name and the stream that points to my file of choice. In order to get my file that is on the disk, I’m using createReadStream function from fs library which is a very common way to setup a stream.

At this point, we are ready to make our HTTP call.

async function run() {
	...
	const response = await client.uploadStream(
		"POST", `deployit/package/upload/myfile.dar`,
		formData,
		{ additionalHeaders: formData.getHeaders() });

	console.log(response.result.id);
}

As you can see, we are invoking the upload stream method from the rest client and passing in the following parameters.
HTTP method to use, POST in our case (XL Deploy), second, rest resource URL that needs to be triggered. Bear in mind that actual URL will be composed with the base you passed in the constructor of the RestClient. Then, the stream containing the body. This is going to be the instance of our FormData class, which is of type stream, and as the fourth parameter, we need to pass the additional headers. The additional headers we are specifying are overriding the content-type as for multipart/form-data it needs to be set to multipart/form-data and contains the correct boundary value. That’s what getHeaders will do, return the necessary content-type header with the necessary correct boundary value.

Once the call has been made, the upload of the file will start. As the response from XL Deploy on a successful import we will receive a message in form of JSON where one of the fields do report the ID of the package, and that’s what I’m printing in the console on my last line.

This may be specific for XL Deploy, however, you can easily adapt this code for any other service where multipart/form-data upload is necessary.

Following the complete code sample.

import FormData from "form-data";
import fs from "fs";
import { BasicCredentialHandler } from "typed-rest-client/Handlers";
import { RestClient } from "typed-rest-client/RestClient";

async function run() {
    const requestOptions = { ignoreSslError: true };
    const authHandler = [new BasicCredentialHandler("user", "password")];

    const baseUrl: string = "https://myXLServer:4516";

    const client = new RestClient("myRestClient", baseUrl, authHandler, requestOptions);

    const formData = new FormData();
    formData.append("fileData", fs.createReadStream("C:\\path\\to\\myfile.dar"));

    const response = await client.uploadStream<any>(
        "POST", `deployit/package/upload/myfile.dar`,
        formData,
        { additionalHeaders: formData.getHeaders() });

    // tslint:disable-next-line:no-console
    console.log(response.result.id);
}

run();

Good luck!