Passing values between TFS 2015 build steps

Introduction

It may happen that you need to pass or make available a value from one build step in your build definition, to all other build steps that are executed after that one. It is not well documented, but there are two ways of passing values in between build steps.
Both of the approaches I am going to illustrate here are based on setting a variable on the task context. The first task can set a variable, and following tasks are able to use the variable. The variable is exposed to the following tasks as an environment variable. When ‘issecret’ option is set to true, the value of the variable will be saved as secret and masked out from log.

In order to test my approaches, I made 4 build tasks, two of them for the first approach and two of them for the second one. They look something like this:

task-1-set

You can download all of the examples here.

Task Logging Command

Build task context supports several types of logging commands. Logging command are a facility available in the run context of the build engine and do allow us to perform some particular actions. A full list of available logging commands is available here. Be aware that some of them are only available since a certain version of the build agent, and before using them check the minimum agent version for clarity, eventually limit your build task to the indicated version.
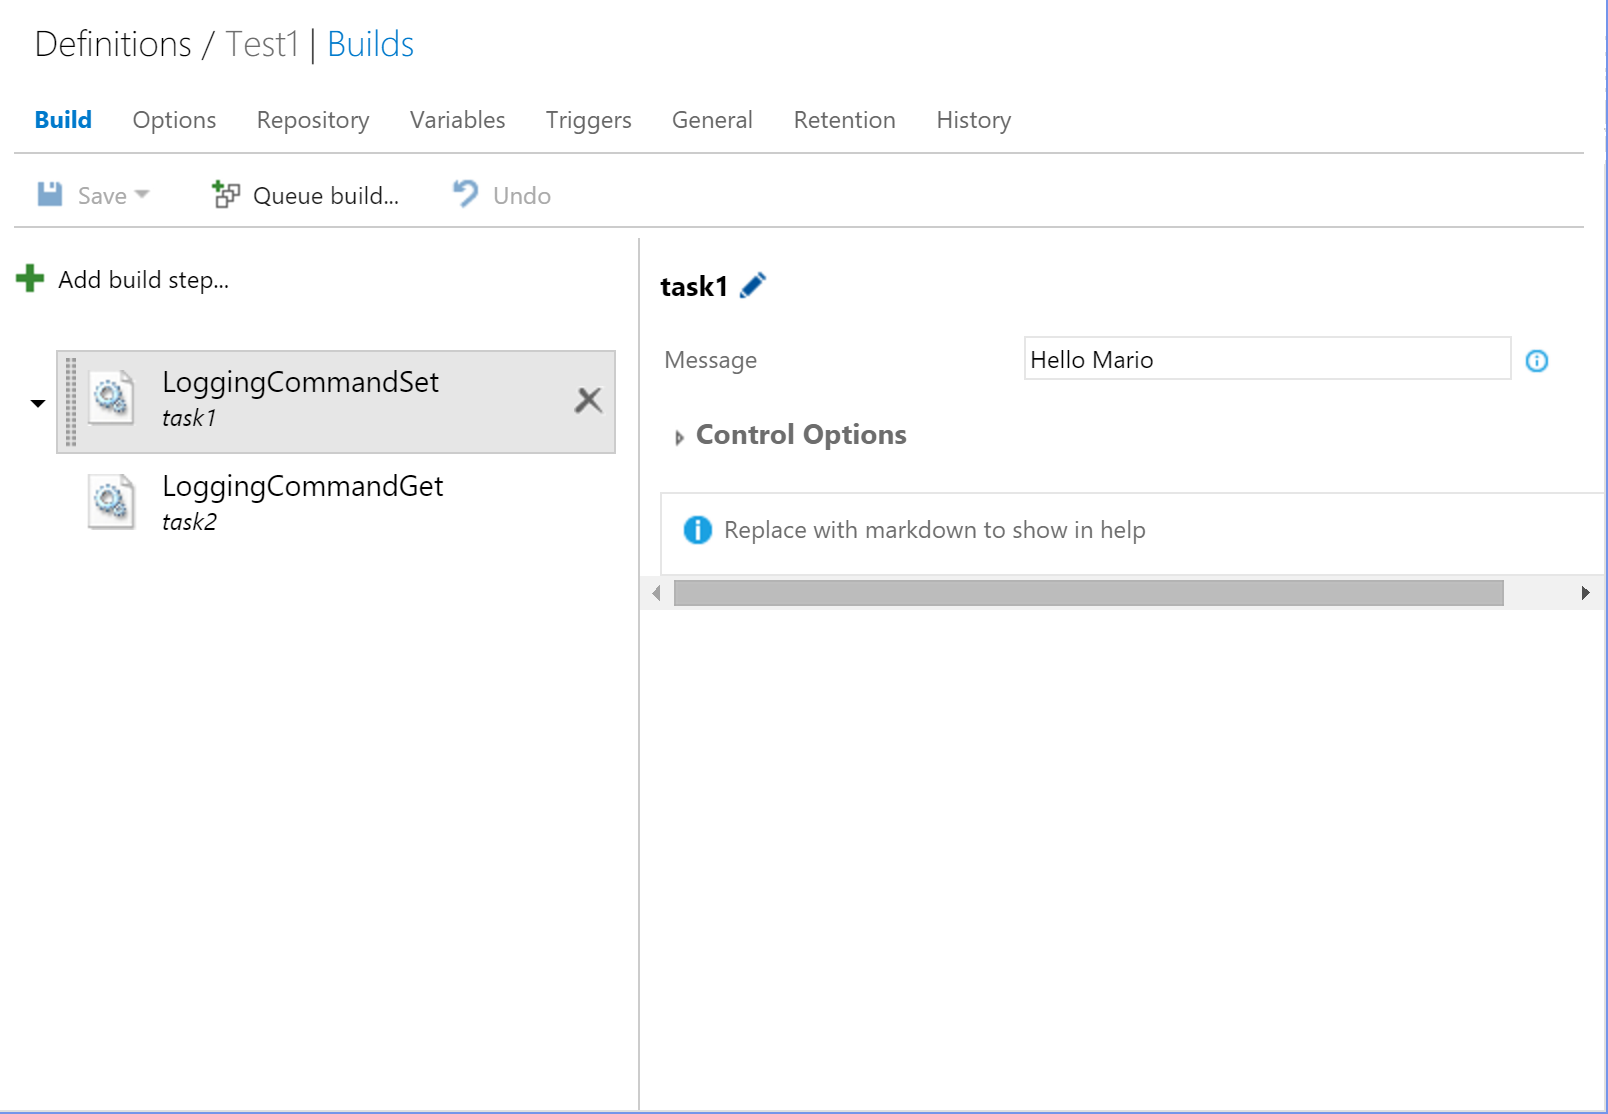
In our example, I will use a variable provided as a parameter to my task with a value set from the UI, print the value out and store it in the task context. This will be my build task called task1. Once I set the task manifest correctly, I will upload it to my on-premise TFS (it will also work on VSTS/VSO). Let’s check the code.

Write-Output "Message is: $msg"
Write-Output ("##vso[task.setvariable variable=task1Msg;]$msg")

Now, I will create another task and call it task2. This task will try to retrieve the value from the task context, then print the value out. Following is the code I’m using.

$task1Msg = $env:task1Msg

if ($task1Msg)
{
	Write-Output "Value of the message is set and equals to $task1Msg"
}
else
{
	Write-Output "Value of the message is not set."
}

You can find all of the examples I’m using available for download here.

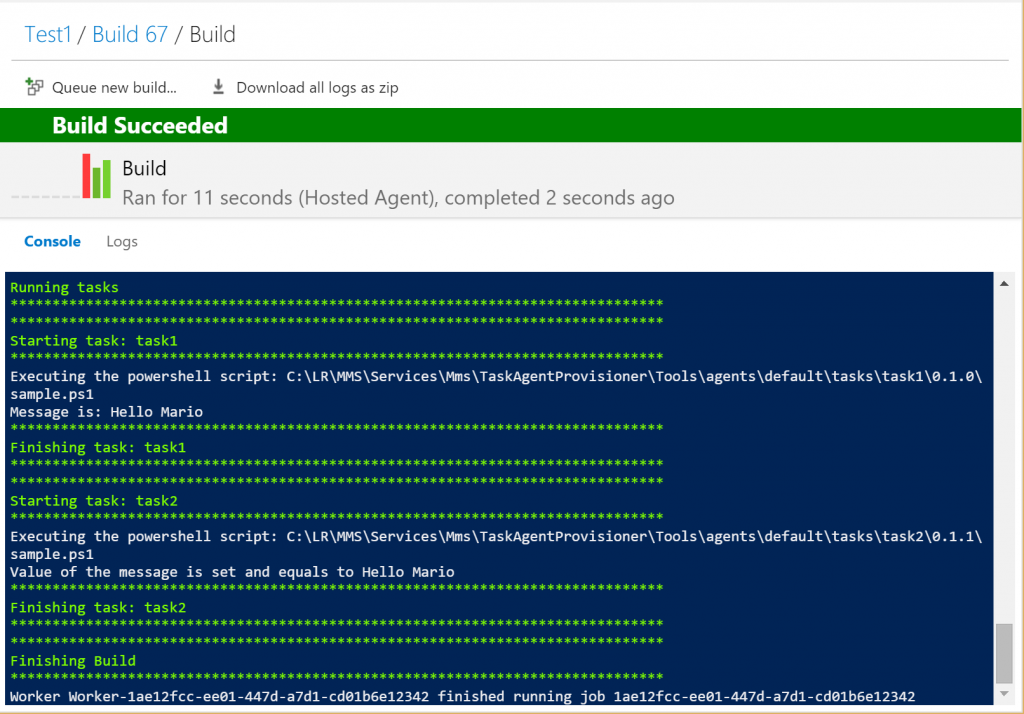
If you now set your build definition with tasks task1 and task2, you will see that based on what you set as a Message in task1, will be visualized in the console by the task2.

task-1-2-run

Set-TaskVariable and Get-TaskVariable cmdlets

The same result can be achieved by using some cmdlets that are made available by the build execution context. We are going to create a task called task3 which will have the same functionality as task1, but it will use a different approach to achieve the same. Let’s check the code:

Import-Module "Microsoft.TeamFoundation.DistributedTask.Task.Common"
    
Set-TaskVariable "task1Msg" $msg 

As you can see we are importing modules from a specific library called Microsoft.TeamFoundation.DistributedTask.Task.Common. You can read more about the available modules and exposed cmdlets in my post called Available modules for TFS 2015 build tasks.
After that we are able to invoke the Set-TaskVariable cmdlet and pass the variable name and value as parameters. This will do the job.

In order to retrieve task we need to import another module which is Microsoft.TeamFoundation.DistributedTask.Task.Internal. Although those are quite connected actions, for some reason Microsoft decided to package them in two different libraries. We are going to retrieve our variable value in the following way:

Import-Module "Microsoft.TeamFoundation.DistributedTask.Task.Internal"

$task1Msg = Get-TaskVariable $distributedTaskContext "task1Msg"

if ($task1Msg)
{
	Write-Output "Value of the message is set and equals to $task1Msg"
}
else
{
	Write-Output "Value of the message is not set."
}

As you can see we are invoking the Get-TaskVariable cmdlet with two parameters. First one is the task context. As for other things, build execution context will be populated with a variable called distributedTaskContext which is of type Microsoft.TeamFoundation.DistributedTask.Agent.Worker.Common.TaskContext and beside other exposes information like ScopeId, RootFolder, ScopeType, etc. Second parameter is the name of the variable we would like to retrieve.

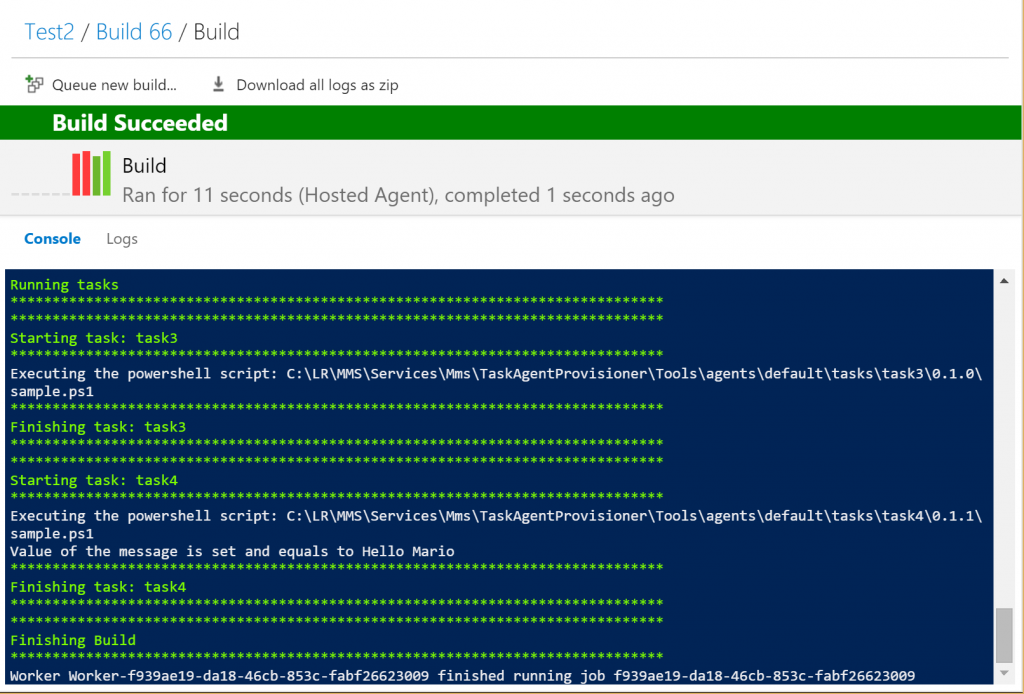
The result still stays the same as you can see from the following screenshot:

task-3-4-run

Conclusion

Both approaches will get the job done. It is on you to choose the preferred way of storing and retrieving values. A mix of both also works. You need to experiment a bit with the build task context and see what works for you the best. Be aware that this is valid at the moment I’m writing this, and it is working with TFS 2015, TFS 2015.1 and with VSTS as of 2016-02-19. Seems however that in the near future all of this will be heavily refactored by Microsoft, then my guide will not be relevant anymore.

Stay tuned!

Uploading XL Deploy DAR package via PowerShell

Introduction

Recently at my customer’s site, I started using XebiaLabs product called XL Deploy. It is a software solution that helps automating the deployment process. Many operations are exposed via a REST API. Uploading of packages is one of them and is done following the Multipart/form-data standard. In case you need to do so, via PowerShell, you may be surprised about the difficulty of something that appears to be a trivial task. As you may know, PowerShell doesn’t play well with Multipart/form-data requests. I will show you a cmdlet that I wrote that can be handy in accomplishing this task.

Welcome Send-Package cmdlet

Before showing you the actual cmdlet that will send a package to XL Deploy I need to mention that the core of this cmdlet is Invoke-MultipartFormDataUpload cmdlet about which I blogged earlier.

First of all two small helper cmdlets. As the file name needs to be specified in the URL, we need to encode it. This may be done with some simpler code for this particular case, however I will show you a cmdlet that I’m using also for other XL Deploy calls where this approach is necessary.

<############################################################################################ 
    Encodes each part of the path separately.
############################################################################################>
function Get-EncodedPathParts()
{
    [CmdletBinding()]
    param
    (
        [string][parameter(Mandatory = $true)]$PartialPath
    )
    BEGIN { }
    PROCESS
    {
        return ($PartialPath -split "/" | %{ [System.Uri]::EscapeDataString($_) }) -join "/"
    }
    END { }
}

The other one will make sure that the URL passed in is formatted correctly for XL Deploy and that is a valid URL.

<############################################################################################ 
    Verifies that the endpoint URL is well formatted and a valid URL.
############################################################################################>
function Test-EndpointBaseUrl()
{
	[CmdletBinding()]
	param
	(
		[Uri][parameter(Mandatory = $true)]$Endpoint
	)
	BEGIN
	{
		Write-Verbose "Endpoint = $Endpoint"
	}
	PROCESS 
	{
		#$xldServer = $serviceEndpoint.Url.AbsoluteUri.TrimEnd('/')
		$xldServer = $Endpoint.AbsoluteUri.TrimEnd('/')

		if (-not $xldServer.EndsWith("deployit", "InvariantCultureIgnoreCase"))
		{
			$xldServer = "$xldServer/deployit"
		}

		# takes in consideration both http and https protocol
		if (-not $xldServer.StartsWith("http", "InvariantCultureIgnoreCase"))
		{
			$xldServer = "http://$xldServer"
		}

		$uri = $xldServer -as [System.Uri] 
		if (-not ($uri.AbsoluteURI -ne $null -and $uri.Scheme -match '[http|https]'))
		{
			throw "Provided endpoint address is not a valid URL."
		}

		return $uri
	}
	END { }
}

This cmdlets and the one I described in the previous post are required to be available for our new upload cmdlet. After having assured that they are available we can write a cmdlet I named Send-Package.

<############################################################################################ 
    Uploads the given package to XL Deploy server.
############################################################################################>
function Send-Package()
{
    [CmdletBinding()]
    PARAM
    (
        [string][parameter(Mandatory = $true)][ValidateNotNullOrEmpty()]$PackagePath,
        [Uri][parameter(Mandatory = $true)][ValidateNotNullOrEmpty()]$EndpointUrl,
        [System.Management.Automation.PSCredential]$Credential
    )
    BEGIN
    {
        if (-not (Test-Path $PackagePath))
        {
            $errorMessage = ("Package {0} missing or unable to read." -f $PackagePath)
            $exception =  New-Object System.Exception $errorMessage
			$errorRecord = New-Object System.Management.Automation.ErrorRecord $exception, 'SendPackage', ([System.Management.Automation.ErrorCategory]::InvalidArgument), $PackagePath
			$PSCmdlet.ThrowTerminatingError($errorRecord)
        }

        $EndpointUrl = Test-EndpointBaseUrl $EndpointUrl
    }
    PROCESS
    {
        $fileName = Split-Path $packagePath -leaf
        $fileName = Get-EncodedPathParts($fileName) 

        $uri = "$EndpointUrl/package/upload/$fileName"

        $response = Invoke-MultipartFormDataUpload -InFile $PackagePath -Uri $uri -Credential $credentials

        return ([xml]$response).'udm.DeploymentPackage'.id
    }
    END { }
}

You can now invoke this cmdlet and pass the requested parameters. If the call succeeds you will get back the package id.

At example:

$uri = "http://xld.majcica.com:4516"
$filePath = "C:\Users\majcicam\Desktop\package.dar"
$credentials = (Get-Credential)

$packageId = Send-Package $filePath $uri $credentials

Write-Output "Package was uploaded successfully with the following id: '$packageId'"

In case you do not want to provide credentials interactively, the following cmdlet may help you:

<############################################################################################ 
    Given the username and password strings, create a valid PSCredential object.
############################################################################################>
function New-PSCredential()
{
	[CmdletBinding()]
	param
	(
		[string][parameter(Mandatory = $true)]$Username,
		[string][parameter(Mandatory = $true)]$Password
	)
	BEGIN
	{
		Write-Verbose "Username = $Username"
	}
	PROCESS
	{
		$securePassword = ConvertTo-SecureString –String $Password -asPlainText -Force
		$credential = New-Object –TypeName System.Management.Automation.PSCredential –ArgumentList $Username, $securePassword

		return $credential
	}
	END { }
}

That’s all folks! I tested this scripts with XL Deploy 5.1.0 and 5.1.3 and had not encountered any issues. If any, do not hesitate to comment.

Happy deploying!

Tough life behind a proxy

In many enterprises when it comes to Internet access you will find yourself behind a proxy server. In such conditions many application do require a specific setup or they will not work at all. Recently I had to install a npm package from the official public npm repository and the “usual” command doesn’t work. Thus in case of npm client behind a proxy server, you need to pass the following argument --proxy.

My command from:

npm install -g tfx-cli

became

npm --proxy http://my.proxy.com:8080 install -g tfx-cli

Also, as I am actively using Visual Studio Code, I had an unpleasant surprise. If you do tend to install a Visual Studio Code extension (plugin) and you are behind a proxy, at the moment you are doomed. There is no way, in the latest version at the time of writing, to install Visual Studio Code extension if behind a proxy.

When it comes to .NET software development, all of the commonly used classes as HttpClient do cope well with proxy, the only problems is that developers rarely think about it and do not implement adequate support. In this particular case specifying a proxy in HttpClientHandler is the solution, which then needs to be passed to the HttpClient constructor.

So fellow developers please have mercy for all of the people behind a proxy, it ain’t an easy life!