Automating BI projects, based on Microsoft tooling, was always a bit painful. Personally, all of the things shipped with SSDT seemed a bit unloved from a Microsoft side.
What I would like to show you in this post is how I managed to automate the build and deployment of my Integration Services Projects (.dtproj type). We will build our project in order to get the necessary ispac files, upload this artifact in TFS and then deploy it via a TFS Release.
Let’s start with the build. As you may already know, IS Projects are not based, as most of Visual Studio projects, on MSBuild. This is the first difficulty everyone faces once they start setting a CI/CD pipeline for this type of projects. The only way to build it is to use devenv.com executable that is part of the Visual Studio installation. For that, you will need a custom build task or you’ll need to execute a script that will handle the necessary.
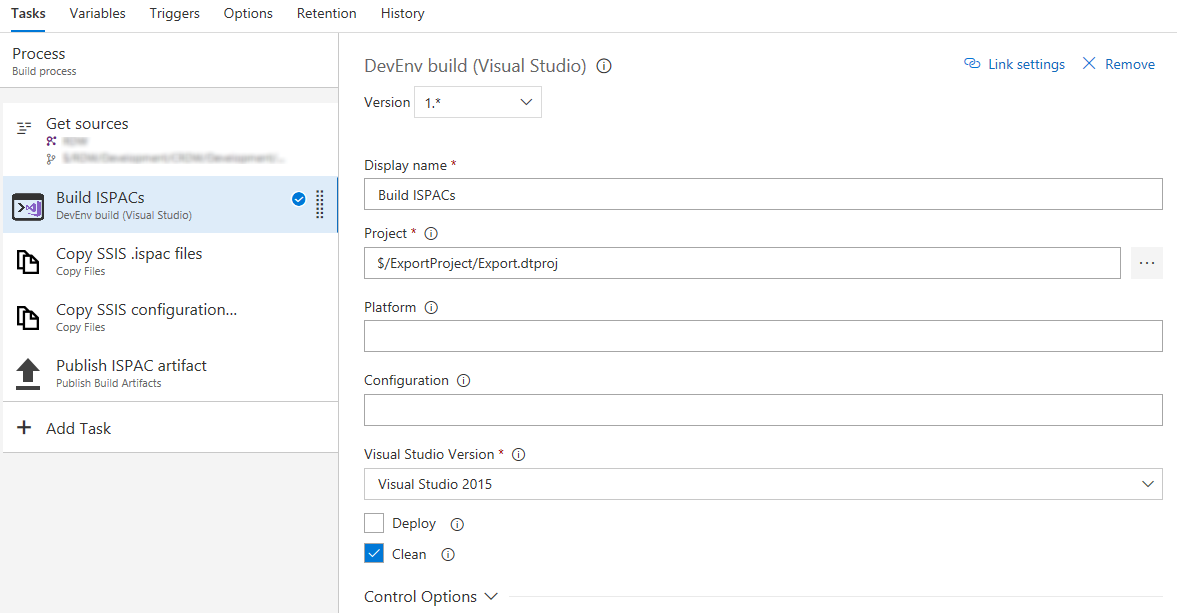
In my case, I made a custom build task for it (which can be found here) and thus my build definition looks like this:
Following are the steps of my build. First I will ‘compile’ the SSIS project, then copy the ispac files that were generated to the Build Staging folder, again I’ll copy my SSIS configuration file (more about the configuration file later) to the same location and at the end, I’ll upload all of the files in the Staging folder to TFS as my build artifact.
Now that my artifact is ready, we can proceed with the deployment in the release.
In order to deploy the SSIS package, I’ll use my own build/release task called Deploy SSIS.
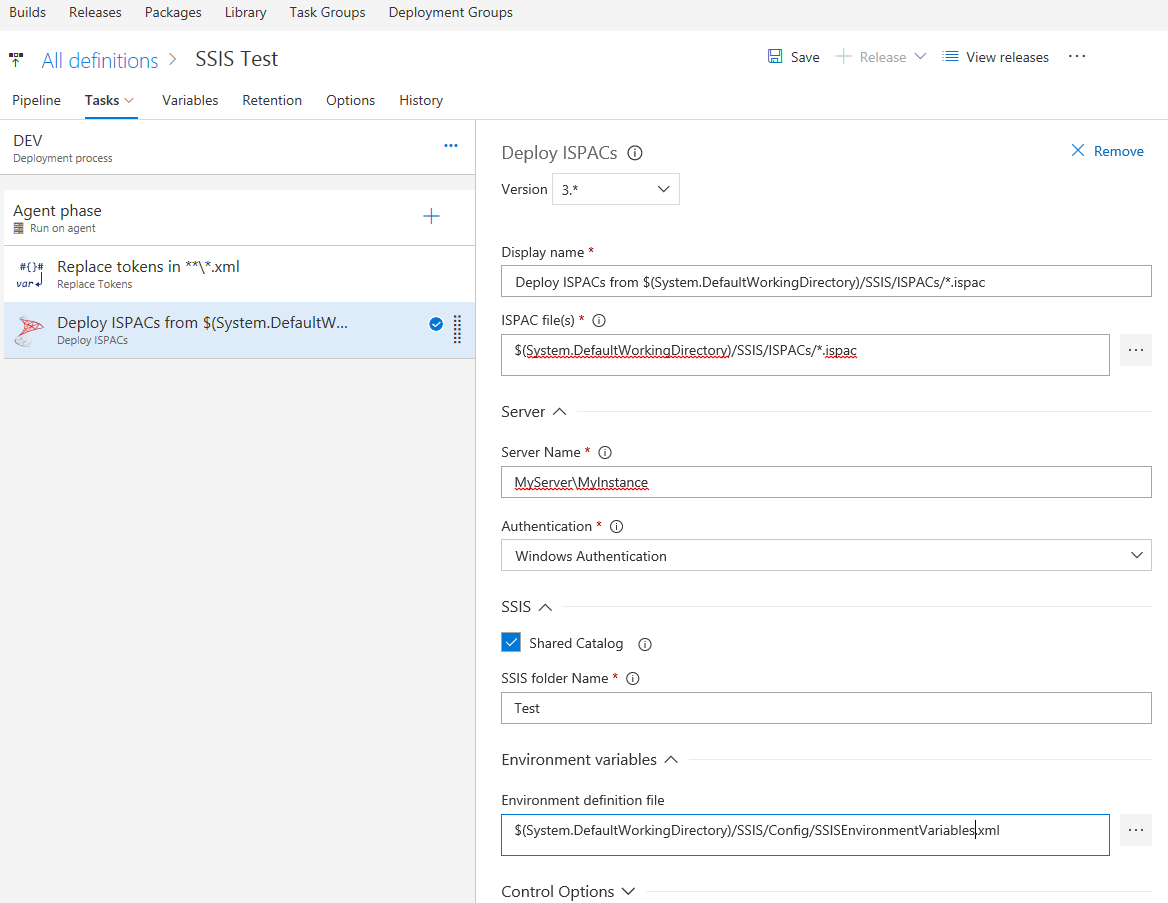
The release steps will look like the following.
As you can see I will start with replacing the placeholders in the configuration file. The configuration file contains some environment dependent values and in the first step, I’ll make sure that those are substituted with the correct values that are coming from the environment variables in the release.
But what is this configuration file I already mentioned a couple of times? It is a file that my deploy task is capable of processing and it contains a list of SSIS environments and variables. There are no other ways of supplying this information, considering that it is not part of the ispacs, and as it was a necessity for my automation to provide them, I came up with a schema from which my Deployment task will pick those up, add them to my SSIS instance and eventually make all of the necessary references. Following is an example of the configuration file.
<?xml version="1.0" encoding="UTF-8" ?>
<environments>
    <environment>
        <name>MyEnv</name>
        <description>My Environments</description>
        <ReferenceOnProjects>
            <Project Name="BusinessDataVault" />
            <Project Name="Configuration" />
        </ReferenceOnProjects>
        <variables>
            <variable>
                <name>CLIENTToDropbox</name>
                <type>Boolean</type>
                <value>1</value>
                <sensitive>false</sensitive>
                <description></description>
            </variable>
            <variable>
                <name>InitialCatalog</name>
                <type>String</type>
                <value>DV</value>
                <sensitive>false</sensitive>
                <description>Initial Catalog</description>
            </variable>
            <variable>
                <name>MaxFilesToLoad</name>
                <type>Int32</type>
                <value>5</value>
                <sensitive>false</sensitive>
                <description>Max Files To Load by dispatcher </description>
            </variable>
        </variables>
    </environment>
</environments>
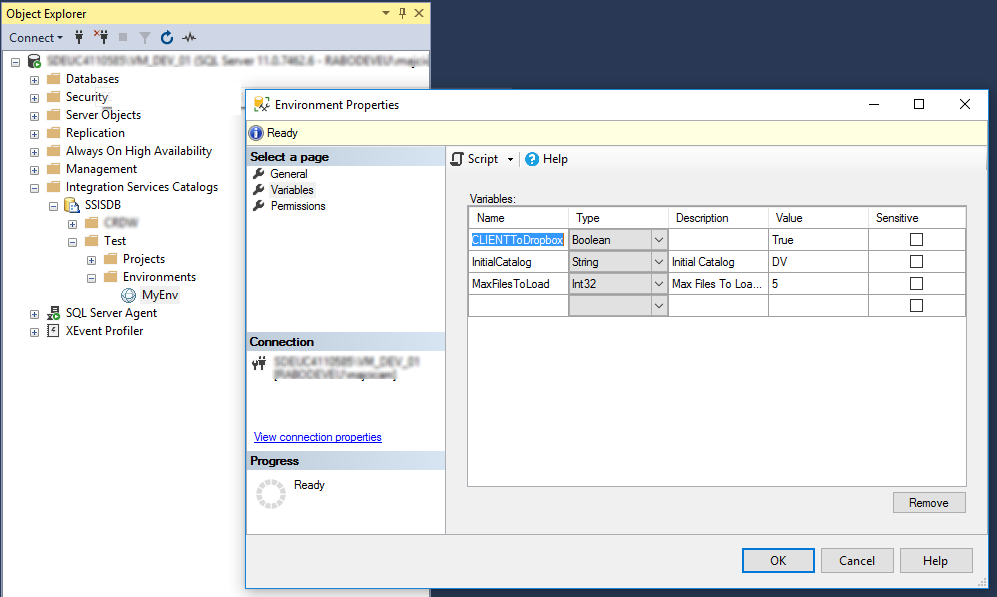
It represents a set of environments. Each environment needs a name. Once defined the task will proceed to create them in SSIS. Environments must be referenced to projects in order for projects to used them, therefore the ReferenceOnProjects element will allow you to enlist the projects on which you would like to apply these references automatically. Last but not least, a list of variables that do need to be populated for the given environment. Variables will also be automatically referenced in projects if the names are matching with parameters. In the end, for the example in question, you will get the following.
Now that we cleared why do we have the config file and how to set it up, I’ll mention you that it is also checked in the source control as my dtproj and other files. In case you are not a big fan of XML, you can provide the same content in form of JSON file.
Let’s see now what are the necessary parameters for our Deploy SSIS task.
First, the SQL instance on which SSIS is running. That’s an easy one and should be set in the Server name field. You can choose the Authentication type for the connection to be established and it can be the Windows Authentication and SQL Server Authentication. Based on this choice the relevant SQL Connection String that is used to communicate with your server will be set. In case of Windows Authentication, the build agent identity will be used, so make sure that account has the necessary privileges in SQL.
In case you are deploying multiple applications in SSIS, you would like to flag the Share Catalog option because then, the catalog will not be dropped before deploying. Also if you have any other reasons not the drop the catalog on each deployment, this option will do.
SSIS folder Name parameter is self-explanatory. We need to deploy our projects and environments in a folder, that’s the only possible option in SSIS. Thus, we need to choose a name for a folder that we are going to deploy our projects and environments in.
As the last parameter Environment definition file is the location of our configuration file. If not supplied, projects will still be deployed however, no variables will be created and referenced.
I do hope that this is sufficient to get you started with automating your SSIS deployments. If any, don’t hesitate to ask in the comments.
