Provisioning WebDeploy in VSTS/TFS release via DSC script

It’s been a while since we got at our disposition some great tooling for the provisioning of our machines. Unfortunately, it is not as used as I would like it to be. For us working on Microsoft platform, there is a tool that can do the job, available out of the box, for free, on every modern windows machine. Obviously, I’m talking about the Windows PowerShell Desired State Configuration or for short, DSC. Although not truly a provisioning tool and more as Microsoft defines it, “a management platform in PowerShell that enables you to manage your IT and development infrastructure with the configuration as code”, it will get easily job done when it comes to provisioning tooling and features.

After this long introduction lets cut the chase. In this post I’m going to show you how to write a DSC script which will make sure that the desired IIS components are installed on a given machine, check for Microsoft WebDeploy and eventually install all of those if not present. Once the script is ready, I’ll show you how to execute it during the deployment of your project in a VSTS/TFS Release. I will not get in details of how does DSC work, how to write DSC configuration functions or create your custom DSC Configuration Resources. I’ll focus on a big picture, on how to combine all of the necessary to actually get the work done. When it comes to the details, it’s quite easy to find the necessary technical guidance by just googling the desired terms.

I wrote a script that, given a machine name, will make sure a DSC configuration is applied to it.

param(
    [parameter(Mandatory=$true)]
    [string]
    $ServerName
)

$ConfigurationData = @{
    AllNodes = @(
        @{
            NodeName=$ServerName
            PSDscAllowPlainTextPassword=$true
            RebootNodeIfNeeded = $true
         }
   )
}

Configuration DashboardProvisioning
{
 	Import-DscResource -ModuleName 'PSDesiredStateConfiguration'
     
	Node $AllNodes.NodeName 
     {
        WindowsFeature IIS
        {
            Ensure = "Present"
            Name = "Web-Server"
        }

        WindowsFeature IISManagementTools
        {
            Ensure = "Present"
            Name = "Web-Mgmt-Tools"
            DependsOn='[WindowsFeature]IIS'
        }

        WindowsFeature IISAspNet45
        {
            Ensure = "Present"
            Name = "Web-Asp-Net45"
            DependsOn='[WindowsFeature]IIS'
        }

        WindowsFeature WebManagementService
        {
            Ensure = "Present"
            Name = "Web-Mgmt-Service"
            DependsOn='[WindowsFeature]IIS'
        }

        Package WebDeploy
        {
             Ensure = "Present"
             Path  = "\\MyShareServer\Software\WebDeploy_amd64_en-US.msi"
             Name = "Microsoft Web Deploy 3.6"
             LogPath = "$Env:SystemDrive\temp\logoutput.txt"
             ProductId = "6773A61D-755B-4F74-95CC-97920E45E696"
             Arguments = "LicenseAccepted='0' ADDLOCAL=ALL"
        }
    }
}

DashboardProvisioning -ConfigurationData $ConfigurationData

Start-DscConfiguration -Path .\DashboardProvisioning -Wait -Force -Verbose

The configuration part will make sure that three Windows features are installed and those are all IIS components, necessary for my website to run. The last part, package configuration entry, is making sure that WebDeploy is present, more precisely version 3.6 of WebDeploy. In case it is not installed on the given machine it will run the installer that is located in this particular case on a share at “\\MyShareServer\Software\WebDeploy_amd64_en-US.msi“. You will need to adjust this setting and adapt it to the path where you have placed the msi installer of WebDeploy 3.6. The agent that executes this configuration script will need to have the sufficient rights to access and read that path.

You can manually test this script from your local PC in order to make sure that is working as expected. Once ready we will execute this script in our deployment pipeline.

An example of the invocation is shown in the following screenshot:

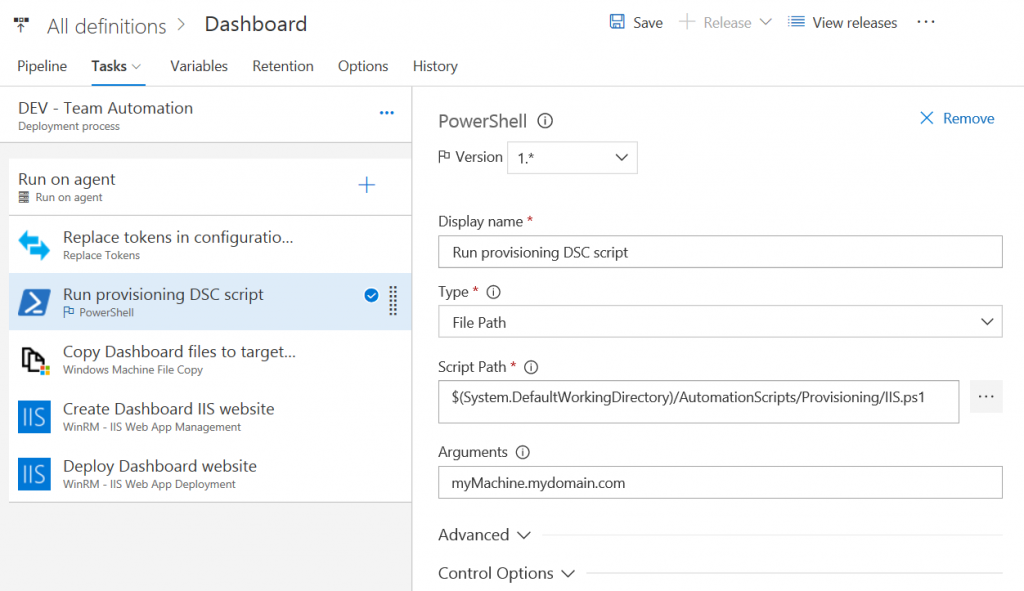
As you can see, I’m using the simple PowerShell build task to run my script and as the argument, I’m passing in the machine name, FQDN of my web server in that particular environment. It is that simple! Now, before I do try to copy my files, create and deploy my website, I’m sure that all of the prerequisites are in place so that my deployment can succeed. This step takes a very short time to execute in case the configuration that I specified is already in place. A major benefit is that I can start with a clean machine and my deployment will take care that all of the necessary is in place before proceeding with the actual deployment. In a more complex environment, this will bring consistency in the configuration between different machines and environments and reduce the manual interventions regarding the configuration to a bare minimum.

Once you start testing, make sure that Windows Management Framework of at least version 4 is installed on both your build server and the destination machine and that WinRM is set up, again, for both of these machines.

Once successful I’ll encourage you to extend this script with all of your custom configuration settings, necessary for your application to run.

Cheers!

Automate setting ‘Retain indefinitely’ flag on your releases

Overview

As a common practice, after a successful release to production, often there is a need to retain the involved artifact and relevant release information for a certain amount of time. In order to avoid that a retention policy removes this information, you will mark that release with a Retain indefinitely flag, by choosing that option from the VSTS UI.

As this is a manual process that I would like to automate, I will use the Retain indefinitely current release task available in VSTS Marketplace.

After installing the extension, in the list of available tasks, check the Utility category and you’ll find the above-mentioned task.

Only a single parameter is presented by the task in a form of a checkbox labelled Mark the current release to be retained indefinitely. By default is set to true. If checked, it will mark the current release with Retain indefinitely flag. Otherwise, it will take the Retain indefinitely flag off the current release.

I will add it only to my production environment process and I will place it as the last task. E.g.

This is because I do not want this task to execute if any of the previous tasks in the process do fail. It should execute only if I managed to deploy my application in production. That is the criteria for retaining this release for a longer time.
The only requirement for this task to run is that the account on which the build agent is running has sufficient privileges to set Retain indefinitely flag.

That’s all. Now you do not need to remember to set the Retain indefinitely flag after every successful production release.

UPDATE:

After extensive testing, I noticed that it’s mostly the case that additional rights do need to be granted for the build agent identity in order for this task to succeed.
In case the permissions are missing, a similar error will be visible in the log:

##[error]VS402904: Access denied: User Project Collection Build Service (mummy) does not have manage releases permission. Contact your release manager.

Edit the security settings for that particular release or for all the releases and set the following to the needed account.

Make sure ‘Manage Releases’ permission is granted for the indicated user.

Another note is that also the cross-platform agents are supported starting from the version 2.x of the extension. If you check on GitHub you’ll see that the task has been re-written and it is now based on node provider with the code written in TypeScript.

Uploading build/release tasks to VSTS

Let’s start with why? Why would someone upload a task directly to TFS/VSTS? You can just install or update the extension that added those tasks, no?!?! So why?
Obviously there are many reasons, and aside the development of the tasks themselves, often is a case when you find and fix a bug in a task that you need to get in production ASAP. Notifying third party and waiting for a new version of the extension is often not acceptable.
But there is already a tool that Microsoft made for handling tasks! Does TFS-CLI tells you nothing? Sure, tool that works very well and which I mentioned already in several occasions on my blog. Still, getting it requires Java Runtime Environment, NodeJs, tool itself, configuration. These are often not available out of the box and if you are doing this things occasionally, a better way may be a simple script.

Following is a script I do use:

param(
   [Parameter(Mandatory=$true)][string]$TaskPath,
   [Parameter(Mandatory=$true)][string]$VstsUrl,
   [Parameter(Mandatory=$true)][string]$Pat
)

# Load task definition from the JSON file
$taskDefinition = (Get-Content $taskPath\task.json) -join "`n" | ConvertFrom-Json
$taskFolder = Get-Item $TaskPath

# Zip the task content
Write-Output "Zipping task content"
$taskZip = ("{0}\..\{1}.zip" -f $taskFolder, $taskDefinition.id)
if (Test-Path $taskZip) { Remove-Item $taskZip }

Add-Type -AssemblyName "System.IO.Compression.FileSystem"
[IO.Compression.ZipFile]::CreateFromDirectory($taskFolder, $taskZip)

# Prepare to upload the task
Write-Output "Uploading task content to $VstsUrl"

$taskZipItem = Get-Item $taskZip
$encodedCredentials = [System.Convert]::ToBase64String([System.Text.Encoding]::ASCII.GetBytes(":$Pat"))

$headers = @{ Authorization = "Basic $encodedCredentials"; "Content-Range" = "bytes 0-$($taskZipItem.Length - 1)/$($taskZipItem.Length)"}

$url = "{0}/_apis/distributedtask/tasks/{1}?api-version=2.0-preview" -f $VstsUrl, $taskDefinition.id

try
{
	Invoke-RestMethod -Uri $url -Headers $headers -ContentType application/octet-stream -Method Put -InFile $taskZipItem
	Write-Host "Task uploaded successfully" -ForegroundColor Green
}
finally
{
    Remove-Item -LiteralPath $taskZip -Force
}

To invoke this, it is sufficient to provide the path to the folder containing the task, url towards your VSTS account (in case of TFS, path to the collection) and your personal access token. E.g.

.\TaskUploader.ps1 .\task\ https://myaccount.visualstudio.com jx3sa4h3cb56ehftgrjitj6kctei3pp7usuyxkoim5vpeqcgn7eq

That’s all.