Getting started with SpecFlow and CodedUI
Introduction
Often when I approach a new tooling, framework or technology, I tend to be quite excited with the new possibilities or new ways of working.
Unfortunately many times I get quickly disappointed and left to a mercy of Google trying to solve some basic impediments. Obvious things are, at the beginning, not so obvious and I often do get stuck and spend a lot of time trying to solve “beginners” problems. Also, in this kind of situations I do not get to start with an optimal solution as I am eager to get going as quickly as possible and deliver a result.
In my opinion this is also the case when it comes to SpecFlow and CodedUI. In the middle of all getting started guides, there is not a single one tackling this two chaps in a proper way.
With this post I’ll try to spread my two cents on this argument.
Getting started with SpecFlow
SpecFlow is an extension for Visual Studio that gives us the possibility to write behavior specifications using Gherkin language. If the last phrase makes no sense to you, I will advise you to Google around keywords as BDD, ATDD or Specification-By-Example, before continuing reading further.
Out of the box, SpecFlow will add some new item templates to Visual Studio, which we can use for creating our feature files. Once the feature files are added and written, SpecFlow will help us create our binding classes, but even more importantly, it’s designer will create auto generated code that will be associated to our feature file.
Based on our settings, this auto generated code will defer. It will contain the necessary classes and attributes so that the content of our feature files can get executed by your testing framework of choice. SpecFlow supports several unit test framework to execute the acceptance tests, but as you can imagine, CodedUI is not one of them.
In order to make this happen we will need to extend the SpecFlow. If you search for the information on how to do that, you will quickly find that you can define a generatorProvider for your unitTestProvider. It can be a quick fix and there are plenty of articles about this approach. However, reading the SpecFlow documentation you will notice that it reports the following regarding the generatorProvider attribute in the configuration;
Obsolete, will be removed in v2.0. Use <plugins> instead.
So, we should use a plugin instead! Unfortunately if you check the documentation about the plugins you will be welcomed by the following note:
“Note: More information about plugins comes soon!”.
This is a point where this blog post will be useful. I will explain through an example many of the in’s and out’s you need to know about writing plugins for SpecFlow.
Let’s start.
CodedUI as Unit test provider
By CodedUI tests we usually intend the test type that allows us to perform UI automation. Still we need to distinguish a couple of things here. There is the API (the engine) for the UI automation and there is a “driver” that allows us executing our tests (test execution framework). Our execution engine recalls a lot a MS Test unit test engine and it does that with a reason. Underneath they are almost the same thing. This means that our UI automation that is offered by CodedUI framework is wrapped and executed by MS Test engine. Indeed all of the attributes used are the same except the CodedUITestAttribute which again on it’s own is based on TestClassExtensionAttribute, part of Microsoft.VisualStudio.TestTools.UnitTesting.
So why can’t we then just use MSTest provider in order to execute our CodedUI automation? We actually can do that, however in order to make it work properly in this case we need to manage correctly the calls to Playback.Initialize() and Playback.Cleanup() methods. This is not handy and it is given to us for free by applying the correct attribute CodedUITestAttribute on our test class.
Now this is going to be our goal, make sure that SpecFlow applies the CodedUITestAttribute on our designer auto generated class, instead of the one that is applied by using the MS Test provider, the TestClassAttribute.
Creating the SpecFlow plugin
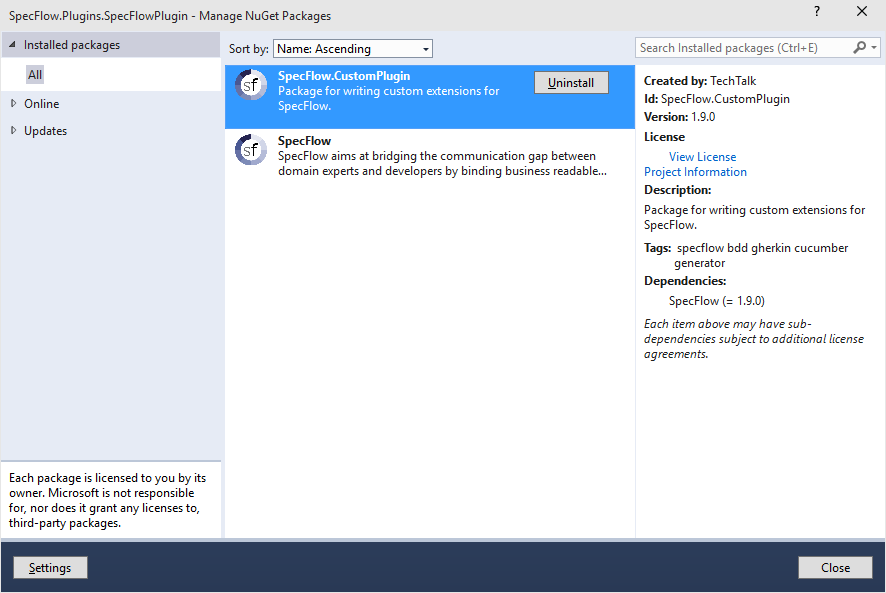
There is not much necessary for SpecFlow to load a plugin, a class that implements IGeneratorPlugin interface, a GeneratorPluginAttribute applied on the assembly level that will mark it as SpecFlow plugin and the registration in the configuration file. In practice, we need to create a class library project and as a first thing add SpecFlow.CustomPlugin Nuget package, which on it’s own, as a prerequisite will pull down also the SpecFlow package.
Once this is done, you will see that we now do have all the necessary references added to our project. We can now rename our only class (that was added by default and it’s named Class1) to CodedUIProviderPlugin and implement the IGeneratorPlugin interface (part of TechTalk.SpecFlow.Generator.Plugins namespace).
You can see that three methods are brought in by the IGeneratorPlugin interface and these method names are self explanatory; still let’s see what they should be used for:
- RegisterConfigurationDefaults – If you are planning to intervene at the SpecFlow configuration, this is the right place to get started.
- RegisterCustomizations – If you are extending any of the components of SpecFlow, you can register your implementation at this stage.
- RegisterDependencies – In case your plugin is of a complex nature and it has it’s own dependencies, this can be the right place to set your Composition Root.
Our interest will focus on RegisterCustomizations method and we will remove the exceptions that were added automatically by the Visual Studio on interface implementation.
Before we start adding any more code, let’s analyse our plan. We are going to extend MsTest2010GeneratorProvider which at the bottom is the implementation of IUnitTestGeneratorProvider interface. This will be the interface that I am going to register inside the RegisterCustomizations method and assign it to the implementation class that I will name CodedUIGeneratorProvider.
At the end, our plugin class will look like this:
public class CodedUIProviderPlugin : IGeneratorPlugin
{
    public void RegisterCustomizations(ObjectContainer container, SpecFlowProjectConfiguration generatorConfiguration)
    {
        string unitTestProviderName = generatorConfiguration.GeneratorConfiguration.GeneratorUnitTestProvider;

        if (unitTestProviderName.Equals("mstest", StringComparison.InvariantCultureIgnoreCase) ||
            unitTestProviderName.Equals("mstest.2010", StringComparison.InvariantCultureIgnoreCase))
        {
            container.RegisterTypeAs();
        }
    }

    public void RegisterDependencies(ObjectContainer container)
    { }

    public void RegisterConfigurationDefaults(SpecFlowProjectConfiguration specFlowConfiguration)
    { }
}
As you can see, I’m checking if the currently selected generation provider is MsTest provider and if so, I am registering my custom type for that given interface. This approach is not rock solid, but it works. For example you cold resolve this interface in the container and check if the returned object is of MsTest2010GeneratorProvider type, then preform the registration, but I am happy with the current solution.
Before I forget I will mark our assembly with the necessary attribute. To do so, open the AssemblyInfo.cs file and add the following attribute:
[assembly: GeneratorPlugin(typeof(CodedUIProviderPlugin))]
All of examples and techniques are valid for SpecFlow 1.9.0. For other versions the procedures may defer.
Extending MsTest2010GeneratorProvider
Instead of implementing the IUnitTestGeneratorProvider we will just slightly alter the MsTest2010GeneratorProvider. This is possible an advised because, as I mentioned above, the test execution framework of CodedUI and MS Test deffer only in one point. MsTest2010GeneratorProvider is the default MS Test provider for SpecFlow and we have a chance to override several methods in order to change/extend the behavior.
In particular I’m interested in SetTestClass method as it is responsible for generating the code of the test class. Before proceeding I need to mention a couple of things on code generation used by SpecFlow. SpecFlow leverages the CodeDom for the necessary code generation.
CodeDom or Code Document Object Model, is a set of classes part of the .Net framework itself and makes possible generation of the source code for .NET languages without knowing the target language beforehand. It’s structure and syntax can be a bit scary at the first sight but after a while you get used to it. There are a couple of concepts you will need to master before being able to understand and work with it, that’s why I encourage you to check some guidelines on web before attempting major changes. The following is one of the posts that may help – “Using CodeDOM to generate CSharp (C#) and VB code“.
Let’s get back on overriding our SetTestClass method and check my full implementation.
public class CodedUIGeneratorProvider : MsTest2010GeneratorProvider
{
    public CodedUIGeneratorProvider(CodeDomHelper codeDomHelper)
        : base(codeDomHelper)
    { }

    public override void SetTestClass(TestClassGenerationContext generationContext, string featureTitle, string featureDescription)
    {
        base.SetTestClass(generationContext, featureTitle, featureDescription);

        foreach (CodeAttributeDeclaration declaration in generationContext.TestClass.CustomAttributes)
        {
            if (declaration.Name == "Microsoft.VisualStudio.TestTools.UnitTesting.TestClassAttribute")
            {
                generationContext.TestClass.CustomAttributes.Remove(declaration);
                break;
            }
        }

        generationContext.TestClass.CustomAttributes.Add(
            new CodeAttributeDeclaration(
                new CodeTypeReference("Microsoft.VisualStudio.TestTools.UITesting.CodedUITestAttribute")));
    }
}
As you can see, as a first thing we are calling the base class implementation of the method so it can work it’s magic. Once the test method is setup, we will iterate through all of the attributes applied on that class and search the one that we are interested in, called TestClassAttribute. Once we found it, we will remove it, as it is going to be replaced with the CodedUITestAttribute in the following step. Also, we can stop cycling our loop as there can be only one occurrence of it. As just mentioned, the next and the last step is to add a new custom attribute on that class, which happens to be CodedUI’s, CodedUITestAttribute.
Job done!
Finishing touches
Before we build our new plugin and start using it, we need to take care of a small SpecFlow problem. In order for SpecFlow to be able to load our plugin, we need to name our assembly in a certain way. I checked the SpecFlow source code once I was unable to make it load and I discovered the following:
public class RuntimePluginLoader : IRuntimePluginLoader
{
	private const string ASSEMBLY_NAME_PATTERN = "{0}.SpecFlowPlugin";

	public IRuntimePlugin LoadPlugin(PluginDescriptor pluginDescriptor)
	{
		var assemblyName = string.Format(ASSEMBLY_NAME_PATTERN, pluginDescriptor.Name);
...
The above example is part of RuntimePluginLoader class, the implementation of the interface IRuntimePluginLoader that is used to load all of the plugins.
As you can see from the code sample it always searches for the assembly name that is composed from the given name in the app.config file plus the suffix “.SpecFlowPlugin”. This means that we need to add that suffix to our assembly in order to be found by SpecFlow loader. Let’s do so:
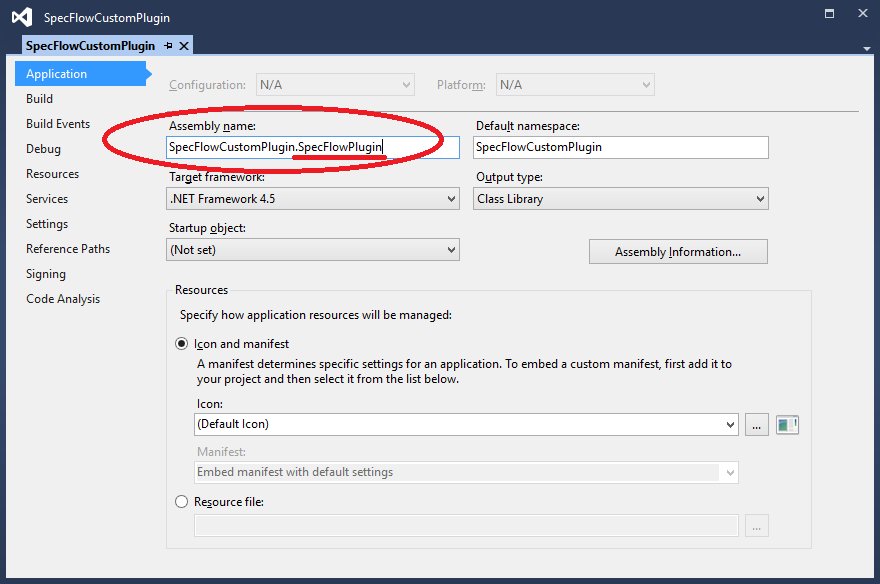
As shown in the picture above, just add the required suffix to your assembly name in the project properties.
This is very important tip, as if you do not apply this suffix, SpecFlow will not be able to load your plugin!
Now you can compile your library and start using it in your SpecFlow projects.
Practical example
In this small example I will implement, by using CodedUI, a simple scenario (that is similar to the SpecFlow default example in it’s feature item template) of testing Windows calculator.
Once I added the necessary, I will use the plugin we just created and verify that the result is as expected. For completeness I will also implement all steps of our scenario.
Make sure you have installed SpecFlow Visual Studio Extension before continuing.
At this point we need to create a new project in which we will add our feature files and leverage our newly created plugin. We can start by creating a new CodedUI project and adding to that project the SpecFlow Nuget package. Right after we added our new CodedUI project we will get prompted to generate the code for our CodedUI test.
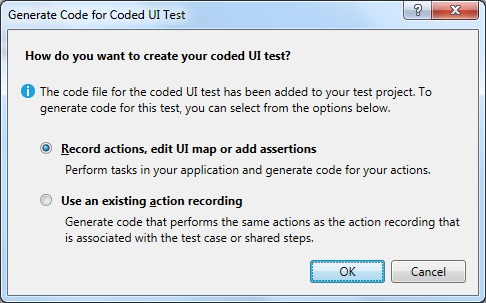
As we are not going to use the test recorder or import our automation from MTM, you can chose Cancel and close this dialog. Once that’s done we can also remove the CodedUITest1.cs file that will not be necessary. As last thing add the SpecFlow Nuget package.
Once this is in place, we can add our feature file.
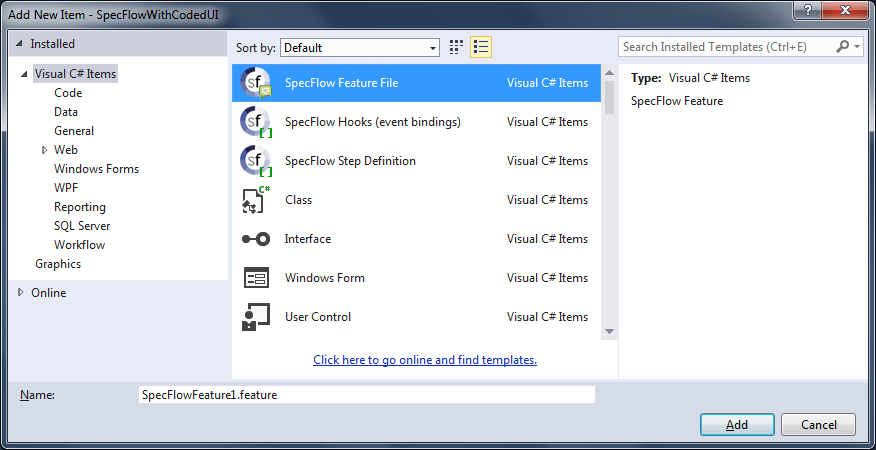
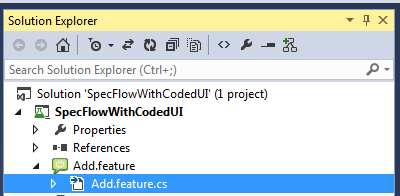
I will name our feature file, Add.feature. For this example purposes the default scenario will be just fine. But before implementing our steps, let’s check the auto generated code for the scenario in question.
Inside the solution explorer, expand your features node and select the proposed class.
The code that is presented should be similar to the following:
#region Designer generated code
#pragma warning disable
namespace SpecFlowWithCodedUI
{
    using TechTalk.SpecFlow;


    [System.CodeDom.Compiler.GeneratedCodeAttribute("TechTalk.SpecFlow", "1.9.0.77")]
    [System.Runtime.CompilerServices.CompilerGeneratedAttribute()]
    [NUnit.Framework.TestFixtureAttribute()]
    [NUnit.Framework.DescriptionAttribute("Add")]
    public partial class AddFeature
    {

        private static TechTalk.SpecFlow.ITestRunner testRunner;

#line 1 "Add.feature"
#line hidden
...
From this you can see that by default, SpecFlow used the NUnit provider to generate our tests. We can change this by indicating the desired provider inside the configuration file (App.config file which is already created by the Nuget package we previously added), open it and add the following:
As soon as you save your app.config file you will be presented with the following dialog:

Answer affirmatively to this dialog and let’s re-check our designer generated code. If all went well, you should see the following:
#region Designer generated code
#pragma warning disable
namespace SpecFlowWithCodedUI
{
    using TechTalk.SpecFlow;


    [System.CodeDom.Compiler.GeneratedCodeAttribute("TechTalk.SpecFlow", "1.9.0.77")]
    [System.Runtime.CompilerServices.CompilerGeneratedAttribute()]
    [Microsoft.VisualStudio.TestTools.UnitTesting.TestClassAttribute()]
    public partial class AddFeature
    {

        private static TechTalk.SpecFlow.ITestRunner testRunner;

#line 1 "Add.feature"
#line hidden
...
As you can see the class structure changed and the correct attributes (targeting MS Test) are now used. This means it’s time to start taking advantage of our plugin. I will create a folder on the project level, in which I will place the compiled dll of our previously created library, and I will call it bin.
Once the library is there we need to modify our app.config file in the following way:
Note that the name we used for specifying our plugin defers from the assembly name. This is because of the suffix convention I mentioned earlier. SpecFlow plugin loader will automatically suffix the assembly name with “.SpecFlowPlugin” and then your assembly name will match and will be picked up.
Last thing I want to mention is the path. When it comes to paths, SpecFlow always starts at the project level, so we need to make a step up and get inside the bin folder. The same applies in case you placed your plugin dll in another folder.
Another handy tip about path is about the SpecFlow dependencies. In case you added (as we did) SpecFlow through Nuget package, you do not need to worry as all of the dependencies will be there and will be picked up automatically. In case you do add SpecFlow manually (no Nuget) you will need to provide the generator path in the configuration file and it should look, at example, like this:
......
After all our hard work, if we now check our designer generated code we should see the following:
namespace SpecFlowWithCodedUI
{
    using TechTalk.SpecFlow;


    [System.CodeDom.Compiler.GeneratedCodeAttribute("TechTalk.SpecFlow", "1.9.0.77")]
    [System.Runtime.CompilerServices.CompilerGeneratedAttribute()]
    [Microsoft.VisualStudio.TestTools.UITesting.CodedUITestAttribute()]
    public partial class AddFeature
    {
...
As you can see, we achieved the desired result, the CodedUITestAttribute is correctly applied on our feature (test) class.
Again, job done!
CodedUI automation in binding class
We have already created our feature file which contains a scenario. I will now write the necessary code to implement the automation of our steps.
I am not interested to show and explain all of the details of creating a binding class in SpecFlow. This is why I will move quickly through the process till the effective steps implementation. In case you are interested in details check the SpecFlow Getting Started guide.
Before we start, a slightly change is necessary, in order to make our scenario usable with windows calculator:
Open the Add.feature file and adapt the scenario so it matches the following:
Scenario: Add two numbers
	Given I have entered 50 into the calculator
	And I press add
	And I have entered 70 into the calculator
	When I press enter
	Then the result should be 120 on the screen
Then right click inside the editor and from the menu choose Generate Steps Definition:
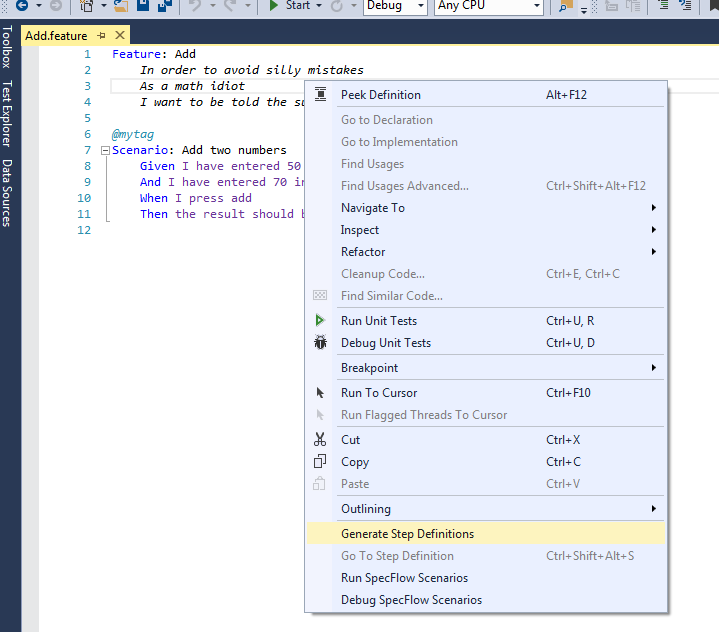
Once you selected it you will be presented with the following screen. Leave everything defaulted and press generate.
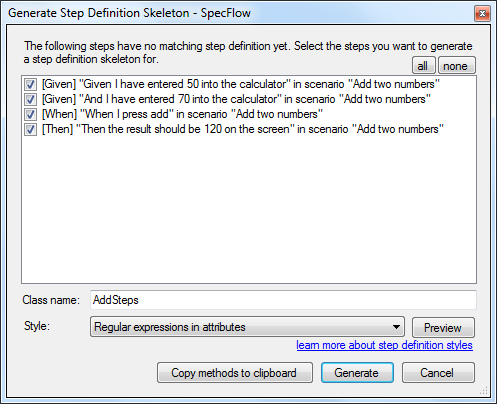
You will be prompted to save this file; do so and place it in the current projects directory. Once done open the file for editing and add the following:
[Binding]
public class AddSteps
{
    private readonly ApplicationUnderTest _aut;

    public AddSteps()
    {
        _aut = ApplicationUnderTest.Launch(@"C:\Windows\System32\calc.exe");
    }

    [Given(@"I have entered (.*) into the calculator")]
    public void GivenIHaveEnteredIntoTheCalculator(int p0)
    {
        Keyboard.SendKeys(_aut, NumbersToSendKeysString(p0));
    }

    [Given(@"I press add")]
    public void GivenIPressAdd()
    {
        Keyboard.SendKeys(_aut, "{Add}");
    }

    [When(@"I press enter")]
    public void WhenIPressEnter()
    {
        Keyboard.SendKeys(_aut, "{Enter}");
    }

    [Then(@"the result should be (.*) on the screen")]
    public void ThenTheResultShouldBeOnTheScreen(int result)
    {
        WinText resultTextBox = new WinText(_aut);
        resultTextBox.SearchProperties[UITestControl.PropertyNames.Name] = "Result";

        Assert.AreEqual(result.ToString(CultureInfo.InvariantCulture), resultTextBox.DisplayText);
    }

    protected string NumbersToSendKeysString(int number)
    {
        StringBuilder result = new StringBuilder();
        char[] numbers = number.ToString(CultureInfo.InvariantCulture).ToCharArray();

        foreach (char c in numbers)
        {
            result.AppendFormat("{{NumPad{0}}}", c);
        }

        return result.ToString();
    }
}
That was about it. Each time the AddSteps class is created (on every scenario run), a new instance of calculator is started. This behavior can be changed and we can start it if necessary, once per feature file or once per test run. I will try to cover this argument in detail in the future posts.
Every step execution will then perform a certain action helped by the automation offered by CodedUI framework.
At the end, we will assert that displayed value equals our expected value, expected result.
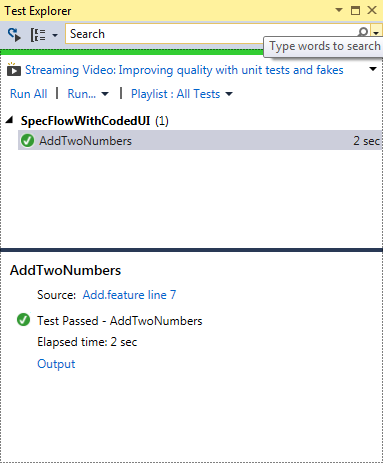
Now we can run our test and it should succeed.
It’s now on you to continue writing your scenarios and implement steps via CodedUI. All the necessary infrastructure is in place.
Final word
Obviously this is a simplified example. In a real world scenario in your binding classes you will use a POM (Page Object Model), a facade that hides the automation complexity and implementation details. Also, reuse of the application under test should be possible and is usually handled in a base class that can be used inherited by our binding class.
Generation providers are only one of many components we can personalize or substitute. If interested in other components, I will advise you to consult the SpecFlow source code on GitHub.
I attached both projects, the plugin and the example, in two separate downloads, you can find them both here:
During the migration of my blog from the WordPress.org on a self hosted instance, files in question got lost. Still I managed to find Plugin example project on my PC
Plugin example project
SpecFlow project using CodedUI automation
If you have any questions do not hesitate to ask in comments.
Happy coding!