Building Visual Studio projects with DevEnv.com

Introduction

This post is about my most successful Azure DevOps extension. Before I tell you more about the newest version, let me tell you something more about the history of it.

Several years ago, just after the TFS 2015 was released, this was one of the first build tasks I built. I had a team who demanded it as not all of the projects they were running were based on MSBuild. Also, the necessary script to perform this action was quite simple, thus, a great practice ground to start writing a custom build task (I emphasise build as the release was back then not there yet).
It turned out to be very useful, however, considering its simplicity, I never thought it may be of interest to others. It was until I wrote and published the Deploy SSIS extension that I realized that may be handy to publish this task as an extension. It is not that I suddenly changed my mind, it just made sense to describe the whole process of building and deploying SSIS projects in a blog post and I missed a building part. It turns out I was wrong a big time as this is the most used extension I wrote with over a thousand downloads from the Azure DevOps Marketplace.

What’s new in version 2

My initial implementation stayed untouched for quite some time. In the end, it is a simple task that just worked. However, some users made me notice an obvious flaw. In the project was set to be built, all of the projects in the containing solution would be built. Strangely enough the same is stated in the help page of the tool itself, it just that I never noticed it.

The first argument for devenv is usually a solution file or project file.
You can also use any other file as the first argument if you want to have the
file open automatically in an editor. When you enter a project file, the IDE
looks for an .sln file with the same base name as the project file in the
parent directory for the project file. If no such .sln file exists, then the
IDE looks for a single .sln file that references the project. If no such single
.sln file exists, then the IDE creates an unsaved solution with a default .sln
file name that has the same base name as the project file.

I address this issue by adding a separate filed for the solution and for the project. As this is a breaking change for the existing users, I published a new major version of the task.
Some minor improvements are also now included in the new version.
The first issue ever to be reported was actually a feature request. It was asked if the search for the solution file can be performed so that the wildcards can be used as parameters for the solution input field. This is now addressed.
Also, all of the dependency libraries are now updated to the latest available version. These are ‘Task Library’ which is now v0.11.0 and ‘VSSetup library’ that was boosted to v2.2.5. This also bring some changes to the retrieval of the path of the DevEnv come to accommodate the newly added Visual Studio 2019 option.

What’s next

Although the task is focusing on windows tooling and needs windows only tooling to be present on the build agent, the PowerShell implementation is somewhere limiting. The next step will be rewriting the task in TypeScript. Not a huge added value, however, it is making this extension easier to maintain in the future.

Truly my hopes are in Microsoft basing all of their projects on MSBuild (as they recently did for SSRS projects) and making this extension obsolete. However, for time being, this is one of the puzzle pieces, that could help you in automating your MS BI pipelines.
XL Deploy in VSTS/TFS build/release pipelines

Introduction

Circa a year ago I showed you how to use XebiaLabs Team Foundation Server 2015 XL Deploy plugin to create, import and deploy, XL Deploy Deployment Archives, on TFS and VSTS. With a new version of the plugin, that is now renamed into VSTS extension for XL Deploy, XebiaLabs delivers two more build/release tasks. This tasks are supported both by build and release pipelines in VSTS and Team Foundation Server. This will allow us to be more granular and chose to perform only certain operations at each stage, in our pipelines. We can at example choose to create our XL Deploy Deployment Archive during the build and later on, in our release definition, deploy the same artifact in different environments, using XL Deploy.
In the following post, I’ll show you an example on how to achieve this by using our two new tasks, respectively, Package with XL Deploy build task and Deploy with XL Deploy build task.

Building the artifact

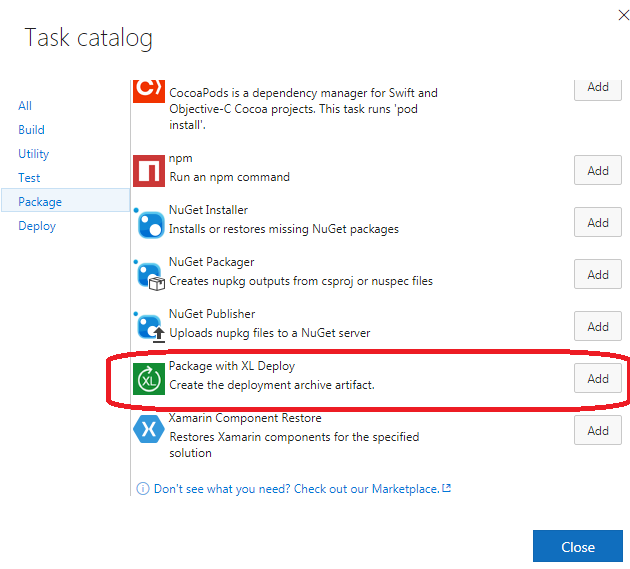
As in my previous post, we will keep our Visual Studio Build, however, instead of using the XL Deploy build task, we will add Package With XL Deploy task which you can find in the Package category in the Task Catalog

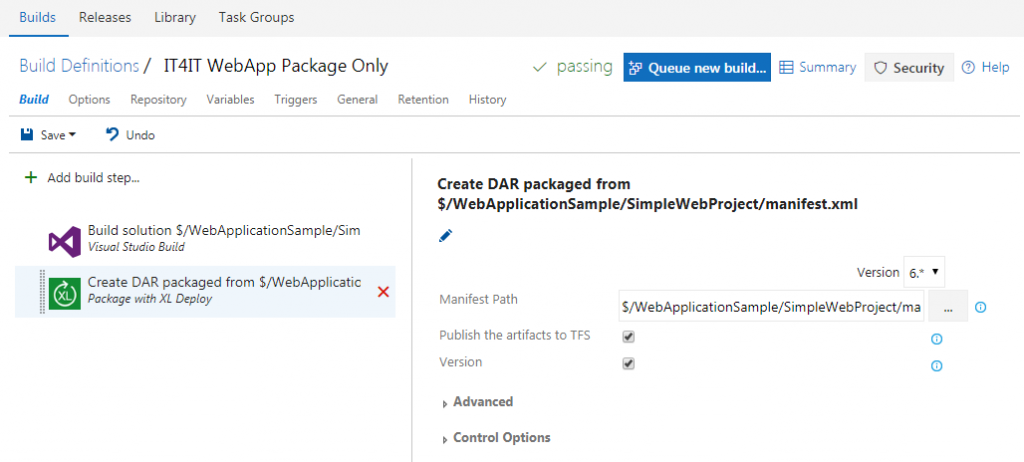
Once added, we need to point it to the right manifest path, chose if we want the task to set the version of the created package based on the build number and, in our case, Publish the artifact to TFS. In this way once the package is created, it will be uploaded to TFS and associated as an artifact to the current build. At the end the result should be similar to the following.

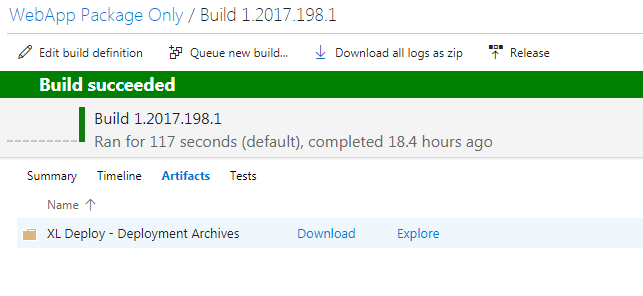
You can now try your build and at the end, if successful, you should see our DAR package under the build artifacts.

If you can see your artifact uploaded, we can move to the next step.

Deploying from the VSTS Release Management

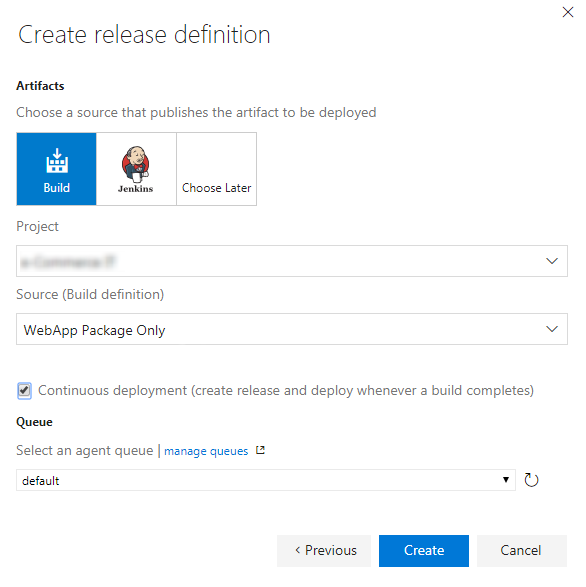
We are going now to create a new release definition and start with an empty template. As artifact source we are going to indicate a build and select from the relevant drop-down, build definition that we created in our previous step. You also may choose to select a continuous deployment option and a specific build queue for this build.

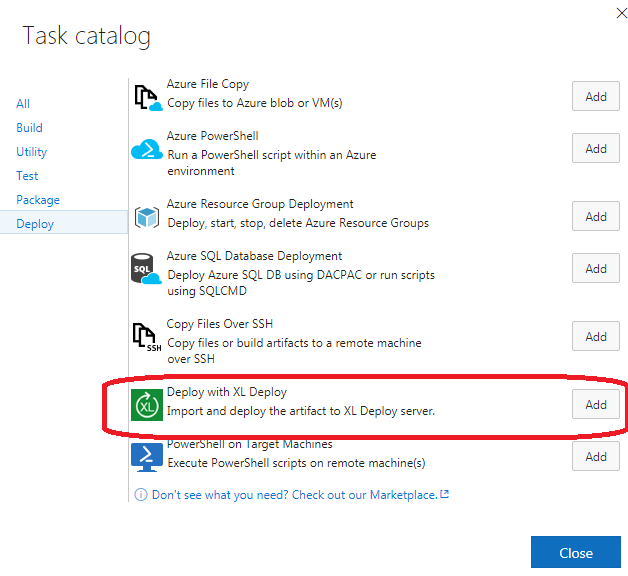
Once the release definition is created, for your initial Environment, choose Add task and select Deploy with XL Deploy from the task catalog.

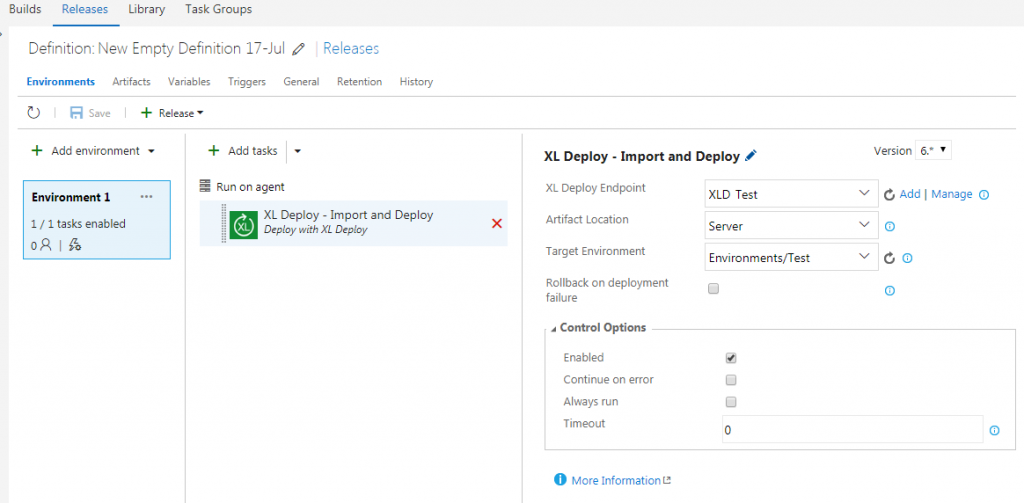
This task will allow us to import the DAR package into XL Deploy and trigger the deployment for the desired environment. Bare in mind that it will check if the package is already in XL Deploy and, if so, will skip the import. This means that if you are using it multiple times for different environment definitions, it will behave as efficiently as possible.

Now we need to select the XL Deploy Endpoint, which indicates the instance of XL Deploy we are using for this deployment and fill in the necessary indications about the artifact location and the name of our target environment. For what concerns the XL Deploy Endpoint you can get further information in Add an XL Deploy endpoint in Visual Studio Team Services document. Artifact can be ‘picked up’ from the Server, it means that it will be made available by the release itself, or it can be retrieved from the file share. In our case it will be delivered by the release which will gets it from the associated build.

That’s all! Now we can create a new release and let our task delegate the deployment to XL Deploy.

Conclusion

We saw how can we leverage the new build/release tasks to interact with XL Deploy in different phases of our Build/Release process.

You can find more VSTS specific information at the following link or more information about the VSTS extension for XL Deploy here.