Using Windows Machine File Copy (WinRM) VSTS extension
Implementation of the original Windows Machine File Copy task is based on Net Use Command and Robocopy. This command makes use of the SMB (server message block) and the Netbios protocol on port 139 or 445. Although by default this should be always supported in Intranets, it may be that due to the network restrictions or security policies it is not possible to setup such a connection or you are running a copy on a machine that is out of your local network. Recently I faced an issue copying files with Windows Machine File Copy task due to the SMB restrictions. This pushed me to recreate the same task as the original Windows Machine File Copy task, however with the transfer based on WinRM protocols. I shared my work in a form of an extension on Visual Studio Team Services – Visual Studio Marketplace. You can find my extension here WinRm File Copy.
Sources are available on GitHub in the repository called mmajcica/win-rm-file-copy, meanwhile the original implementation is part of the Microsoft/vsts-tasks repository.
In this post I will not go into the implementation details, just illustrate the usage of the task itself.
Usage wise, there are no differences with the original Microsoft task and this was also my main goal. Here is a screenshot of the task:
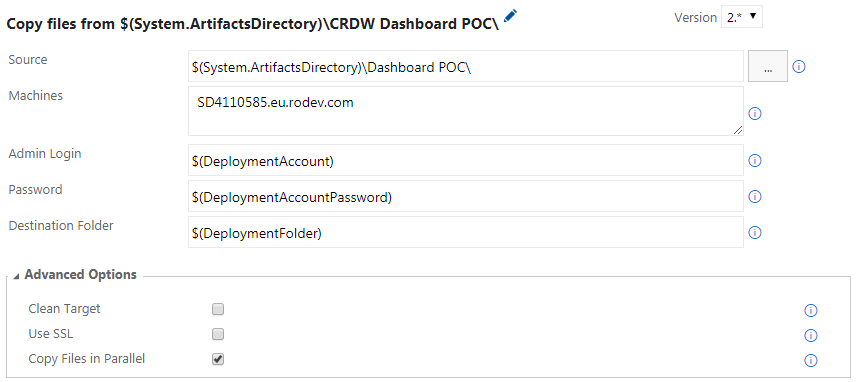
As you can see, all of the parameters are almost the same as for the original task.
Requirements wise, PowerShell V5 is required both on the build server as on the destination machine. And that is the only requirement, given for granted that WinRM is correctly setup.
Let’s quickly see how to set up a file copy. As for the Microsoft task, you need to specify the following parameters:
- Source: The source of the files. As described above using pre-defined system variables like $(Build.Repository.LocalPath) make it easy to specify the location of the build on the Build Automation Agent machine. The variables resolve to the working folder on the agent machine, when the task is run on it. Wild cards like **/*.zip are not supported. Probably you are going to copy something from your artifacts folder that was generated in previous steps of your build/release, at example $(System.ArtifactsDirectory)\Something
- Machines: Specify comma separated list of machine FQDNs/ip addresses along with port(optional). For example dbserver.fabrikam.com, dbserver_int.fabrikam.com:5988,192.168.34:5989.
- Admin Login: Domain/Local administrator of the target host. Format:
\ < Admin User>. - Password: Password for the admin login. It can accept variable defined in Build/Release definitions as ‘$(passwordVariable)’. You may mark variable type as ‘secret’ to secure it.
- Destination Folder: The folder in the Windows machines where the files will be copied to. An example of the destination folder is C:\FabrikamFibre\Web.
- Use SSL: In case you are using secure WinRM, HTTPS for transport, this is the setting you will need to flag.
- Clean Target: Checking this option will clean the destination folder prior to copying the files to it.
- Copy Files in Parallel: Checking this option will copy files to all the target machines in parallel, which can speed up the copying process.
There is not much more to say. If you need to copy a file or a folder, from your build agent, in a target folder on a remote machine, using WinRm as a transfer media, this is the way to go.
Happy coping!