Securing Nexus Repository Manager OSS
Recently one of my articles got published on SonaType web site. It is based on my blog post Nexus Repository Manager OSS as Nuget server, which, after reviewing it for SonaType blog, somehow didn’t seemed complete. Thus, I decided to add an extra chapter about the security which I would like to share with you, also on my personal blog, here.
Security
I suppose that your computers are part of an Active Directory domain. I will propose here a setup to make your new Nexus instance dialogue with your domain controller when it comes to authenticating users. Why? Well, uploading packages to the hosted repository requires an API-key and it is assigned on per user basis. If you wish that your users (services) to be distinguished and limit some of them, you would need to setup the authentication and roles correctly. You could do this by simply using Nexus internal database, however, as we all know, adding users manually and creating another identity, from convenience and maintenance prospective is not recommendable. Not to speak about the security implications.
Setting up LDAP connection
In the left-hand main menu panel expand the security group and select the LDAP Configuration option. A new tab will open and you will be presented with a long list of parameters:
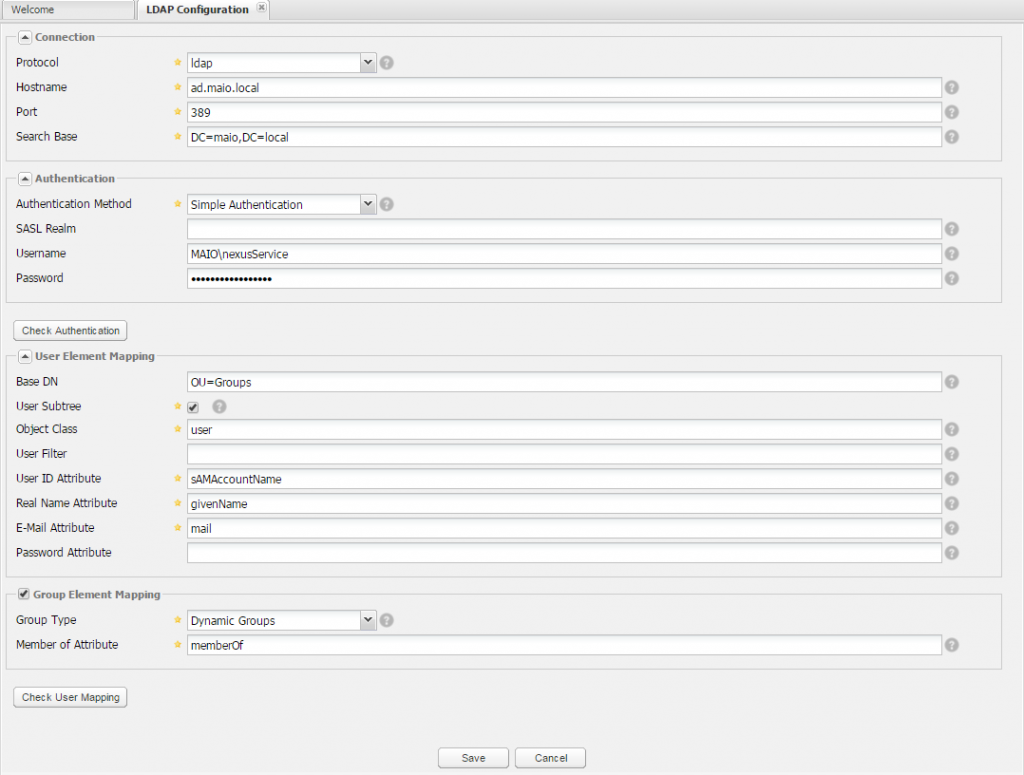
We are going to analyze them one by one and explain the values you do need to enter in order to make this connection work.
Protocol
Here you have two choices Lightweight Directory Access Protocol and the Lightweight Directory Access Protocol over SSL. Probably you are going to use just a simple LDAP protocol and not the
Hostname
The hostname or IP address of the LDAP server. Simply add the FQDN towards your domain controller.
Port
The port on which the LDAP server is listening. Port 389 is the default port for the ldap protocol, and port 636 is the default port for the ldaps.
If you have a multi domain, distributed Active Directory forest, you should connect to the Active Directory through port 3268. Connecting directly to port 389 might lead to errors. Port 3268 exposes Global Catalog Server that exposes the distributed data. The SSL equivalent connection port is 3269.
Search Base
The search base is the Distinguished Name (DN) to be appended to the LDAP query. The search base usually corresponds to the domain name of an organization. For example, the search base on my test domain server could be dc=maio,dc=local.
Authentication Method
Simple authentication is what we are going to use in first instance for our Active Directory authentication. It is not recommended for production deployments not using the secure ldaps protocol as it sends a clear-text password over the network. You can change
Username
For the LDAP service to establish the communication with the AD server, a valid account is necessary. Usually you will create a service account in your AD for this purpose only.
Password
Password for the above mentioned account.
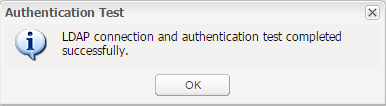
This is the first part of configuration. Now we need to check if what we entered is valid and if the connection can be established.
Click on Check Authentication button and if the configuration is valid, you should get the following message:
Base DN
You should indicate in which organizational unit Nexus should search for user accounts. By default it can equal to ‘cn=users’ however if you store your user accounts in a different OU, please specify the full path. An example, if you created an OU at the root level called MyBusiness then an OU called Users, you will need to specify the following value as base DN, ‘OU=Users,OU=MyBusiness’.
User Subtree
This needs to be check only if you are having other OU’s, under the one specified in Base DN, in which users are organized. If that is not the case, you can leave it unchecked.
Object Class
For AD it needs to be set yo ‘user’.
User ID Attribute
In the MS AD implementation this value equals to sAMAccountName
Real Name Attribute
You can set this to ‘givenName’ attribute, or simply to cn if givenName is not used during the user creation.
E-Mail Attribute
This attribute should map to ‘mail’
Group Type
Group Type needs to be set to Dynamic Groups.
Member Of Attribute
In case of MS AD this equals to ‘memberOf’.
Now that we have set all of the relevant values, we can ask Nexus OSS to give us a preview of retrieved accounts and mappings to make sure everything is set up correctly. Click on the Check User Mapping button and you should see a preview of the retrieved values and how they are mapped into Nexus OSS. If everything looks fine , save your configuration.
Once the configuration is persisted, the last thing to do is to let Nexus know that you would like to use this new setup for the authentication. This is done by enabling the LDAP Authentication Realm.
In the left-hand main menu panel, from the administration group, choose Server. In the nexus tab that opens, go to the security settings
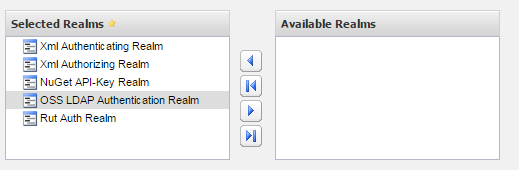
You will find the OSS LDAP Authentication Realm in the group shown on the right side, called Available Realms. Move it to Selected realms (as shown in the picture above) and save this settings.
Configuring roles
Now that we are able to authenticate through LDAP (AD) we need to set who can do what. This is when the roles do get handy. I usually create security groups and then associate them to roles as this moves the operations of granting the access rights to merely assigning a user to a group.
You can still associate roles to the user in more or less the same way, however I’m going to show you my favorite approach.
From the left-hand main menu panel, in the Security group, select Roles. A new tab showing a list of roles will appear.
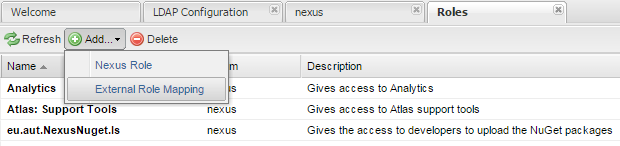
Choose Add and then External Role Mapping option. You will then be presented with the following dialog:
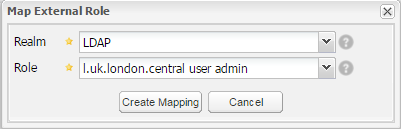
As you can see from this screenshot, choose LDAP as Realm and the role (an AD security group to be precise) you wish to map. Be aware that in some cases, not all of the groups will be listed. It is a well know bug. If this is your case, there is a workaround. Add a Nexus Role instead of the External Role Mapping and name the role precisely as your missing group is named. This should do the trick until this issue gets solved.
Once the mapping is added, you will need to assign roles (actual rights) to selected security group.
On the Role/Privilege Management bar, choose Add button and select the following roles:
- Nexus API-Key Access
- Nexus Deployment Role
- Repo: All NuGet Repositories (Full Control)
- Artifact Upload
These set of rights will enable whoever part of that group to login in Nexus OSS, manually upload packages, get the API-Key, and generally to control all NuGet repositories. In other words, a sort of developers role when it comes to NuGet.
When it comes to administrator role, it is sufficient to assign only the Nexus Administrator Role.
At the end of selecting roles, do not forget to click on Save button and persist this configuration.
This two basic profiles should be sufficient to start using Nexus. If further profiles are necessary, check the managing roles guide.
You can now test all of our security setup. Make sure you AD user account is part of the administrative security group that you just mapped to Nexus Administrator Role. Log out and log back in with your domain account. If you succeed to login, congratulations LDAP is set correctly.