Automate setting ‘Retain indefinitely’ flag on your releases

Overview

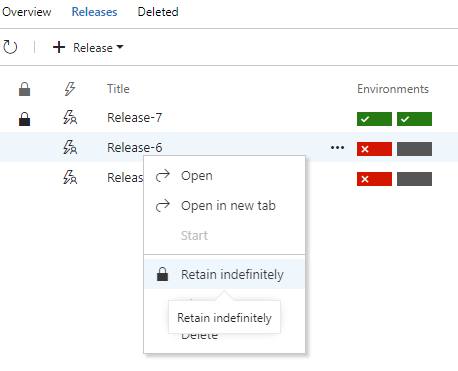
As a common practice, after a successful release to production, often there is a need to retain the involved artifact and relevant release information for a certain amount of time. In order to avoid that a retention policy removes this information, you will mark that release with a Retain indefinitely flag, by choosing that option from the VSTS UI.

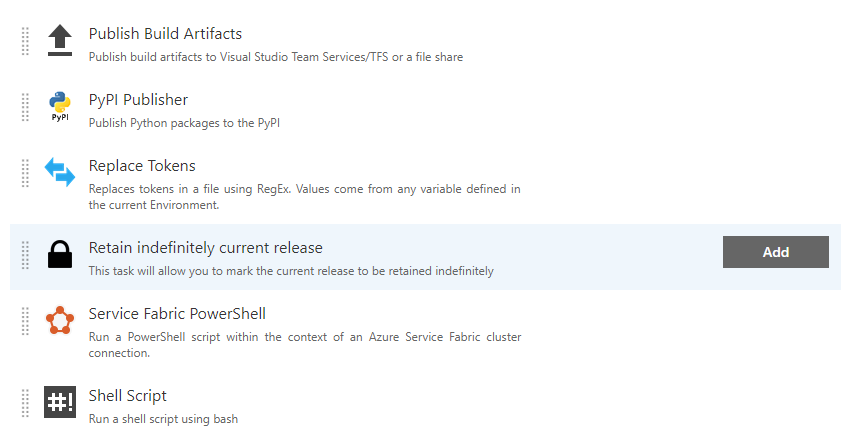
As this is a manual process that I would like to automate, I will use the Retain indefinitely current release task available in VSTS Marketplace.

After installing the extension, in the list of available tasks, check the Utility category and you’ll find the above-mentioned task.

Only a single parameter is presented by the task in a form of a checkbox labelled Mark the current release to be retained indefinitely. By default is set to true. If checked, it will mark the current release with Retain indefinitely flag. Otherwise, it will take the Retain indefinitely flag off the current release.

I will add it only to my production environment process and I will place it as the last task. E.g.

This is because I do not want this task to execute if any of the previous tasks in the process do fail. It should execute only if I managed to deploy my application in production. That is the criteria for retaining this release for a longer time.
The only requirement for this task to run is that the account on which the build agent is running has sufficient privileges to set Retain indefinitely flag.

That’s all. Now you do not need to remember to set the Retain indefinitely flag after every successful production release.

UPDATE:

After extensive testing, I noticed that it’s mostly the case that additional rights do need to be granted for the build agent identity in order for this task to succeed.
In case the permissions are missing, a similar error will be visible in the log:

##[error]VS402904: Access denied: User Project Collection Build Service (mummy) does not have manage releases permission. Contact your release manager.

Edit the security settings for that particular release or for all the releases and set the following to the needed account.

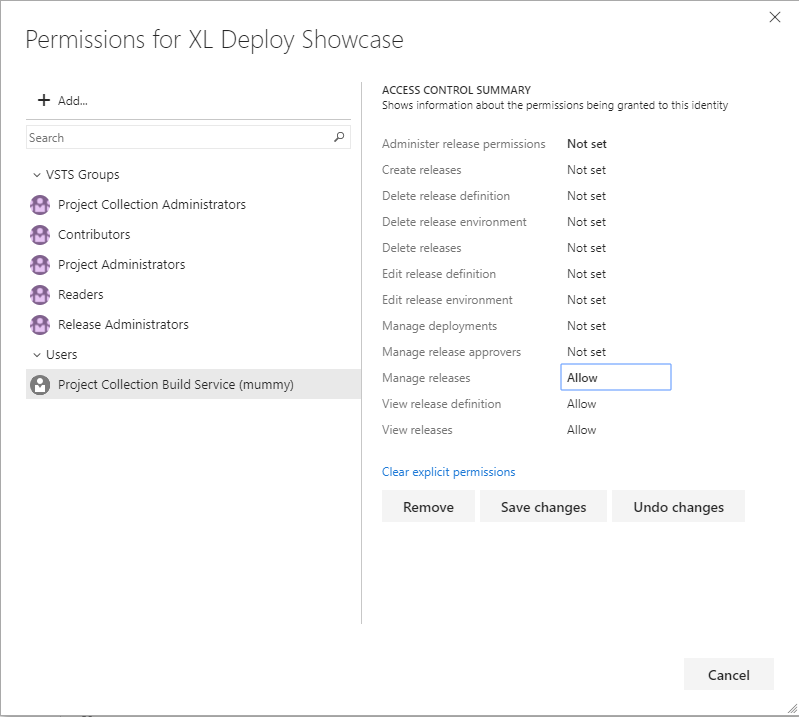
Make sure ‘Manage Releases’ permission is granted for the indicated user.

Another note is that also the cross-platform agents are supported starting from the version 2.x of the extension. If you check on GitHub you’ll see that the task has been re-written and it is now based on node provider with the code written in TypeScript.

Uploading build/release tasks to VSTS

Let’s start with why? Why would someone upload a task directly to TFS/VSTS? You can just install or update the extension that added those tasks, no?!?! So why?
Obviously there are many reasons, and aside the development of the tasks themselves, often is a case when you find and fix a bug in a task that you need to get in production ASAP. Notifying third party and waiting for a new version of the extension is often not acceptable.
But there is already a tool that Microsoft made for handling tasks! Does TFS-CLI tells you nothing? Sure, tool that works very well and which I mentioned already in several occasions on my blog. Still, getting it requires Java Runtime Environment, NodeJs, tool itself, configuration. These are often not available out of the box and if you are doing this things occasionally, a better way may be a simple script.

Following is a script I do use:

param(
   [Parameter(Mandatory=$true)][string]$TaskPath,
   [Parameter(Mandatory=$true)][string]$VstsUrl,
   [Parameter(Mandatory=$true)][string]$Pat
)

# Load task definition from the JSON file
$taskDefinition = (Get-Content $taskPath\task.json) -join "`n" | ConvertFrom-Json
$taskFolder = Get-Item $TaskPath

# Zip the task content
Write-Output "Zipping task content"
$taskZip = ("{0}\..\{1}.zip" -f $taskFolder, $taskDefinition.id)
if (Test-Path $taskZip) { Remove-Item $taskZip }

Add-Type -AssemblyName "System.IO.Compression.FileSystem"
[IO.Compression.ZipFile]::CreateFromDirectory($taskFolder, $taskZip)

# Prepare to upload the task
Write-Output "Uploading task content to $VstsUrl"

$taskZipItem = Get-Item $taskZip
$encodedCredentials = [System.Convert]::ToBase64String([System.Text.Encoding]::ASCII.GetBytes(":$Pat"))

$headers = @{ Authorization = "Basic $encodedCredentials"; "Content-Range" = "bytes 0-$($taskZipItem.Length - 1)/$($taskZipItem.Length)"}

$url = "{0}/_apis/distributedtask/tasks/{1}?api-version=2.0-preview" -f $VstsUrl, $taskDefinition.id

try
{
	Invoke-RestMethod -Uri $url -Headers $headers -ContentType application/octet-stream -Method Put -InFile $taskZipItem
	Write-Host "Task uploaded successfully" -ForegroundColor Green
}
finally
{
    Remove-Item -LiteralPath $taskZip -Force
}

To invoke this, it is sufficient to provide the path to the folder containing the task, url towards your VSTS account (in case of TFS, path to the collection) and your personal access token. E.g.

.\TaskUploader.ps1 .\task\ https://myaccount.visualstudio.com jx3sa4h3cb56ehftgrjitj6kctei3pp7usuyxkoim5vpeqcgn7eq

That’s all.

Using Windows Machine File Copy (WinRM) VSTS extension

Implementation of the original Windows Machine File Copy task is based on Net Use Command and Robocopy. This command makes use of the SMB (server message block) and the Netbios protocol on port 139 or 445. Although by default this should be always supported in Intranets, it may be that due to the network restrictions or security policies it is not possible to setup such a connection or you are running a copy on a machine that is out of your local network. Recently I faced an issue copying files with Windows Machine File Copy task due to the SMB restrictions. This pushed me to recreate the same task as the original Windows Machine File Copy task, however with the transfer based on WinRM protocols. I shared my work in a form of an extension on Visual Studio Team Services – Visual Studio Marketplace. You can find my extension here WinRm File Copy.

Sources are available on GitHub in the repository called mmajcica/win-rm-file-copy, meanwhile the original implementation is part of the Microsoft/vsts-tasks repository.

In this post I will not go into the implementation details, just illustrate the usage of the task itself.

Usage wise, there are no differences with the original Microsoft task and this was also my main goal. Here is a screenshot of the task:

As you can see, all of the parameters are almost the same as for the original task.

Requirements wise, PowerShell V5 is required both on the build server as on the destination machine. And that is the only requirement, given for granted that WinRM is correctly setup.

Let’s quickly see how to set up a file copy. As for the Microsoft task, you need to specify the following parameters:

  • Source: The source of the files. As described above using pre-defined system variables like $(Build.Repository.LocalPath) make it easy to specify the location of the build on the Build Automation Agent machine. The variables resolve to the working folder on the agent machine, when the task is run on it. Wild cards like **/*.zip are not supported. Probably you are going to copy something from your artifacts folder that was generated in previous steps of your build/release, at example $(System.ArtifactsDirectory)\Something
  • Machines: Specify comma separated list of machine FQDNs/ip addresses along with port(optional). For example dbserver.fabrikam.com, dbserver_int.fabrikam.com:5988,192.168.34:5989.
  • Admin Login: Domain/Local administrator of the target host. Format: \ < Admin User>.
  • Password: Password for the admin login. It can accept variable defined in Build/Release definitions as ‘$(passwordVariable)’. You may mark variable type as ‘secret’ to secure it.
  • Destination Folder: The folder in the Windows machines where the files will be copied to. An example of the destination folder is C:\FabrikamFibre\Web.
  • Use SSL: In case you are using secure WinRM, HTTPS for transport, this is the setting you will need to flag.
  • Clean Target: Checking this option will clean the destination folder prior to copying the files to it.
  • Copy Files in Parallel: Checking this option will copy files to all the target machines in parallel, which can speed up the copying process.

There is not much more to say. If you need to copy a file or a folder, from your build agent, in a target folder on a remote machine, using WinRm as a transfer media, this is the way to go.

Happy coping!