Passing values between TFS 2015 build steps

Introduction

It may happen that you need to pass or make available a value from one build step in your build definition, to all other build steps that are executed after that one. It is not well documented, but there are two ways of passing values in between build steps.
Both of the approaches I am going to illustrate here are based on setting a variable on the task context. The first task can set a variable, and following tasks are able to use the variable. The variable is exposed to the following tasks as an environment variable. When ‘issecret’ option is set to true, the value of the variable will be saved as secret and masked out from log.

In order to test my approaches, I made 4 build tasks, two of them for the first approach and two of them for the second one. They look something like this:

task-1-set

You can download all of the examples here.

Task Logging Command

Build task context supports several types of logging commands. Logging command are a facility available in the run context of the build engine and do allow us to perform some particular actions. A full list of available logging commands is available here. Be aware that some of them are only available since a certain version of the build agent, and before using them check the minimum agent version for clarity, eventually limit your build task to the indicated version.
In our example, I will use a variable provided as a parameter to my task with a value set from the UI, print the value out and store it in the task context. This will be my build task called task1. Once I set the task manifest correctly, I will upload it to my on-premise TFS (it will also work on VSTS/VSO). Let’s check the code.

Write-Output "Message is: $msg"
Write-Output ("##vso[task.setvariable variable=task1Msg;]$msg")

Now, I will create another task and call it task2. This task will try to retrieve the value from the task context, then print the value out. Following is the code I’m using.

$task1Msg = $env:task1Msg

if ($task1Msg)
{
	Write-Output "Value of the message is set and equals to $task1Msg"
}
else
{
	Write-Output "Value of the message is not set."
}

You can find all of the examples I’m using available for download here.

If you now set your build definition with tasks task1 and task2, you will see that based on what you set as a Message in task1, will be visualized in the console by the task2.

task-1-2-run

Set-TaskVariable and Get-TaskVariable cmdlets

The same result can be achieved by using some cmdlets that are made available by the build execution context. We are going to create a task called task3 which will have the same functionality as task1, but it will use a different approach to achieve the same. Let’s check the code:

Import-Module "Microsoft.TeamFoundation.DistributedTask.Task.Common"
    
Set-TaskVariable "task1Msg" $msg 

As you can see we are importing modules from a specific library called Microsoft.TeamFoundation.DistributedTask.Task.Common. You can read more about the available modules and exposed cmdlets in my post called Available modules for TFS 2015 build tasks.
After that we are able to invoke the Set-TaskVariable cmdlet and pass the variable name and value as parameters. This will do the job.

In order to retrieve task we need to import another module which is Microsoft.TeamFoundation.DistributedTask.Task.Internal. Although those are quite connected actions, for some reason Microsoft decided to package them in two different libraries. We are going to retrieve our variable value in the following way:

Import-Module "Microsoft.TeamFoundation.DistributedTask.Task.Internal"

$task1Msg = Get-TaskVariable $distributedTaskContext "task1Msg"

if ($task1Msg)
{
	Write-Output "Value of the message is set and equals to $task1Msg"
}
else
{
	Write-Output "Value of the message is not set."
}

As you can see we are invoking the Get-TaskVariable cmdlet with two parameters. First one is the task context. As for other things, build execution context will be populated with a variable called distributedTaskContext which is of type Microsoft.TeamFoundation.DistributedTask.Agent.Worker.Common.TaskContext and beside other exposes information like ScopeId, RootFolder, ScopeType, etc. Second parameter is the name of the variable we would like to retrieve.

The result still stays the same as you can see from the following screenshot:

task-3-4-run

Conclusion

Both approaches will get the job done. It is on you to choose the preferred way of storing and retrieving values. A mix of both also works. You need to experiment a bit with the build task context and see what works for you the best. Be aware that this is valid at the moment I’m writing this, and it is working with TFS 2015, TFS 2015.1 and with VSTS as of 2016-02-19. Seems however that in the near future all of this will be heavily refactored by Microsoft, then my guide will not be relevant anymore.

Stay tuned!

Nexus Repository Manager OSS as Nuget server

Introduction

In the past years I heard a lot of bad excuses when it came to NuGet package management. Mentioning Nexus in many .Net shops I had a chance to work in, put a strange ‘fear feeling’ in the air. None of those two chaps are to be in fear off and, surprise surprise, they work exceptionally well together. In this post I would like to tell you how to set up a NuGet proxy repository and a local, private, NuGet repository on Nexus Repository Manager OSS. I will guide you through the installation of Nexus Repository Manager OSS and all of the necessary setup tasks in order to create your own NuGet server that will proxy the calls to NuGet.org and store your own packages. I will mentions also some details about the configuration and maintenance and show you how to set up your tooling in order to work with it. It is going to be a pretty long post, so if interested, keep on reading. I hope that I can convince you to give a change to Nexus and get the best out NuGet.

Prerequisites

In order ton install Nexus you need to make sure that a couple of things are in place.
First thing, make sure JRE is installed. In the command prompt run java -version. If command executed successfully you are ready to go. If not, download the right version for your OS at http://www.java.com/en/download/manual.jsp. Still make sure that you are running at least JRE version 8u31+, as it is strongly recommended by SonaType.

Operating system requirements are specified at the following link https://support.sonatype.com/hc/en-us/articles/213464208-Sonatype-Nexus-System-Requirements.

Download the latest version of SonaType Nexus at http://www.sonatype.org/nexus/go/. At the moment of writing the current version is 2.12.0.

Installing Nexus

In order to install Nexus Repository Manager OSS, you need to extract the content of the downloaded file inside a directory. In my case this will be D:\Nexus. Once done get inside a folder called nexus-2.x.x-xx\bin and execute the following commands, nexus install, and once done, nexus start. You will see something similar to this:

D:\Nexus\nexus-2.12.0-01\bin>nexus install
wrapper  | nexus installed.

D:\Nexus\nexus-2.12.0-01\bin>nexus start
wrapper  | Starting the nexus service...
wrapper  | Waiting to start...
wrapper  | nexus started.

D:\Nexus\nexus-2.12.0-01\bin>

Now let’s get on the default address http://localhost:8081/nexus.

If all went well you should see the following:

welcome_screen

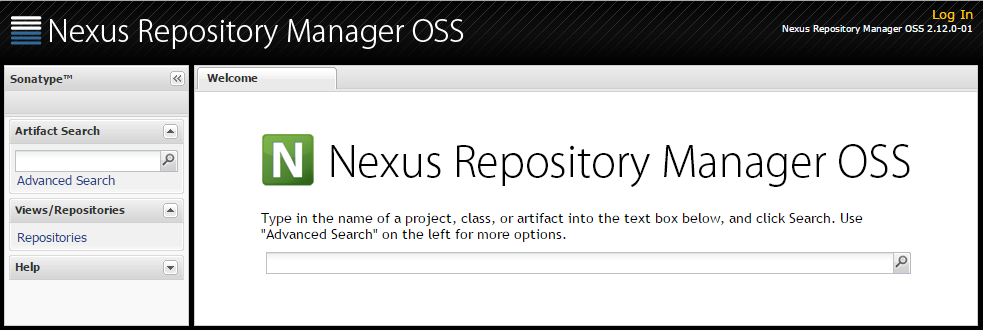
Login by following the link in the up-right corner. Default administrative account is admin with a password equal to admin123. Once logged in you will see in the menu on the left side additional options. We are now ready to start configuring our repositories.

I also advise you to check the list of recommended post installation configuration steps in the Post-Install Checklist.

Nuget proxy repository

By default, Nexus Repository Manager OSS ships pre-configured with several repositories. If you intend to used it only as a Nuget repository/proxy you can remove all of them.

repositories

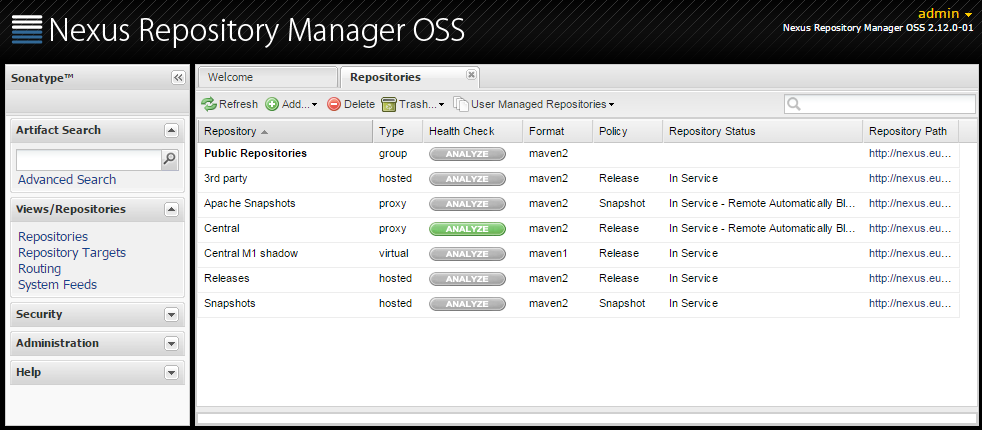
This happens to be my case, so I will remove all of the pre-configured repositories. Once you delete all of them, you should see a message saying, No repositories defined.

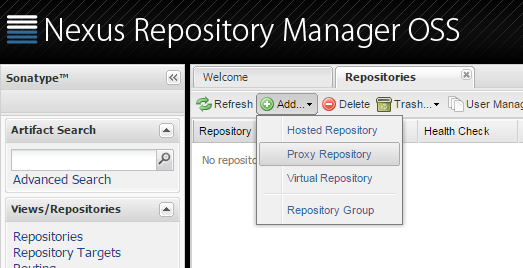
I will now add a repository that will proxy calls towards the Nuget.org public repository. Click on add a choose Proxy repository.

add_proxy_repo

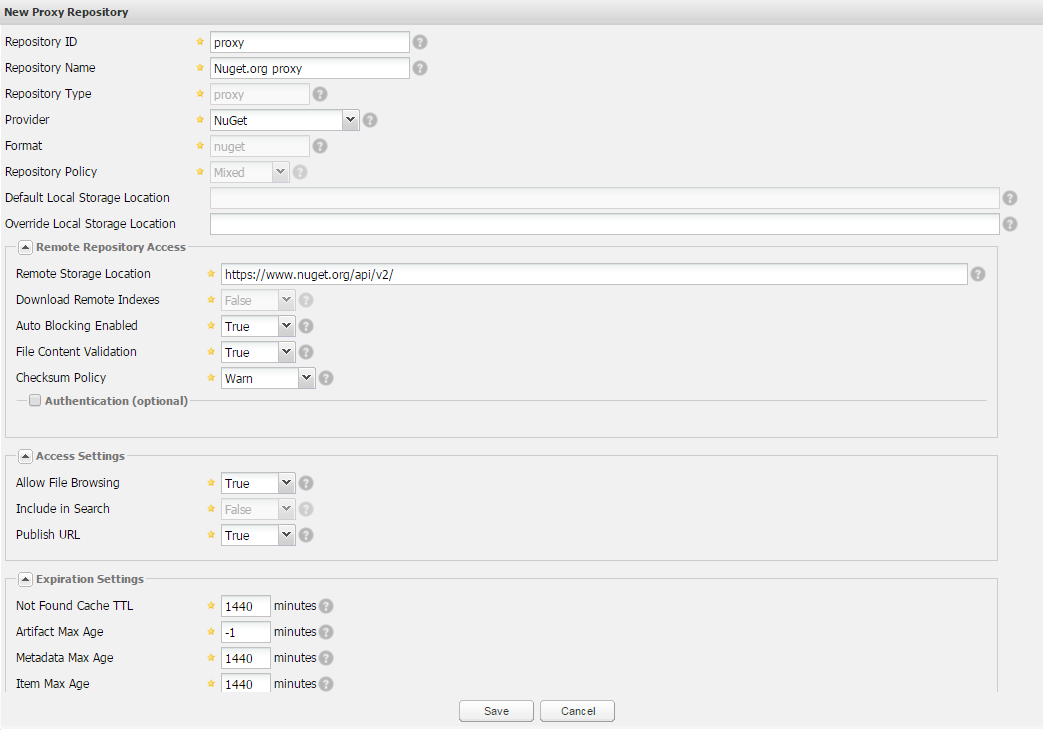
At the bottom of the screen you will be asked to fill in all the necessary details. Let’s analyse the important ones.

Repository ID: I am going to choose a vary concise name here, as this will be a part of our feed url. I will set it to proxy.

Repository Name: This is just a name that will be assigned to this repository and it will only be visible from the Nexus repositories management interface. I will set it to Nuget.org proxy.

Provider: It needs to be set to NuGet.

Remote Storage Location: Here we will set the link to the NuGet.org feed. Currently it is https://www.nuget.org/api/v2/

This are all of the necessary parameters. Once filled in, you can click on Save.

new_proxy_repo

If you now select the just created repository and then open the NuGet tab, you will find the link to your feed. In my case it is http://localhost:8081/nexus/service/local/nuget/proxy/.
First part of the link is obviously wrong. You will not be able to use this feed from any other machine than the server itself. It is displayed as local host as that is the url that we used to access the administration interface. It needs to be http://yournexusservername:8081/nexus/service/local/nuget/proxy/ where yournexusservername is the name of the machine. We will see later how to influence this url.

Nuget private repository

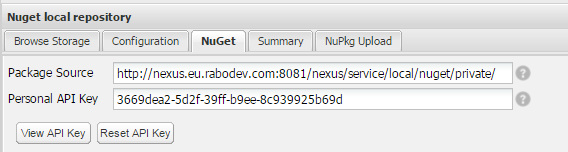
In case you have your own, private NuGet packages, that you would like to publish and retrieve, Nexus Repository Manager OSS can help you with that too. You need to create a hosted repository. For this repository you need to set the same settings as for the proxy, except the Remote Storage Location. I’ve set Repository ID to ‘private’ and Repository Name to ‘Nuget local repository’.
Once created, under the NuGet tab, you will find the personal API key that you need to use via NuGet.exe in order to push a package to this repository.

api_key

One last step is necessary before you get to be able to upload your packages. We need to enable the authentication and to do so, you will need to set NuGet API-Key Realm.

security_settings_realms

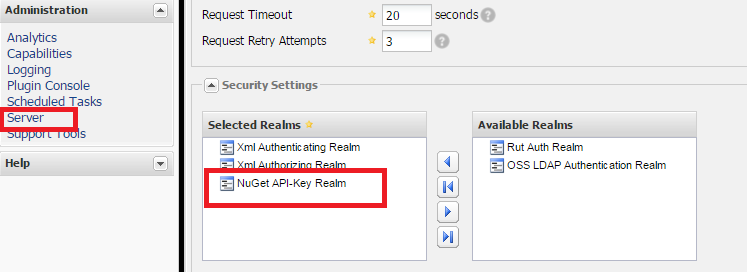
Under the Server settings, make sure that NuGet API-Key Realm is under the Selected Realms, which by default is NOT.

Now you can set your Api Key and push your package.

Api keys are on per user basis generated. Each user has it’s own unique key, and if you intend to upload the packages under a specific user profile, make sure you get the right key. Log in as that user and check the above mentioned property.

Living under the same roof

Having multiple repositories and feeds can be unhandy to setup and maintain. Lucky Nexus Repository Manager OSS offers a solution that can consolidate multiple repositories under a single feed. A repository group hides multiple repositories behind a single address/feed and allows us to modify the underlying repositories, add new ones or make other changes, without the need to change the configuration in any of your projects or in the tooling. Also it gives a lot of flexibility in setting up different policies and strategies in managing your repositories.
In order to create a Repository Group, under the repository management, choose Add then Repository Group option.

new_repository_group

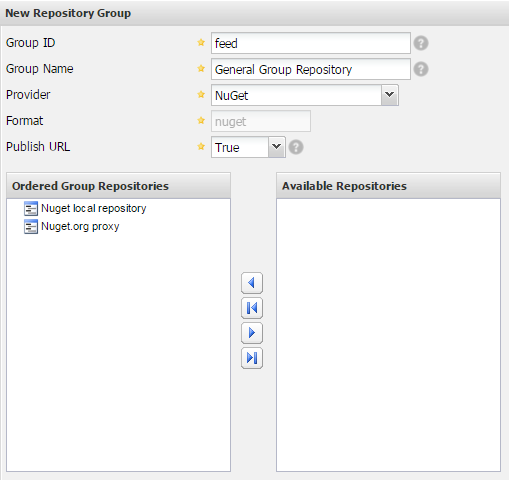
Same settings are mandatory as for the private repository with one addition. You need to choose which repositories will be part of this group.

Tidying up

Link to our feed as it is right now is quite verbose and hard to recall, http://yournexusservername:8081/nexus/service/local/nuget/proxy/. Instead of pointing to yournexusservername we may consider adding a CNAME into our DNS and then point it to that machine. This will also ease the maintenance later on, if we do decide to move the service to another machine. In that case it will be sufficient to re-point DNS to the new machine and no changes to the feed URL will be necessary.

Another thing that stands out is that Nexus Repository Manager OSS web server as it’s feeds do run on port 8081. If this is an option, it will be easier to run it on port 80 (or 443 in case you plan to use SSL). you can also notice that ‘nexus’ part of URL (context root) just after the port number, it also may not be necessary and removing it will shorten all of the url’s.

I registered a CNAME in my domain and called it nexus. Now by calling http://nexus.maio.local:8081/nexus I’m able to reach my server. In order to get server running on port 80 and remove that nexus suffix, we need to get to the conf folder (in my case D:\Nexus\nexus-2.12.0-01\conf) and edit the file called nexus.properties. We are interested in changing two properties under # Jetty section. First one is application-port which by default is set to 8081. You need to set this to 80. Second property we are going to change is nexus-webapp-context-path and we need to change if from /nexus to just a /. This will set the context root with no prefix and make our URL shorter.
At the end your configuration file should look like following:

...
# Jetty section
application-port=80
application-host=0.0.0.0
nexus-webapp=${bundleBasedir}/nexus
nexus-webapp-context-path=/
...

Now it will be sufficient to restart the nexus windows service in order the changes to take the effect. In case no other application is using the port 80, restart should succeed and we are now able to get to the administrative interface by just calling http://nexus.maio.local/.
Also my feed now changes to http://nexus.maio.local/service/local/nuget/proxy/ which is shorter and easier to remember.

To make sure that the URL’s are not based on the upcoming request, you will need to set the base URL in the server settings.

application_server_settings

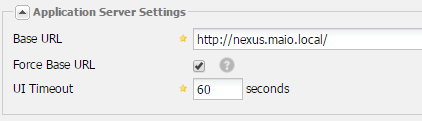
Set the base URL accordingly to your CNAME and remove the nexus from context root. You would like also to check the Force Base URL option as then the current settings will be considered for all of the links and Nexus Repository Manager will not base any on the upcoming request URL.

Other considerations

Proxy

In case your Nexus Repository Manager is behind a proxy you will need to set the relevant settings inside the Server panel. Make sure that you set both HTTP and HTTPS settings as NuGet.org feed uses HTTPS.

http_proxy_settings

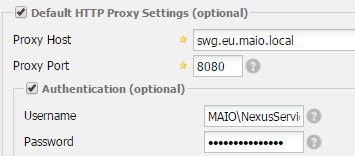
It is sufficient to indicate the proxy host, port and the Authentication credentials (Username and password).

License and Vulnerability Tracking

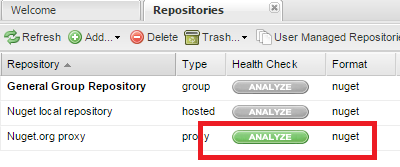
This is a very neat feature that is offered by Nexus Repository Manager OSS. For our proxied repository we are able to activate Repository Health Check. If active Nexus Repository Manager OSS will return actionable quality, security, and licensing information about the open source components in the repository. This will give us an overview of the mentioned metrics for all of the packages that were served by our proxy feed. To enable it, click on the analyse button and after some time you will see the results.

activate_rhc

On the SonaType blog you can find a video interview made to Marcel de Vries that talks this argument in the detail.

Maintenance

In case you are planning to use your proxy intensively you may be concerned about the disk space it may require to support all of the packages that are cached by the proxy. In that case you could opt for an out of the box task. If you open the Scheduled Tasks panel and Add a new scheduled task, there is a predefined task that will do just that.

scheduled_tasks

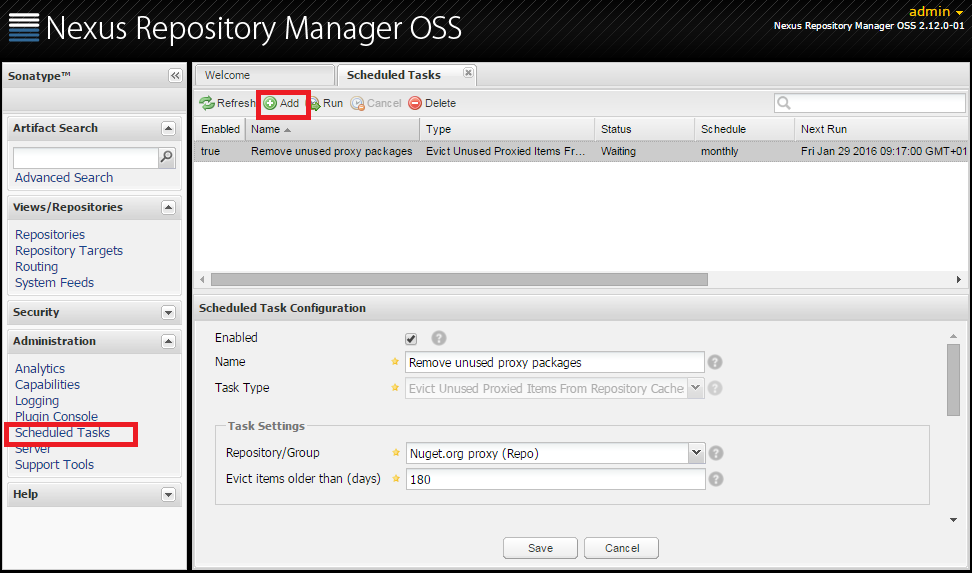
Create a Scheduled task of type ‘Evict Unused Proxied Items From Repository Caches’. On a given schedule it will remove all of the items for the chosen repository that are older than a number of days you set.

Support and documentation

Nexus is a well documented project. You can find more information about all of the arguments treated in this blog post and much more at http://books.sonatype.com/nexus-book/reference/index.html. Also in case you encounter a problem and can’t find an answer about, there is a support even for a free OSS version at https://support.sonatype.com/hc/en-us/categories/201980798.

Visual Studio feed

Adding a new feed in Visual Studio is an ordinary task. Select the following menu Tools > NuGet Package Manager > Package Manager Setting. Then in the Options window, select Package Sources and add a new one by clicking on the plus button. You can name the new feed to Nexus and set the source to http://nexus.maio.local/service/local/nuget/feed/. Press Update, then OK.

package_sources_options

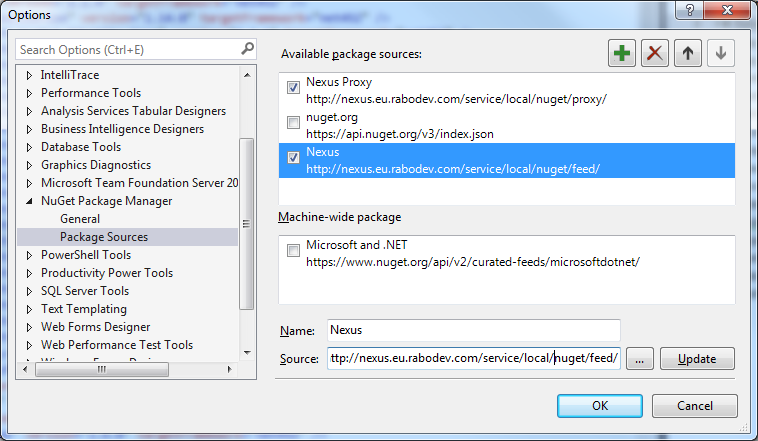
This will allow you to access NuGet.org through Nexus Repository Manager OSS in Visual Studio.

Now in the NuGet Package Manager select the newly added Package Source and you are ready to browse and install the available packages.

nuget_package_manager

If you added a group feed, you will be able to retrive both NuGet.org and your private packages through the same feed.

Build agent package restore

Before we enable the NuGet package restore in our build task we need to make sure that we have the necessary inside our nuget.config file. If you do not have a nuget.config file, you can place it in one of the paths that are listed in NuGet documentation.
In the package sources you need to add the new feed. Consider the following example.

<?xml version="1.0" encoding="utf-8"?>
<configuration>
  <packageSources>
	<add key="Nexus" value="http://nexus.maio.local/service/local/nuget/feed/" />
  </packageSources>
</configuration>

Now you need to check in this file and enable the package restore on your build task.

build_task

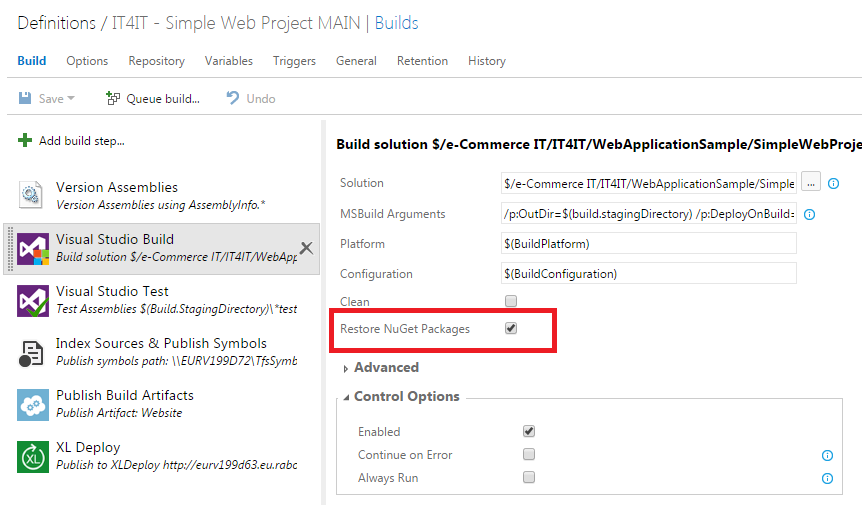
This should be now sufficient for the build agent to retrieve all of the necessary packages via Nexus Repository Manager OSS.
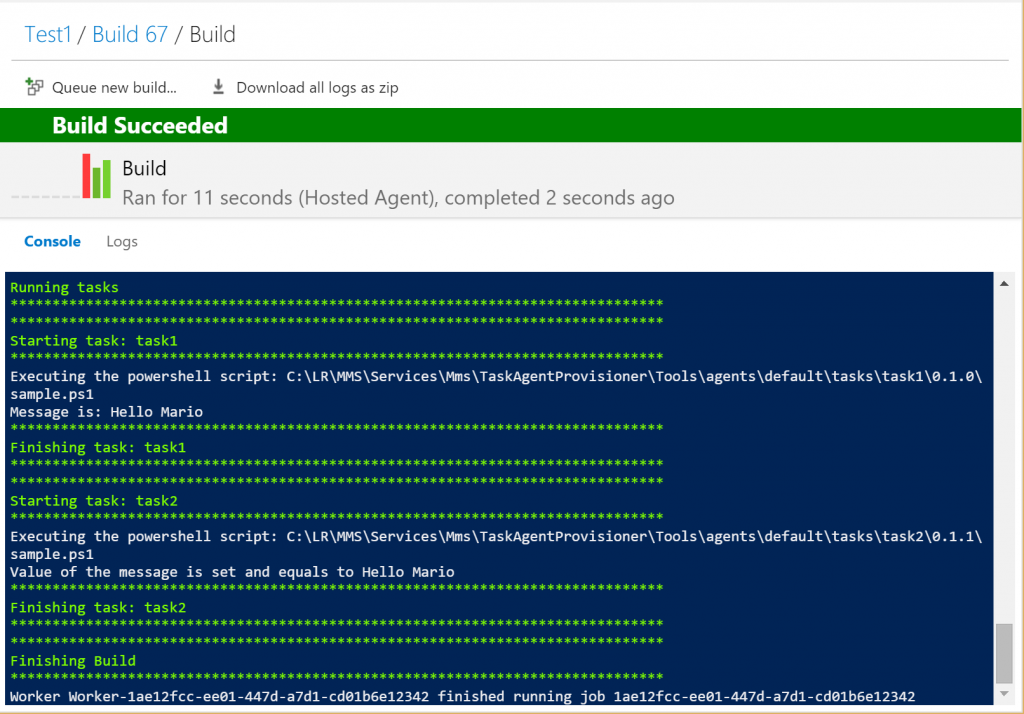
You can now remove the packages folder from the source code and request a clean build. In the build console then you will find references about packages being restored.

Manually uploading a package

Our custom NuGet packages can be uploaded via the Nexus Repository Manager OSS web interface. Select your repository and go to the NuPkg Upload tab.

nupkg_upload

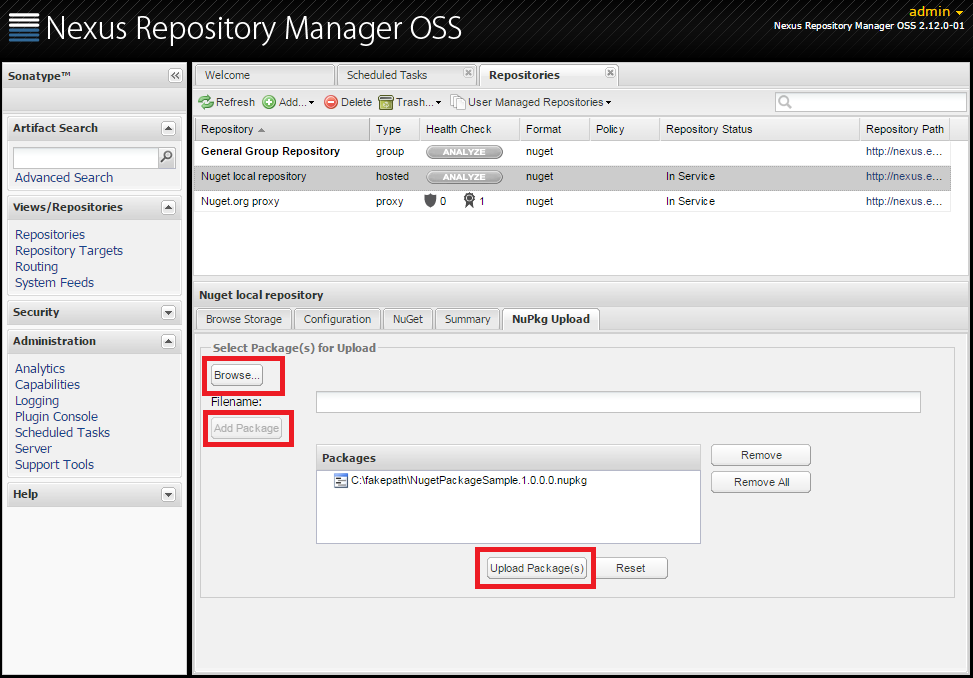
In that tab, select Browse and choose your .nupkg file. Then click on Add package and if that is the only one you would like to upload, choose Upload Package(s) button. If all goes well you will see the upload confirmation message. If you get to browse storage tab and refresh it, you should see your package uploaded.
To be sure that we can retrieve our custom package (also via the group repository) let’s get in Visual Studio and search for it.

search_hosted_package

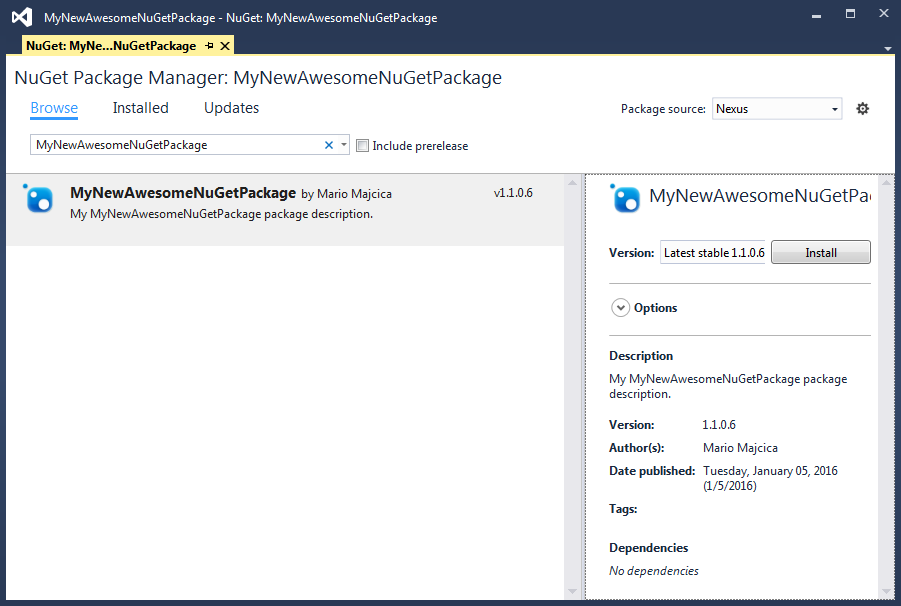
As you can see, we are able to find our package both via our hosted repository feed as also via the group repository. This shows all of the potential of the group repositories and the way it eases the maintenance.

I came in an situation in which I was not able to find via group repository the package I uploaded. In case you upload a package that is present (matches the name and version of the package) in your proxy repository (NuGet.org), your package will not be shown. This is however an edge case and in real life situation you should never encounter such a situation. Still I think it is worth mentioning as during a trial it can happen and I do not want you to freak out about it.

Uploading the package via TFS 2015 build

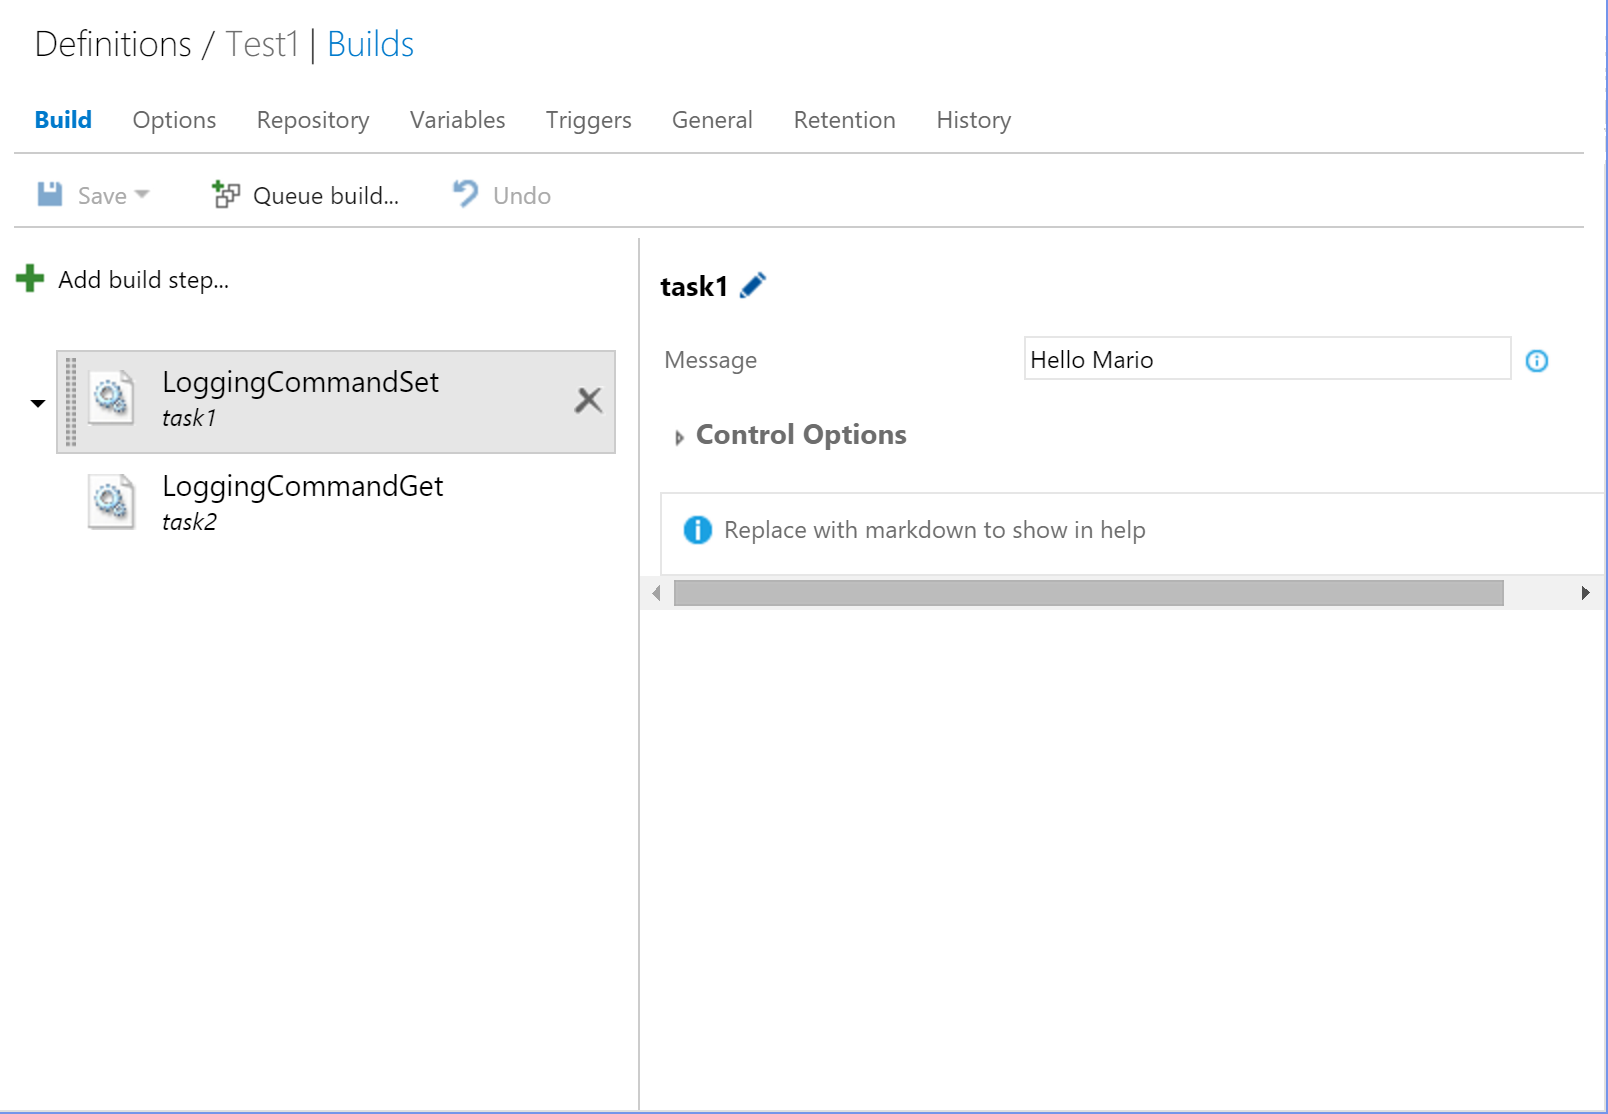
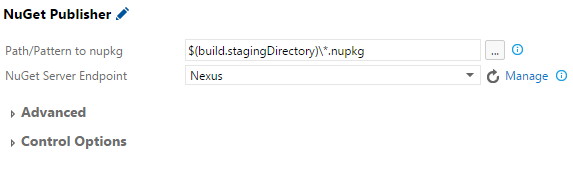
With TFS 2015 Update 1 a new build task called NuGet Publisher is made available. It can help you with uploading your package to any NuGet repository. After adding the above mentioned build task to your build definition you will be presented with the following options:

nuget_publisher

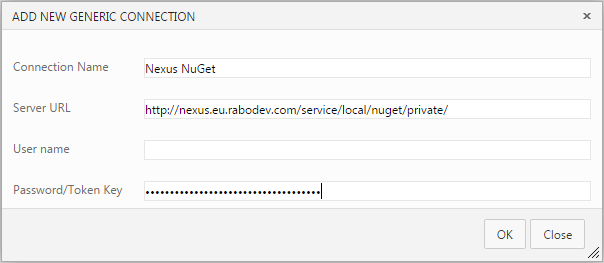
It is sufficient to define a new NuGet Server Endpoint only once. If you choose manage and then add new generic endpoint you will need to specify your feed as server URL, assign an arbitrary name to this endpoint and set you ApiKey as Password/Token Key value.

In our example name is Nexus NuGet, Server URL is http://nexus.maio.local/service/local/nuget/private/ and Password/Token Key is 626d4343-965f-30bc-858e-a322672acf54.

nexus_endpoint

Now that the endpoint is set, we need to specify a minimatch pattern that will point to our NuGet package. In the picture above you can see that I’m pointing my search for all the packages in the the staging folder, where my package is created. This will depend largely on your build definition and what you are trying to achieve.

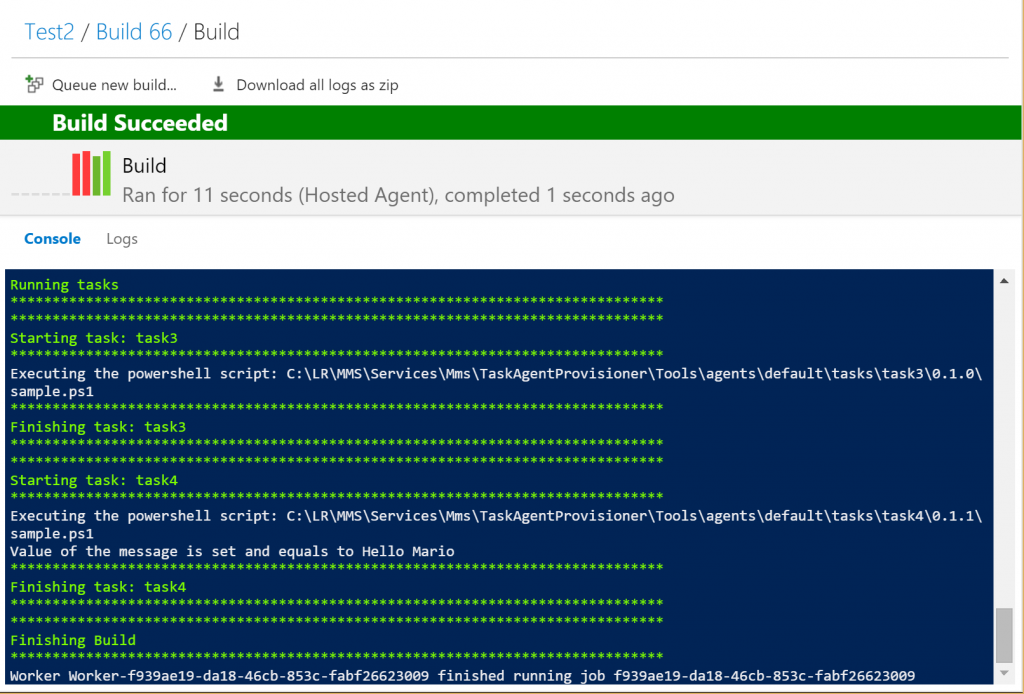
This is sufficient to upload automatically from your build a new version of your package to our local NuGet server.

In case you are interested in building the package based on your sources and your nuspec file directly by your build definition, you can use NuGet Packager build step to achieve that. This is however out of scope for this blog post.

Uninstall Nexus

Last but not least, removing Nexus. In case you are not satisfied with Nexus you should remove it correctly. Luckily it is trivial.
As for the installation, let’s get into nexus-2.x.x-xx\bin folder. Following are the commands to execute and the relative output.

D:\Nexus\nexus-2.12.0-01\bin>nexus stop
wrapper  | Stopping the nexus service...
wrapper  | nexus stopped.

D:\Nexus\nexus-2.12.0-01\bin>nexus uninstall
wrapper  | nexus removed.

After both of these commands succeeded, you can safely remove the folder for your disk. In case you set a non default path for the repository storage, you can remove that one also.

Conclusion

That’s all folks! I hope I covered all of the arguments you may be interested in when it comes to Nexus Repository Manager OSS and NuGet. I do hope that this will encourage you in using or improve your current NuGet services setup.

PowerShell tips and tricks – Retrieving TFS collections and projects

Introduction

The following post is not really about a tip or a trick regarding a PowerShell itself. It’s more about on how to leverage some TFS libraries in order to automate processes regarding TFS via a PowerShell script. It will not show any fancy PowerShell technique but a way to query a TFS server of your choice, extract the necessary information and eventually make changes.

In this first tip we will see the essential, how to connect to the TFS, retrieve all of the available collections and list all of the projects for each TPC. Imagine that you are working on a TFS instance containing multiple collections, each one again having many projects (for many I do intend hundreds of projects in total). Verifying and changing settings on each one manually will not be easy nor convenient. As there is no UI for executing bulk operations on TFS, the easiest and most logical way to interact with it is through PowerShell. Let’s see how we can achieve that.

Prerequisites

Before we start, in order to be able to use these scripts you need to have at least PowerShell v3 installed and the necessary TFS libraries registered in GAC. The easiest way to make sure that you do have just mentioned libraries installed is to make sure that you do have Visual Studio installed on the machine you are executing this script from. Also it is good that the Visual Studio you added does match in version your TFS install. It means that if you do have TFS2013 installed, the best option will be to have Visual Studio 2013. For what concerns PowerShell, you do probably already have version 3 installed on your machine. The easiest way to check is to execute the following command:

$PSVersionTable.PSVersion

If is not the case that you do have PowerShell version 3 installed, you can do so by following this link: Windows Management Framework 3.0

In order to perform the call to the TFS server you need to have sufficient rights to do so. Managing collection objects require Edit instance-level information permission level, which is granted by default only to TFS admin. In case you do not have sufficient rights, you may encounter an exception reporting
Exception calling "GetCollections" with "0" argument(s): "Access Denied: Mario Majcica needs the following permission(s) to perform this action: Edit instance-level information"

Just for a sake of completeness I will add that this is not the only way of establishing a dialog with TFS, you could extract and set some of the information also through the REST API. Also some of the objects I do treat can be retrieved in a slightly more efficient way at the expense of simplicity.
In case you are interested about just mentioned techniques you can read the following post Building a TFS 2015 PowerShell Module using Nuget. Bare in mind that it is not targeting beginners as this blog post and it requires a deeper understanding on TFS Object Model and PowerShell.

Again, some utilities as Microsoft Visual Studio Team Foundation Server 2013 Power Tools do deliver PowerShell Cmdlets that can be used to work with different features of TFS such as changesets, shelvesets, workspaces and more. If interested in details about this approach I can advise you to Google out the argument or get your hands of a book called Windows PowerShell 4.0 for .NET Developers.

Let’s script

First things first. In order to reference the necessary libraries we need to issue the following command.

Add-Type -AssemblyName "Microsoft.TeamFoundation.Client, Version=12.0.0.0, Culture=neutral, PublicKeyToken=b03f5f7f11d50a3a"

This may seem a quite complicated way to load an assembly, unfortunately only a certain pre-defined set of assemblies can be loaded by their partial name. For all the rest a fully qualified name is necessary. In case you decide to use some other TFS functionalities, it may be necessary to reference other libraries.

Note, in case of Visual Studio 2015, the object model client libraries are removed from GAC. However the necesseray libraries are still available. In order to load them you need to approach the load in a different manner.

Add-Type -Path "C:Program Files (x86)Microsoft Visual Studio 14.0Common7IDECommonExtensionsMicrosoftTeamFoundationTeam ExplorerMicrosoft.TeamFoundation.Client.dll"

You need to point the Add-Type cmdlet to a path. It may vary based on the folder in which your Visual Studio is installed.

There is another option that may be a nice way to comply to this dependency. If you are an early adopter of PowerShell 5, you may retrieve the necessary package via OneGet.

Walking through TFS objects

All TFS libraries do have a same entry point. There are multiple factory classes, exposing static methods, that will give us the instance of classes implementing the requested interface thought whom we will perform desired operations. For a less experienced DevOps (at least less Dev’s more Ops) this may not make sense, thus let me try to explain it a bit better.
In order to use an object (a non-static class in this particular case) we need to construct an instance of it (and probably pass some parameters for its initialization). Via the factory pattern, adopted by Microsoft for this particular set of libraries, we are able to get the right instance of the class implementing the interface we are in need for. Still too complicated? Then I’m sorry, I’m already going way out of scope here.

In order to get the object through whom we will get the services we are in need for, we need to call a static method GetConfigurationServer on TfsConfigurationServerFactory class.
This call will return an instance of ConfigurationServer class which will be our main entry point for all the services.

$uri = "http://my.tfs.local:8080/tfs"
$tfsConfigurationServer = [Microsoft.TeamFoundation.Client.TfsConfigurationServerFactory]::GetConfigurationServer($uri)

As you can see I’m passing to the GetConfigurationServer method a parameter, which is the address of our TFS. It means that all of the operations performed through its service calls will be pointing to TFS indicated in this address.

Once our entry point is obtained, we can ask him to get us an instance of the class that implements the necessary logic to perform actions we are in need for.
In our case this is a class that implements ITeamProjectCollectionService interface.
We can request it with the following command

$tpcService = $tfsConfigurationServer.GetService("Microsoft.TeamFoundation.Framework.Client.ITeamProjectCollectionService")

Now that I do have a correct instance of the class that implements the interface which declares the methods I’m interested in, I will just call a method that will return a collection of TeamProjectCollection objects.
This method is called GetCollections and it is invoked as follows.

$tpcService.GetCollections() 

I’m now able to iterate through this collection and retrieve, beside others, the name of each project collection. Each object in the collection represents a project collection on our TFS. There should be always at least one element in it.

Let’s recap our script before continuing.

Add-Type -AssemblyName "Microsoft.TeamFoundation.Client, Version=12.0.0.0, Culture=neutral, PublicKeyToken=b03f5f7f11d50a3a"

$uri = "http://tfs:8080/tfs"
$tfsConfigurationServer = [Microsoft.TeamFoundation.Client.TfsConfigurationServerFactory]::GetConfigurationServer($uri)
$tpcService = $tfsConfigurationServer.GetService("Microsoft.TeamFoundation.Framework.Client.ITeamProjectCollectionService")

$sortedCollections = $tpcService.GetCollections() | Sort-Object -Property Name

foreach($collection in $sortedCollections) {
    Write-Host $collection.Name
}

The only small detail I haven’t mentioned until now, is the fact that once I do retrieve the collections I do sort them base on the value of Name property.

Now that we have a list of all TPC’s we can construct a URL that will be used to get other services which as a starting point do require a reference to the TPC.
As just mentioned in order to construct the URL I will declare another variable and concatenate the TFS URL and the project name after which I can request an instance of TfsTeamProjectCollectionFactory class that I will use as the entry point for all the operations on the given TPC.

As already seen for the ITeamProjectCollectionService we need to obtain a service that will provide us with the necessary data. In our case this is ICommonStructureService3. It is all achieved by the following code.

Now we are able to invoke a method called ListProjects in order to get all of the projects part of that TPC.

$collectionUri = $uri + "/" + $collection.Name
$tfsTeamProject = [Microsoft.TeamFoundation.Client.TfsTeamProjectCollectionFactory]::GetTeamProjectCollection($collectionUri)
$cssService = $tfsTeamProject.GetService("Microsoft.TeamFoundation.Server.ICommonStructureService3")   
$sortedProjects = $cssService.ListProjects() | Sort-Object -Property Name

Each value in $sortedProjects will be of type ProjectInfo and within we will find all of the necessary information about that Team Project.
In between other properties and methods, as expected, we do have a property called Name. We will output the name of all the projects in that TCP.

The end result

I will add some of the formatting for our messages so that the output of the script is easier to read. Also I will collect the total number of projects. This code I do hope is not needed to be explained in detail. Following the complete script.

Add-Type -AssemblyName "Microsoft.TeamFoundation.Client, Version=12.0.0.0, Culture=neutral, PublicKeyToken=b03f5f7f11d50a3a"

$uri = "http://tfs:8080/tfs"
$tfsConfigurationServer = [Microsoft.TeamFoundation.Client.TfsConfigurationServerFactory]::GetConfigurationServer($uri)
$tpcService = $tfsConfigurationServer.GetService("Microsoft.TeamFoundation.Framework.Client.ITeamProjectCollectionService")

$sortedCollections = $tpcService.GetCollections() | Sort-Object -Property Name
$numberOfProjects = 0

foreach($collection in $sortedCollections) {
    $collectionUri = $uri + "/" + $collection.Name
    $tfsTeamProject = [Microsoft.TeamFoundation.Client.TfsTeamProjectCollectionFactory]::GetTeamProjectCollection($collectionUri)
    $cssService = $tfsTeamProject.GetService("Microsoft.TeamFoundation.Server.ICommonStructureService3")   
    $sortedProjects = $cssService.ListProjects() | Sort-Object -Property Name

    Write-Host $collection.Name "- contains" $sortedProjects.Count "project(s)"

    foreach($project in $sortedProjects)
    {
        $numberOfProjects++
        Write-Host (" - " + $project.Name)
    }
}

Write-Host
Write-Host "Total number of project collections" $sortedCollections.Count
Write-Host "Total number of projects           " $numberOfProjects

As there are plenty of properties available, your are able to change or check a setting on all of the projects in all of the TCP’s you have. This can be very handy for the maintenance task as we are going to see later in a blog post that I’m currently working on.

Happy coding!