XL Deploy and TFS 2015 – Building, Importing and Deploying Packages

Recently XebiaLabs released a build task for Microsoft Visual Studio Team Services (VSTS) and Team Foundation Server (TFS) 2015 that facilitates the integration of the vNext build pipeline with their product, XL Deploy. The new build task is capable of creating a deployment archive (DAR package), importing it to an instance of XL Deploy, and eventually, if requested, triggering the deployment of the newly added package. It also contains some other interesting options that will ease the process of versioning the deployment package.

In the following post I will show you how to build an ASP.NET MVC application, create the deployment package, and deploy it via XL Deploy. Let’s start.

Prerequisites

Before we start, make sure that you have all of the necessary items in place. First of all, your build agent needs to be capable of building your application. In the case of on-premises TFS 2015, this means that you need to have installed Visual Studio on your build server.

You also need to install the XL Deploy build task; if you haven’t done so already, refer to Install the XL Deploy build task. As a prerequisite for the XL Deploy build task, your XL Deploy instance needs to be of version 5.0.0 or later; earlier versions are not supported.

Once you ensure that these criteria are met, you can continue reading.

Building your web application

First things first. Create a new empty build definition in your project. If you are not familiar with how to do this, refer to the MSDN article Create a build definition.

Set the repository mappings accordingly before proceeding any further; again, refer to the MSDN article Specify the repository for more information about doing so. For this example I am going to use TFVC; however, all of the techniques I am going to describe do work also with Git repository.

Now you can specify the necessary build steps to compile and publish the web application.

Add a Visual Studio Build build task.
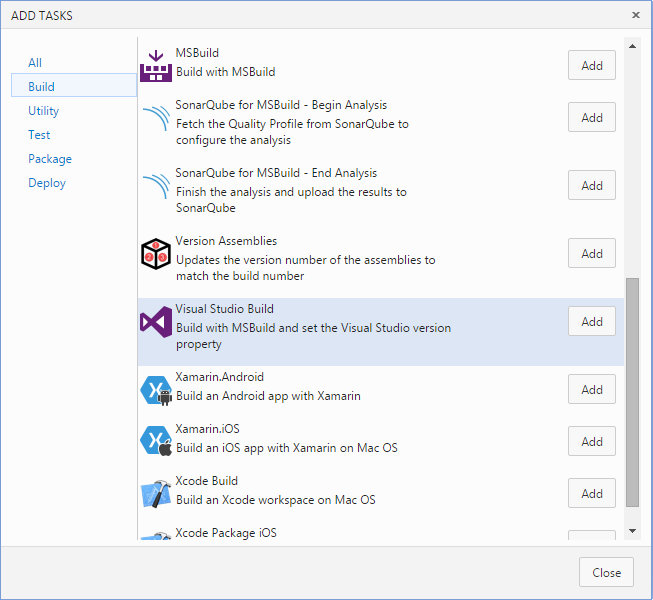
add-task-vsb

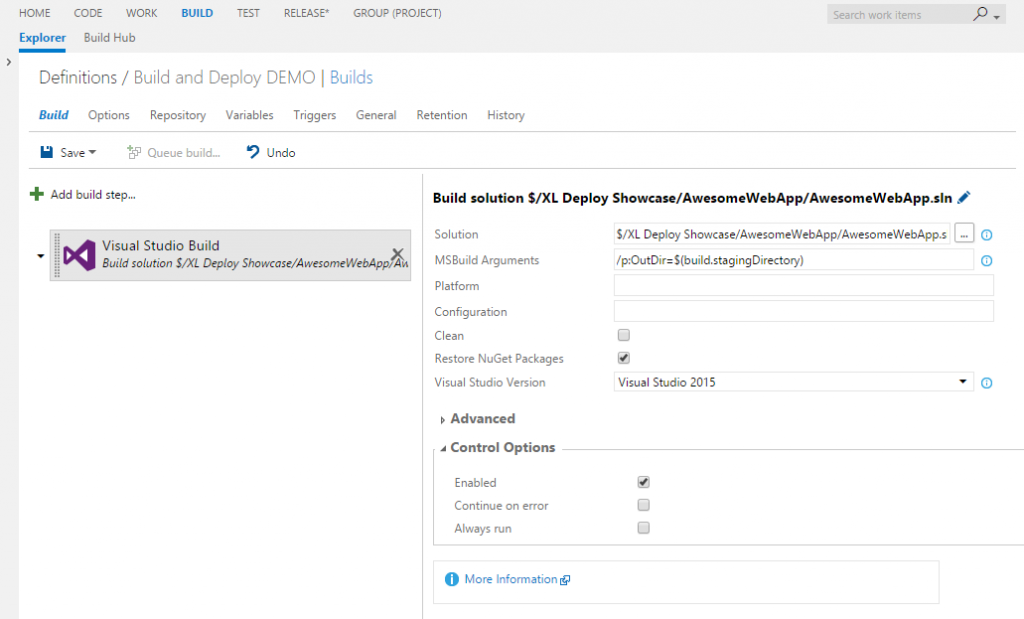
Once added, you need to set the necessary parameters. The first mandatory setting is the path to the solution file in source control. Click the button with three dots and locate your solution file in the version control tree. Once found and confirmed, the Solution box will be populated with the correct path. In my case, that is $/XL Deploy Showcase/AwesomeWebApp/AwesomeWebApp.sln. This is the solution that will be built in the build definition.

Next you need to use the MSBuild Arguments setting to indicate that all of the built items should be delivered in the build staging directory. This is an important step because when the XL Deploy build task starts creating the deployment archive (DAR package), it will search for items to include in it, starting from this directory (considering the build staging directory as root). That’s why I am going to set MSBuild Arguments to /p:OutDir=$(build.stagingDirectory). This is a common way for MSBuild to pass a parameter; I’m using a variable that will resolve in a specific path when the build is run. A list of available variables and their usage is explained in the MSDN article Use variables. For now, I will not change any other setting. Make sure that Restore NuGet Packages is selected and that the correct version of Visual Studio is listed.
vsbuild-task

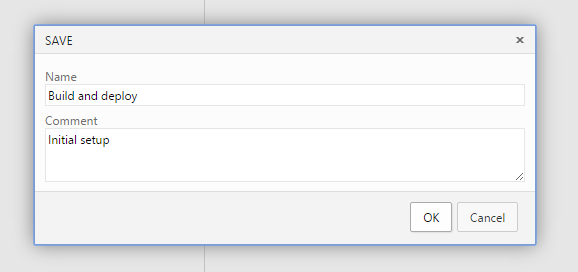
Save the build definition. Enter a relevant name and optionally set the comment.
save-definition

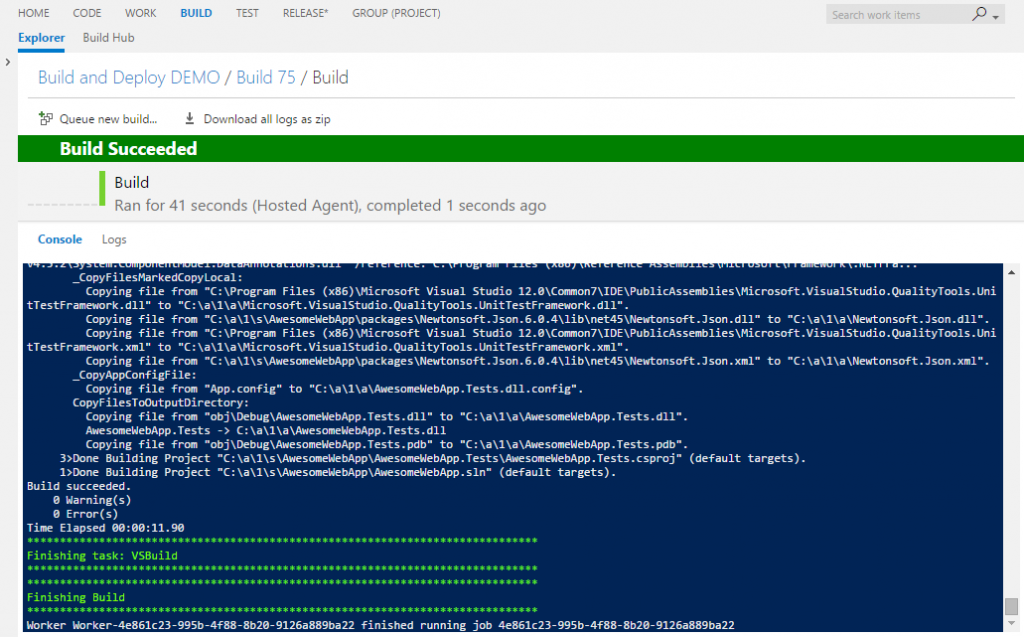
Now, you can test the build. Queue a new build and check the results. If everything went well, you will get a ‘green’ build.
first-build

Now you are sure that the project builds correctly and we can continue with our next task, which is deploying the application via XL Deploy.

You can find more information about build steps on MSDN at Specify your build steps.

XL Deploy build task

In order to continue, you need to have a valid XL Deploy manifest file checked in to our source control. You can read about creating a manifest file at XL Deploy manifest format. I checked in the following manifest:

<?xml version="1.0" encoding="utf-8"?>
<udm.DeploymentPackage version="1.0.0.0" application="AwesomeWebApp">
  <deployables>
	<iis.WebContent name="website-files" file="_PublishedWebsites\AwesomeWebApp">
	  <targetPath>C:\inetpub\AwesomeWebApp</targetPath>
	</iis.WebContent>
	<iis.ApplicationPoolSpec name="AwesomeWebApp">
	  <managedRuntimeVersion>v4.0</managedRuntimeVersion>
	</iis.ApplicationPoolSpec>
	<iis.WebsiteSpec name="AwesomeWebApp-website">
	  <websiteName>AwesomeWebApp</websiteName>
	  <physicalPath>C:\inetpub\AwesomeWebApp</physicalPath>
	  <applicationPoolName>AwesomeWebApp</applicationPoolName>
	  <bindings>
	<iis.WebsiteBindingSpec name="AwesomeWebApp/8088">
	  <port>8088</port>
	</iis.WebsiteBindingSpec>
	  </bindings>
	</iis.WebsiteSpec>
  </deployables>
</udm.DeploymentPackage>

As you can see, I specified the required IIS application pool, a web site, and, most importantly, WebContent. The WebContent element indicates that the files that do represent the web site.

An attribute called file is present on the deployable element iis.WebContent. This attribute is very important, as it will guide the build task in creating the deployment archive. A relative path is set as the value and indicates the folder that needs to be included in the DAR package. This relative path assumes that the root folder is the build staging directory; it will search this directory for the folders specified here. If they are not present, packaging will fail. Now you understand why I delivered the build output in the staging folder. Although this behavior can be overridden in the advanced settings of the XL Deploy build task, I would advise you not to change it if it is not necessary and until you became confident and sufficiently experienced with TFS 2015 builds.

The manifest file also indicates that I expect MSBuild to package the web application under a default folder called _PublishedWebsites. This is standard behavior for MSBuild.

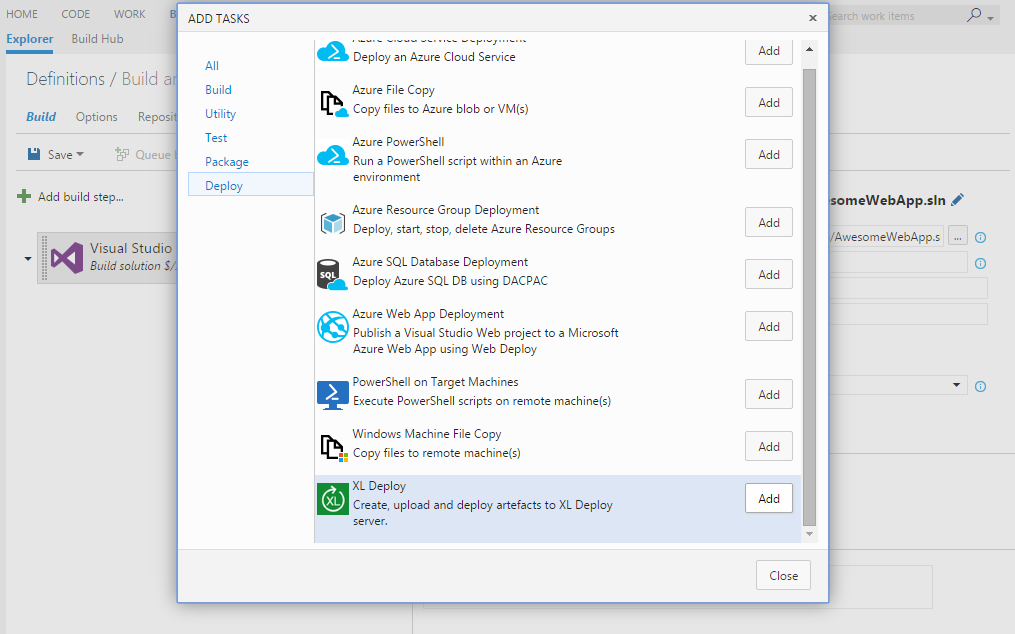
After the manifest file is correctly checked in, you can continue and edit the recently created build definition by adding another build step. This time, go to the Deploy group and select XL Deploy.
add-task-xld

The first mandatory parameter that you need to set is the path to the manifest file. As you did previously for the solution file, click the button with three dots and select the manifest file in source control. In my case, that will be $/XL Deploy Showcase/AwesomeWebApp/deployit-manifest.xml.

Secondly, you need to set the endpoint, which is a definition of the URL and credentials for the XL Deploy server that you intend to use in this deployment. If no XL Deploy endpoints are defined, click Manage and define one. For information about doing so, refer to Add an endpoint in Team Foundation Server 2015. After you are done, click Refresh and your newly added endpoint will appear.

Versioning the package

As you can see, there is a Version option available on the XL Deploy build task. If selected, the deployment package version will be set to the build number format during the process. The build number format is a value that you can set in the General tab of the build definition.

When composing the build number, you can choose between constants and special tokens that are available for that purpose. In Specify general build definition settings, you can read about the available tokens and ways of setting the build number format.

If you are using a different pattern for versioning your deployment package and your build number format has a different use, you can override this behavior by setting a custom value in Version value override parameter under Advanced options.

For this example, I will set this option and then set the build number format to a simple ‘1.1.1$(Rev:.r)’.

Automated deployment

You have the option to automatically deploy the newly imported package to the environment of your choice. If you select the Deploy check-box on the XL Deploy build task, a new field called Target Environment will be available. Here, you need to specify the fully qualified name of the environment defined in XL Deploy. In my case, it is called Test. You can also allow the deployment to be rolled back in case of failure by selecting Rollback on deployment failure.

Note that this requires that you have correctly defined the environment in XL Deploy, with the relevant infrastructure and components. For more information, refer to Create an environment in XL Deploy.

Ready to roll

After you set all of the parameters and save the build definition, you are ready to trigger the new build. Make sure that you set all of the necessary parameters as shown in the picture.
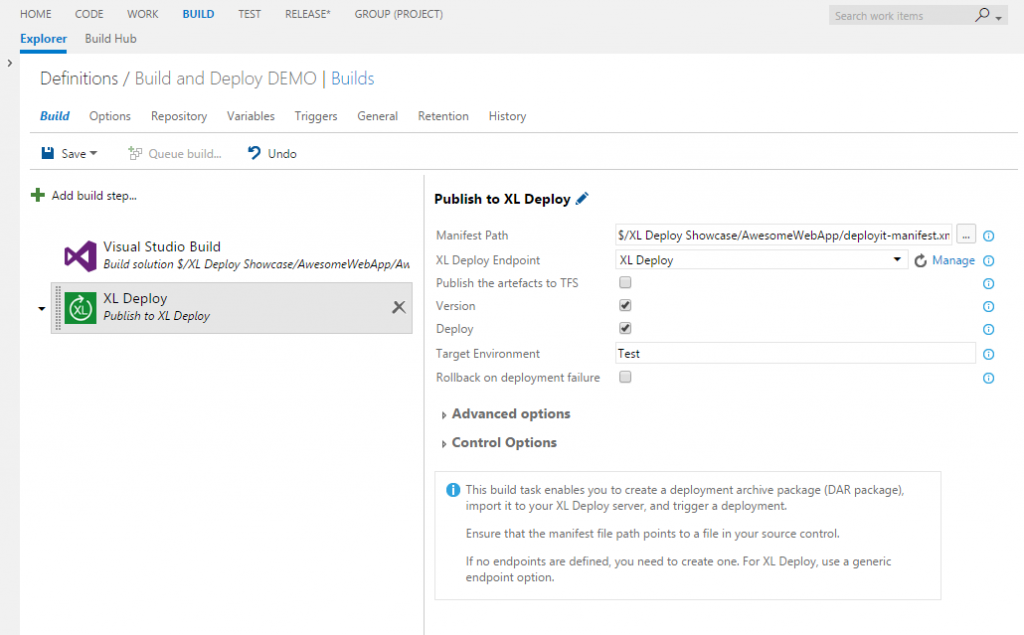
xld-task

You can now trigger the new build. In the build console you should now see the information relevant to the process of creating and versioning the package.
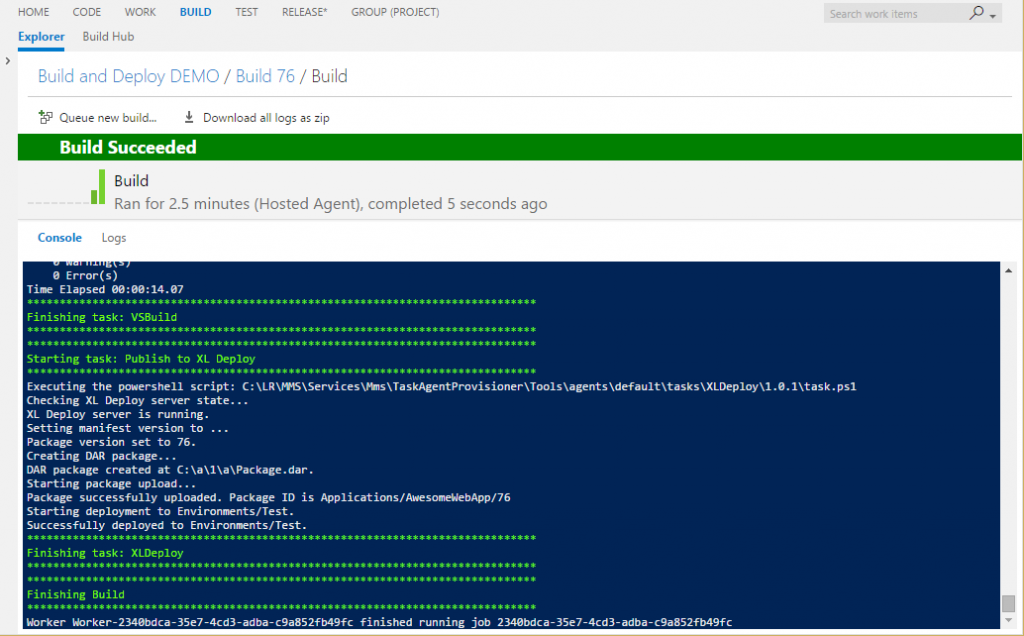
final-build

In case of problems, you can add a new build definition variable named system.debug and set the value to true. Then, in the build log, you will see more detailed messages about all of the actions preformed by the tasks (note that this is not shown in the console). It should be sufficient to diagnose the issue.

Conclusions

This was a small practical example about taking advantage of the new XL Deploy build task. I haven’t covered all of the available options; you can read more about them at Introduction to the Team Foundation Server 2015 plugin. However, this example is sufficient to get started. You can combine other build tasks in your build definition with the XL Deploy build task; but it is important that you invoke the XL Deploy build task after all of the elements that will compose your deployment package are available.
Nexus Repository Manager OSS as Nuget server

Introduction

In the past years I heard a lot of bad excuses when it came to NuGet package management. Mentioning Nexus in many .Net shops I had a chance to work in, put a strange ‘fear feeling’ in the air. None of those two chaps are to be in fear off and, surprise surprise, they work exceptionally well together. In this post I would like to tell you how to set up a NuGet proxy repository and a local, private, NuGet repository on Nexus Repository Manager OSS. I will guide you through the installation of Nexus Repository Manager OSS and all of the necessary setup tasks in order to create your own NuGet server that will proxy the calls to NuGet.org and store your own packages. I will mentions also some details about the configuration and maintenance and show you how to set up your tooling in order to work with it. It is going to be a pretty long post, so if interested, keep on reading. I hope that I can convince you to give a change to Nexus and get the best out NuGet.

Prerequisites

In order ton install Nexus you need to make sure that a couple of things are in place.
First thing, make sure JRE is installed. In the command prompt run java -version. If command executed successfully you are ready to go. If not, download the right version for your OS at http://www.java.com/en/download/manual.jsp. Still make sure that you are running at least JRE version 8u31+, as it is strongly recommended by SonaType.

Operating system requirements are specified at the following link https://support.sonatype.com/hc/en-us/articles/213464208-Sonatype-Nexus-System-Requirements.

Download the latest version of SonaType Nexus at http://www.sonatype.org/nexus/go/. At the moment of writing the current version is 2.12.0.

Installing Nexus

In order to install Nexus Repository Manager OSS, you need to extract the content of the downloaded file inside a directory. In my case this will be D:\Nexus. Once done get inside a folder called nexus-2.x.x-xx\bin and execute the following commands, nexus install, and once done, nexus start. You will see something similar to this:

D:\Nexus\nexus-2.12.0-01\bin>nexus install
wrapper  | nexus installed.

D:\Nexus\nexus-2.12.0-01\bin>nexus start
wrapper  | Starting the nexus service...
wrapper  | Waiting to start...
wrapper  | nexus started.

D:\Nexus\nexus-2.12.0-01\bin>

Now let’s get on the default address http://localhost:8081/nexus.

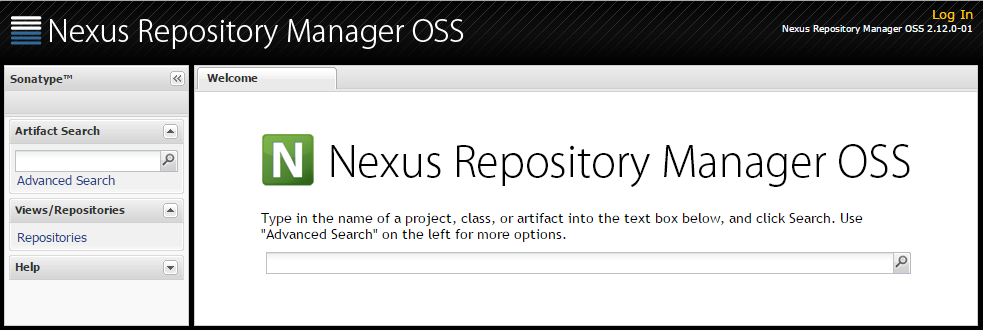
If all went well you should see the following:

welcome_screen

Login by following the link in the up-right corner. Default administrative account is admin with a password equal to admin123. Once logged in you will see in the menu on the left side additional options. We are now ready to start configuring our repositories.

I also advise you to check the list of recommended post installation configuration steps in the Post-Install Checklist.

Nuget proxy repository

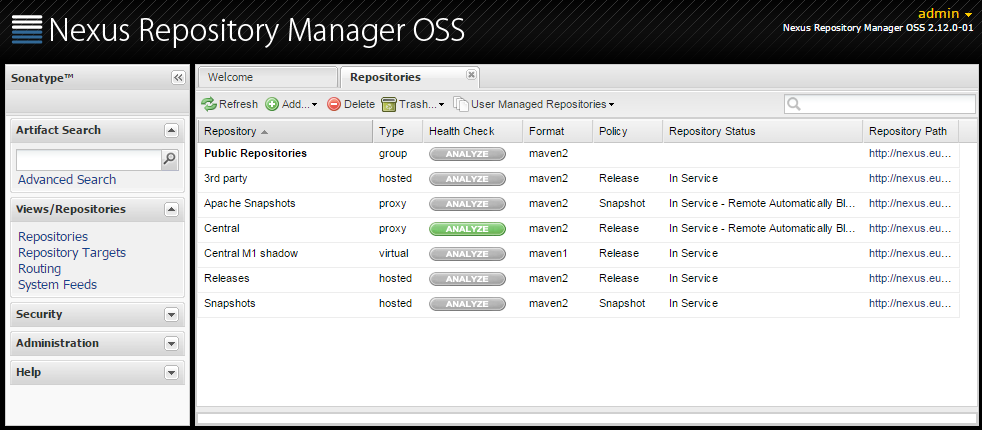
By default, Nexus Repository Manager OSS ships pre-configured with several repositories. If you intend to used it only as a Nuget repository/proxy you can remove all of them.

repositories

This happens to be my case, so I will remove all of the pre-configured repositories. Once you delete all of them, you should see a message saying, No repositories defined.

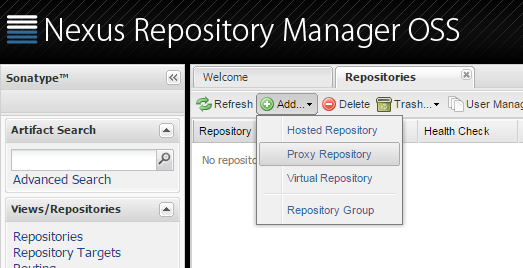
I will now add a repository that will proxy calls towards the Nuget.org public repository. Click on add a choose Proxy repository.

add_proxy_repo

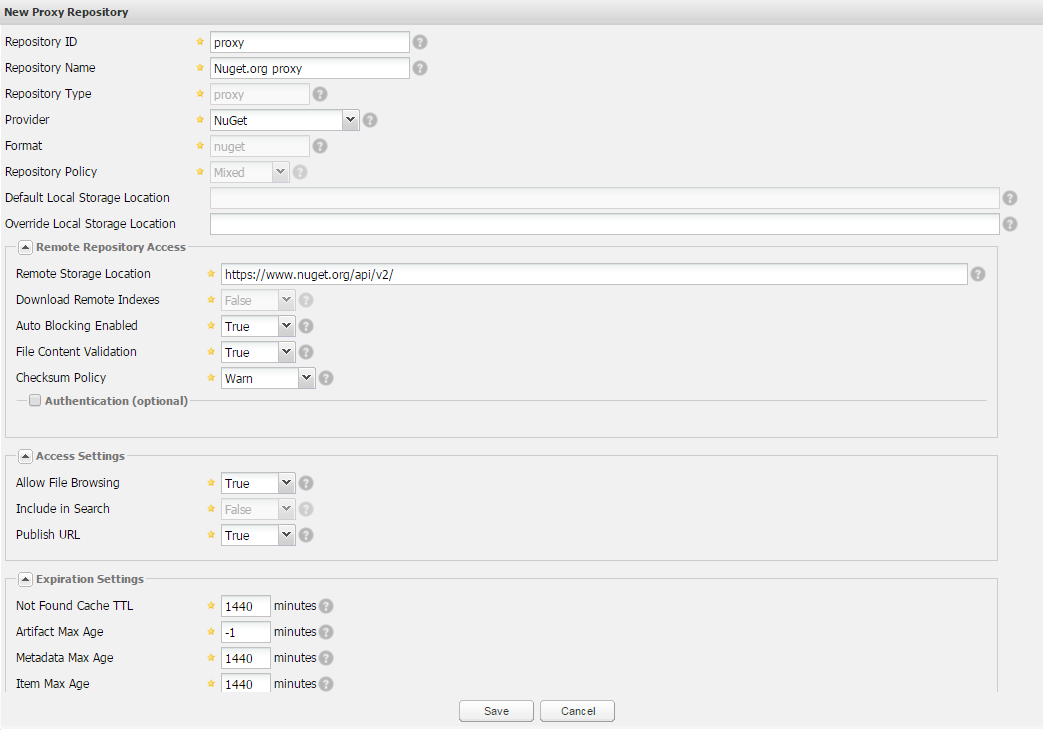
At the bottom of the screen you will be asked to fill in all the necessary details. Let’s analyse the important ones.

Repository ID: I am going to choose a vary concise name here, as this will be a part of our feed url. I will set it to proxy.

Repository Name: This is just a name that will be assigned to this repository and it will only be visible from the Nexus repositories management interface. I will set it to Nuget.org proxy.

Provider: It needs to be set to NuGet.

Remote Storage Location: Here we will set the link to the NuGet.org feed. Currently it is https://www.nuget.org/api/v2/

This are all of the necessary parameters. Once filled in, you can click on Save.

new_proxy_repo

If you now select the just created repository and then open the NuGet tab, you will find the link to your feed. In my case it is http://localhost:8081/nexus/service/local/nuget/proxy/.
First part of the link is obviously wrong. You will not be able to use this feed from any other machine than the server itself. It is displayed as local host as that is the url that we used to access the administration interface. It needs to be http://yournexusservername:8081/nexus/service/local/nuget/proxy/ where yournexusservername is the name of the machine. We will see later how to influence this url.

Nuget private repository

In case you have your own, private NuGet packages, that you would like to publish and retrieve, Nexus Repository Manager OSS can help you with that too. You need to create a hosted repository. For this repository you need to set the same settings as for the proxy, except the Remote Storage Location. I’ve set Repository ID to ‘private’ and Repository Name to ‘Nuget local repository’.
Once created, under the NuGet tab, you will find the personal API key that you need to use via NuGet.exe in order to push a package to this repository.

api_key

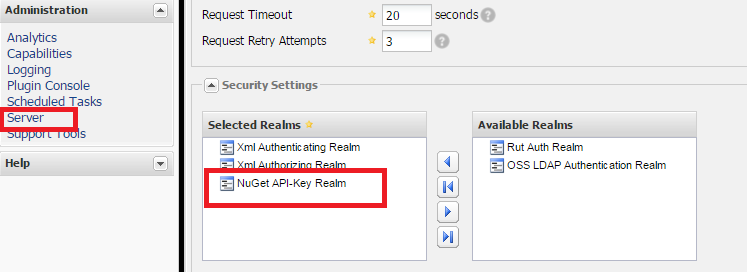
One last step is necessary before you get to be able to upload your packages. We need to enable the authentication and to do so, you will need to set NuGet API-Key Realm.

security_settings_realms

Under the Server settings, make sure that NuGet API-Key Realm is under the Selected Realms, which by default is NOT.

Now you can set your Api Key and push your package.

Api keys are on per user basis generated. Each user has it’s own unique key, and if you intend to upload the packages under a specific user profile, make sure you get the right key. Log in as that user and check the above mentioned property.

Living under the same roof

Having multiple repositories and feeds can be unhandy to setup and maintain. Lucky Nexus Repository Manager OSS offers a solution that can consolidate multiple repositories under a single feed. A repository group hides multiple repositories behind a single address/feed and allows us to modify the underlying repositories, add new ones or make other changes, without the need to change the configuration in any of your projects or in the tooling. Also it gives a lot of flexibility in setting up different policies and strategies in managing your repositories.
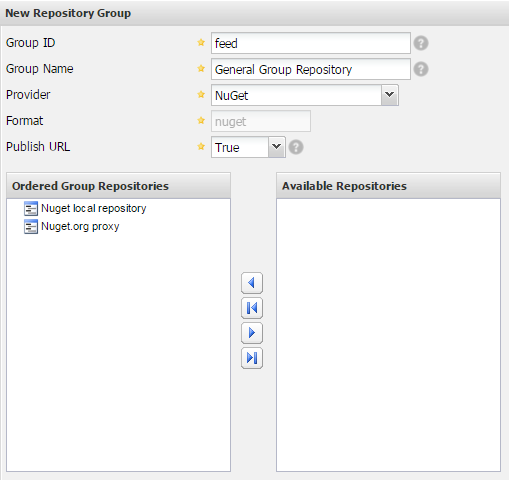
In order to create a Repository Group, under the repository management, choose Add then Repository Group option.

new_repository_group

Same settings are mandatory as for the private repository with one addition. You need to choose which repositories will be part of this group.

Tidying up

Link to our feed as it is right now is quite verbose and hard to recall, http://yournexusservername:8081/nexus/service/local/nuget/proxy/. Instead of pointing to yournexusservername we may consider adding a CNAME into our DNS and then point it to that machine. This will also ease the maintenance later on, if we do decide to move the service to another machine. In that case it will be sufficient to re-point DNS to the new machine and no changes to the feed URL will be necessary.

Another thing that stands out is that Nexus Repository Manager OSS web server as it’s feeds do run on port 8081. If this is an option, it will be easier to run it on port 80 (or 443 in case you plan to use SSL). you can also notice that ‘nexus’ part of URL (context root) just after the port number, it also may not be necessary and removing it will shorten all of the url’s.

I registered a CNAME in my domain and called it nexus. Now by calling http://nexus.maio.local:8081/nexus I’m able to reach my server. In order to get server running on port 80 and remove that nexus suffix, we need to get to the conf folder (in my case D:\Nexus\nexus-2.12.0-01\conf) and edit the file called nexus.properties. We are interested in changing two properties under # Jetty section. First one is application-port which by default is set to 8081. You need to set this to 80. Second property we are going to change is nexus-webapp-context-path and we need to change if from /nexus to just a /. This will set the context root with no prefix and make our URL shorter.
At the end your configuration file should look like following:

...
# Jetty section
application-port=80
application-host=0.0.0.0
nexus-webapp=${bundleBasedir}/nexus
nexus-webapp-context-path=/
...

Now it will be sufficient to restart the nexus windows service in order the changes to take the effect. In case no other application is using the port 80, restart should succeed and we are now able to get to the administrative interface by just calling http://nexus.maio.local/.
Also my feed now changes to http://nexus.maio.local/service/local/nuget/proxy/ which is shorter and easier to remember.

To make sure that the URL’s are not based on the upcoming request, you will need to set the base URL in the server settings.

application_server_settings

Set the base URL accordingly to your CNAME and remove the nexus from context root. You would like also to check the Force Base URL option as then the current settings will be considered for all of the links and Nexus Repository Manager will not base any on the upcoming request URL.

Other considerations

Proxy

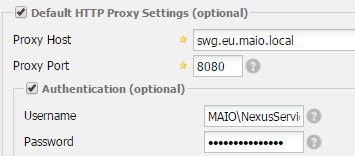
In case your Nexus Repository Manager is behind a proxy you will need to set the relevant settings inside the Server panel. Make sure that you set both HTTP and HTTPS settings as NuGet.org feed uses HTTPS.

http_proxy_settings

It is sufficient to indicate the proxy host, port and the Authentication credentials (Username and password).

License and Vulnerability Tracking

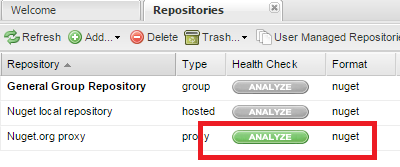
This is a very neat feature that is offered by Nexus Repository Manager OSS. For our proxied repository we are able to activate Repository Health Check. If active Nexus Repository Manager OSS will return actionable quality, security, and licensing information about the open source components in the repository. This will give us an overview of the mentioned metrics for all of the packages that were served by our proxy feed. To enable it, click on the analyse button and after some time you will see the results.

activate_rhc

On the SonaType blog you can find a video interview made to Marcel de Vries that talks this argument in the detail.

Maintenance

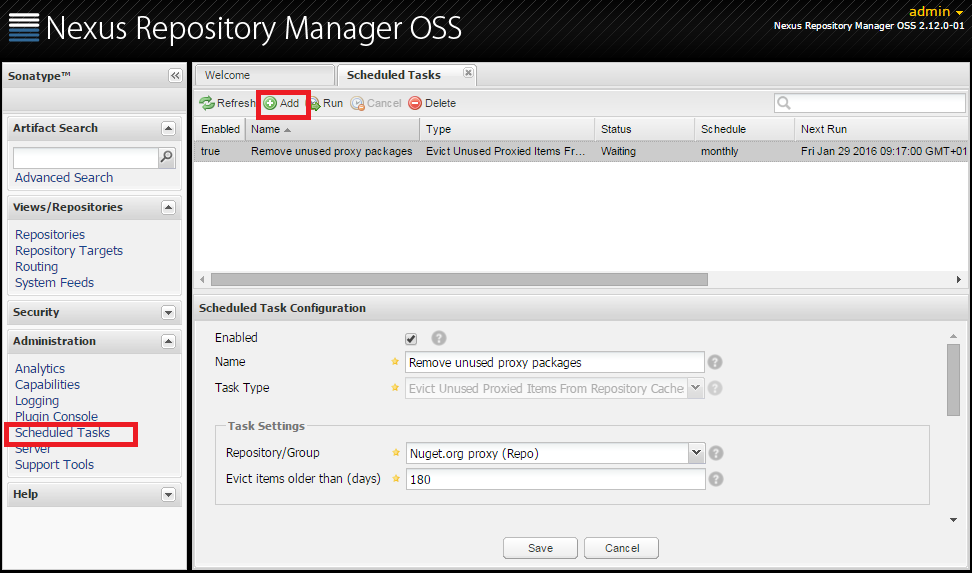
In case you are planning to use your proxy intensively you may be concerned about the disk space it may require to support all of the packages that are cached by the proxy. In that case you could opt for an out of the box task. If you open the Scheduled Tasks panel and Add a new scheduled task, there is a predefined task that will do just that.

scheduled_tasks

Create a Scheduled task of type ‘Evict Unused Proxied Items From Repository Caches’. On a given schedule it will remove all of the items for the chosen repository that are older than a number of days you set.

Support and documentation

Nexus is a well documented project. You can find more information about all of the arguments treated in this blog post and much more at http://books.sonatype.com/nexus-book/reference/index.html. Also in case you encounter a problem and can’t find an answer about, there is a support even for a free OSS version at https://support.sonatype.com/hc/en-us/categories/201980798.

Visual Studio feed

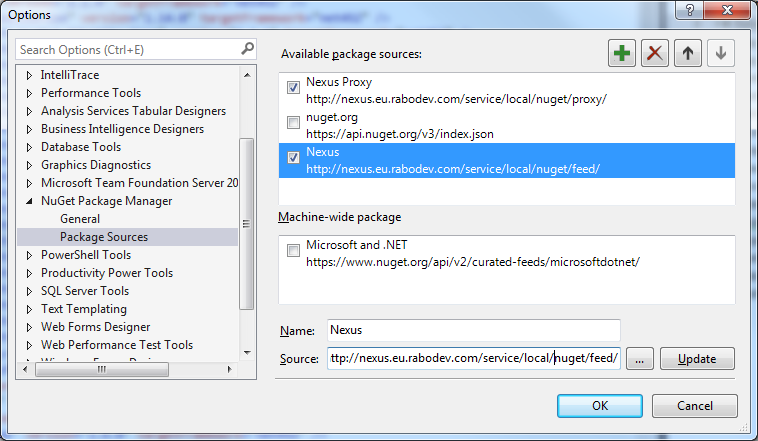
Adding a new feed in Visual Studio is an ordinary task. Select the following menu Tools > NuGet Package Manager > Package Manager Setting. Then in the Options window, select Package Sources and add a new one by clicking on the plus button. You can name the new feed to Nexus and set the source to http://nexus.maio.local/service/local/nuget/feed/. Press Update, then OK.

package_sources_options

This will allow you to access NuGet.org through Nexus Repository Manager OSS in Visual Studio.

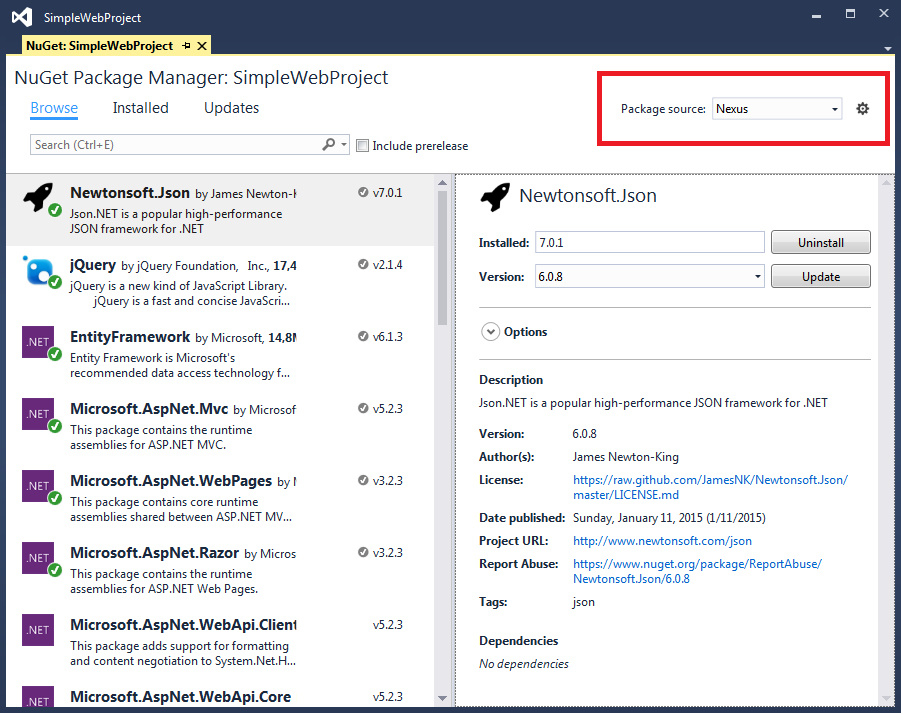
Now in the NuGet Package Manager select the newly added Package Source and you are ready to browse and install the available packages.

nuget_package_manager

If you added a group feed, you will be able to retrive both NuGet.org and your private packages through the same feed.

Build agent package restore

Before we enable the NuGet package restore in our build task we need to make sure that we have the necessary inside our nuget.config file. If you do not have a nuget.config file, you can place it in one of the paths that are listed in NuGet documentation.
In the package sources you need to add the new feed. Consider the following example.

<?xml version="1.0" encoding="utf-8"?>
<configuration>
  <packageSources>
	<add key="Nexus" value="http://nexus.maio.local/service/local/nuget/feed/" />
  </packageSources>
</configuration>

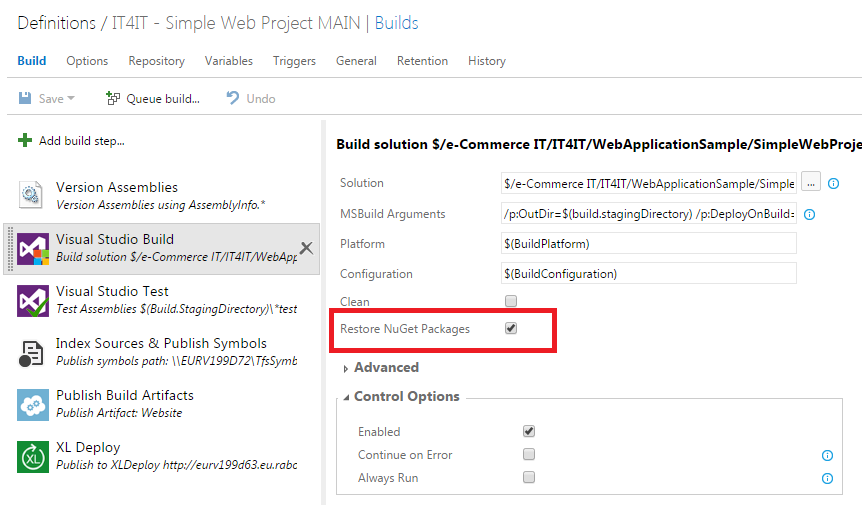
Now you need to check in this file and enable the package restore on your build task.

build_task

This should be now sufficient for the build agent to retrieve all of the necessary packages via Nexus Repository Manager OSS.
You can now remove the packages folder from the source code and request a clean build. In the build console then you will find references about packages being restored.

Manually uploading a package

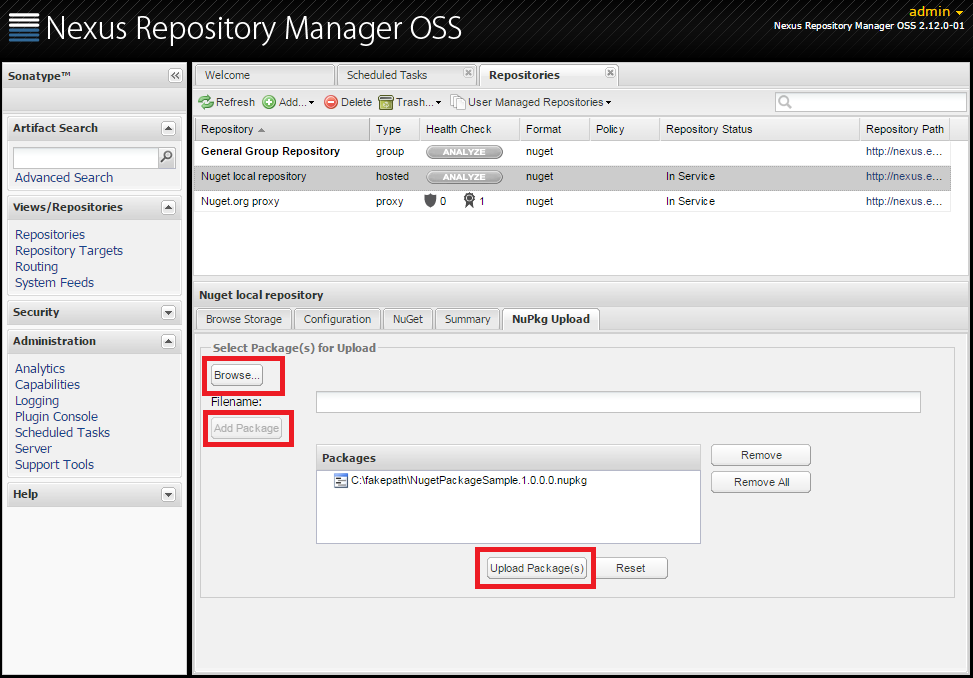
Our custom NuGet packages can be uploaded via the Nexus Repository Manager OSS web interface. Select your repository and go to the NuPkg Upload tab.

nupkg_upload

In that tab, select Browse and choose your .nupkg file. Then click on Add package and if that is the only one you would like to upload, choose Upload Package(s) button. If all goes well you will see the upload confirmation message. If you get to browse storage tab and refresh it, you should see your package uploaded.
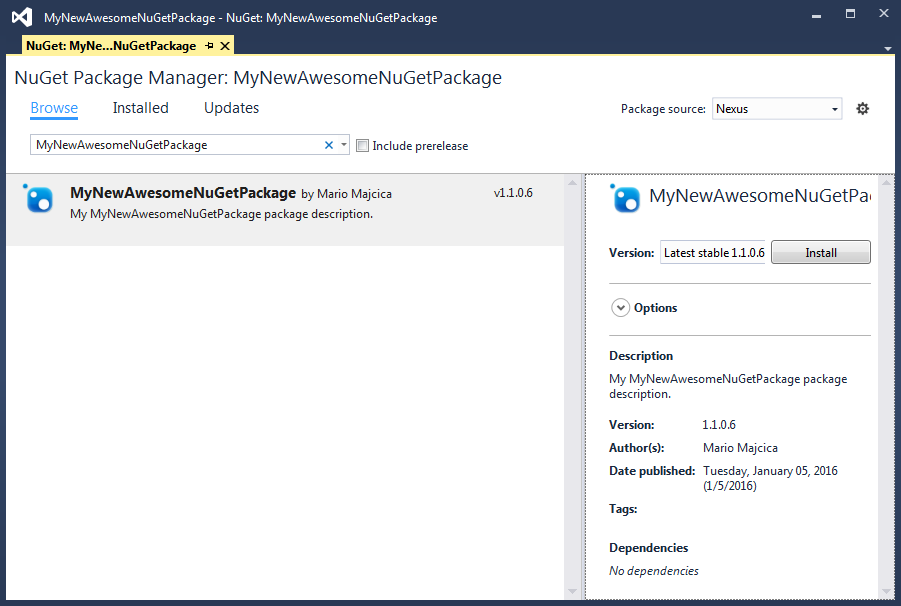
To be sure that we can retrieve our custom package (also via the group repository) let’s get in Visual Studio and search for it.

search_hosted_package

As you can see, we are able to find our package both via our hosted repository feed as also via the group repository. This shows all of the potential of the group repositories and the way it eases the maintenance.

I came in an situation in which I was not able to find via group repository the package I uploaded. In case you upload a package that is present (matches the name and version of the package) in your proxy repository (NuGet.org), your package will not be shown. This is however an edge case and in real life situation you should never encounter such a situation. Still I think it is worth mentioning as during a trial it can happen and I do not want you to freak out about it.

Uploading the package via TFS 2015 build

With TFS 2015 Update 1 a new build task called NuGet Publisher is made available. It can help you with uploading your package to any NuGet repository. After adding the above mentioned build task to your build definition you will be presented with the following options:

nuget_publisher

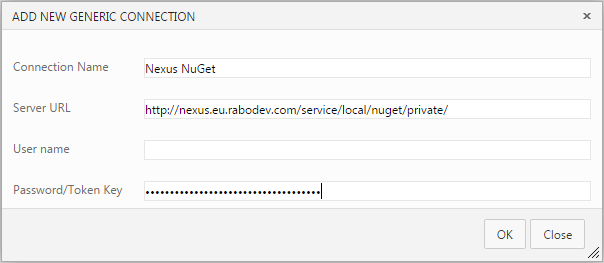
It is sufficient to define a new NuGet Server Endpoint only once. If you choose manage and then add new generic endpoint you will need to specify your feed as server URL, assign an arbitrary name to this endpoint and set you ApiKey as Password/Token Key value.

In our example name is Nexus NuGet, Server URL is http://nexus.maio.local/service/local/nuget/private/ and Password/Token Key is 626d4343-965f-30bc-858e-a322672acf54.

nexus_endpoint

Now that the endpoint is set, we need to specify a minimatch pattern that will point to our NuGet package. In the picture above you can see that I’m pointing my search for all the packages in the the staging folder, where my package is created. This will depend largely on your build definition and what you are trying to achieve.

This is sufficient to upload automatically from your build a new version of your package to our local NuGet server.

In case you are interested in building the package based on your sources and your nuspec file directly by your build definition, you can use NuGet Packager build step to achieve that. This is however out of scope for this blog post.

Uninstall Nexus

Last but not least, removing Nexus. In case you are not satisfied with Nexus you should remove it correctly. Luckily it is trivial.
As for the installation, let’s get into nexus-2.x.x-xx\bin folder. Following are the commands to execute and the relative output.

D:\Nexus\nexus-2.12.0-01\bin>nexus stop
wrapper  | Stopping the nexus service...
wrapper  | nexus stopped.

D:\Nexus\nexus-2.12.0-01\bin>nexus uninstall
wrapper  | nexus removed.

After both of these commands succeeded, you can safely remove the folder for your disk. In case you set a non default path for the repository storage, you can remove that one also.

Conclusion

That’s all folks! I hope I covered all of the arguments you may be interested in when it comes to Nexus Repository Manager OSS and NuGet. I do hope that this will encourage you in using or improve your current NuGet services setup.

TFS 2015 Build Agent failing syncing the repository

I would like to share with you my last struggle with TFS. I received a call from a colleague about some problem with the ‘new’ TFS build. Initially I tough it is only a miss-configuration and that the solution will be trivial, but as you can imagine, it wasn’t.

The problem lied in the fact that build agent couldn’t retrieve the sources and the error message was not treated as such. You could only see logged a (workspace version -1) inside the Get Sources step, after stating that syncing the repository was done.

workspace_version_-1

As a first thing, I tough about agent not having sufficient rights to retrieve the source code. After a quick check and making sure that the agent service user has sufficient rights to retrieve the code, I run my build again and I got the same result. Didn’t helped.

Next thing I checked all sort of settings, running the build on a different build agent on different server, running the agent under different account, making sure that permissions for the _work folder are setup correctly, all sort of things. I ended up realizing that if I moved the code from that Team project to another team project, suddenly my build agent was able to retrieve the code again. There where two things, or the project was corrupted or there where some security issues. Thanks to the Microsoft support assistance, I managed to get to the right solution. And guess what? It was a security issue.

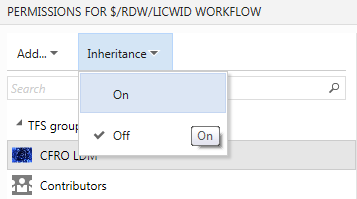
For an unknown reason the permission inheritance was disabled on the folder that contained all of the interested branches.

permission_inheritance_off

By enabling this setting, I saw that there is a small change in the way build agents are authenticated against TFVC. XAML build agent identifies itself with the user that agent runs under. 2015 build agent in the other hand, uses a Project Collection Build Service group to do so. It is added automatically to the source code permissions tree, and in order to propagate it needs to have the permission inheritance switched on or you need to manually set rights for that user group.

Same goes for the owner of the local workspace created by the agent.

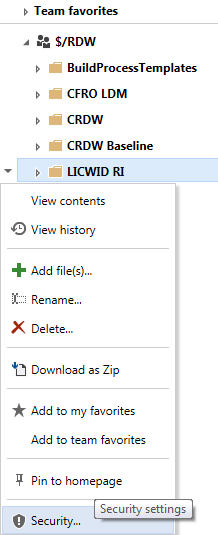
You can change those settings by editing the security for a give item in the source control.

security_settings

Once this is done, you should see your build agent syncing the sources correctly.