Deploy SSIS packages from TFS/VSTS Build/Release

Automating BI projects, based on Microsoft tooling, was always a bit painful. Personally, all of the things shipped with SSDT seemed a bit unloved from a Microsoft side.

What I would like to show you in this post is how I managed to automate the build and deployment of my Integration Services Projects (.dtproj type). We will build our project in order to get the necessary ispac files, upload this artifact in TFS and then deploy it via a TFS Release.

Let’s start with the build. As you may already know, IS Projects are not based, as most of Visual Studio projects, on MSBuild. This is the first difficulty everyone faces once they start setting a CI/CD pipeline for this type of projects. The only way to build it is to use devenv.com executable that is part of the Visual Studio installation. For that, you will need a custom build task or you’ll need to execute a script that will handle the necessary.

In my case, I made a custom build task for it (which can be found here) and thus my build definition looks like this:

Following are the steps of my build. First I will ‘compile’ the SSIS project, then copy the ispac files that were generated to the Build Staging folder, again I’ll copy my SSIS configuration file (more about the configuration file later) to the same location and at the end, I’ll upload all of the files in the Staging folder to TFS as my build artifact.

Now that my artifact is ready, we can proceed with the deployment in the release.

In order to deploy the SSIS package, I’ll use my own build/release task called Deploy SSIS.

The release steps will look like the following.

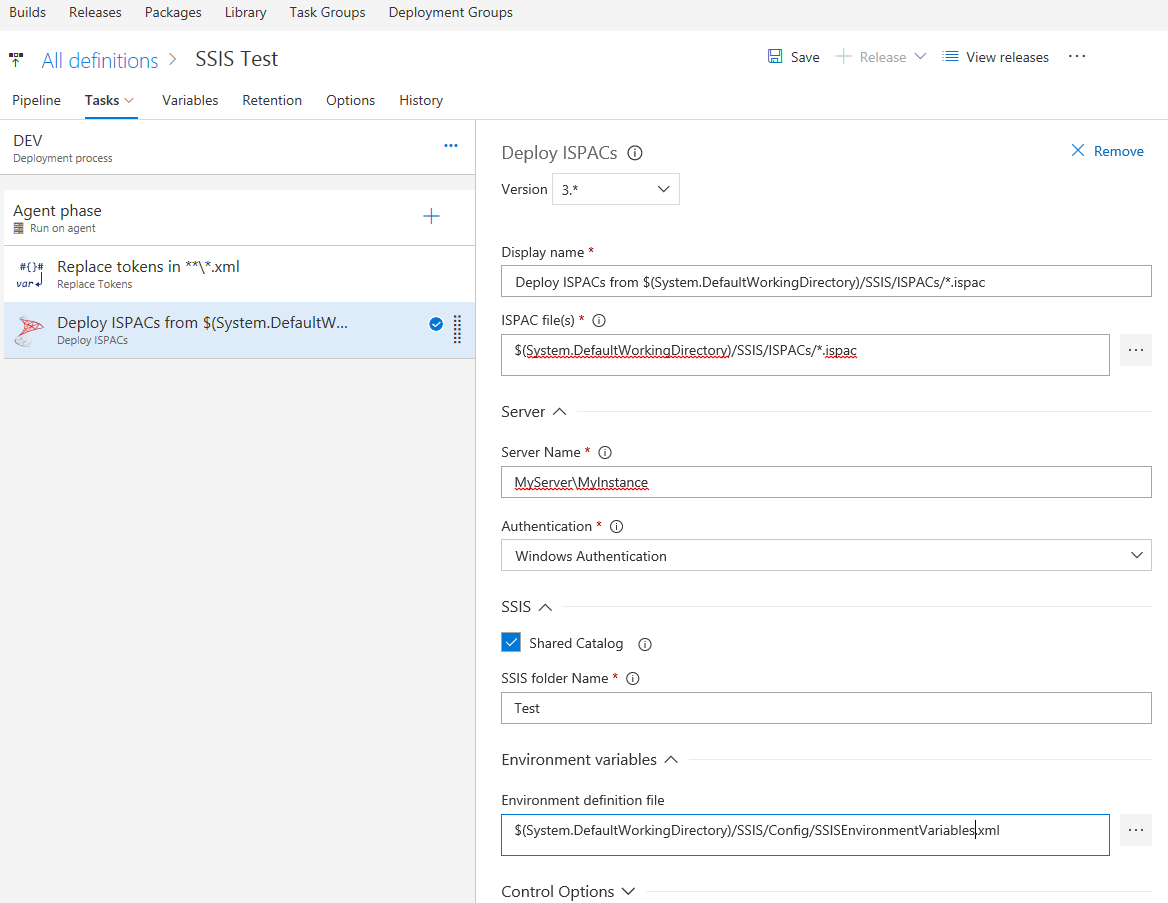
As you can see I will start with replacing the placeholders in the configuration file. The configuration file contains some environment dependent values and in the first step, I’ll make sure that those are substituted with the correct values that are coming from the environment variables in the release.
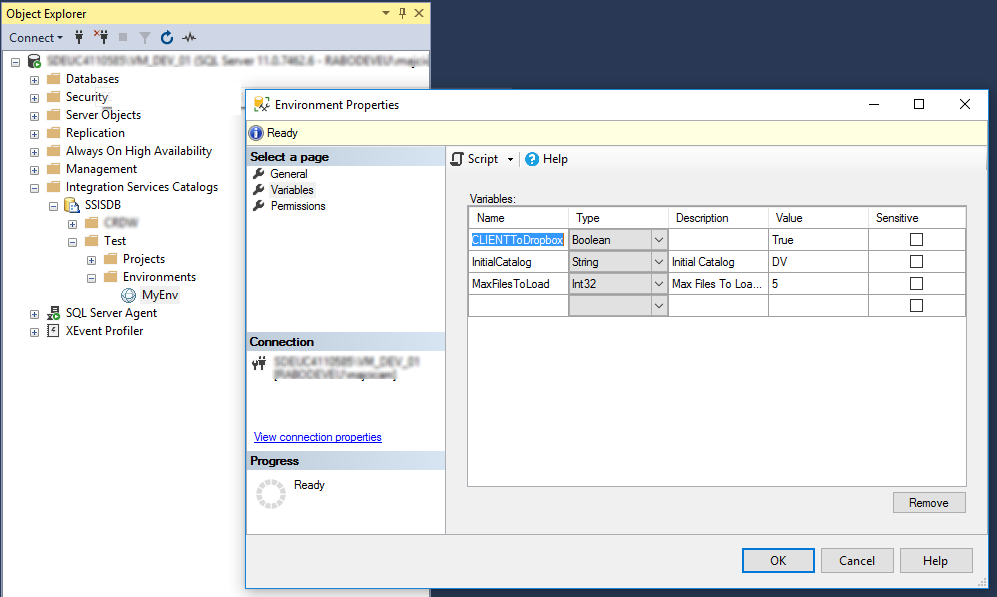
But what is this configuration file I already mentioned a couple of times? It is a file that my deploy task is capable of processing and it contains a list of SSIS environments and variables. There are no other ways of supplying this information, considering that it is not part of the ispacs, and as it was a necessity for my automation to provide them, I came up with a schema from which my Deployment task will pick those up, add them to my SSIS instance and eventually make all of the necessary references. Following is an example of the configuration file.

<?xml version="1.0" encoding="UTF-8" ?>
<environments>
    <environment>
        <name>MyEnv</name>
        <description>My Environments</description>
        <ReferenceOnProjects>
            <Project Name="BusinessDataVault" />
            <Project Name="Configuration" />
        </ReferenceOnProjects>
        <variables>
            <variable>
                <name>CLIENTToDropbox</name>
                <type>Boolean</type>
                <value>1</value>
                <sensitive>false</sensitive>
                <description></description>
            </variable>
            <variable>
                <name>InitialCatalog</name>
                <type>String</type>
                <value>DV</value>
                <sensitive>false</sensitive>
                <description>Initial Catalog</description>
            </variable>
            <variable>
                <name>MaxFilesToLoad</name>
                <type>Int32</type>
                <value>5</value>
                <sensitive>false</sensitive>
                <description>Max Files To Load by dispatcher </description>
            </variable>
        </variables>
    </environment>
</environments>

It represents a set of environments. Each environment needs a name. Once defined the task will proceed to create them in SSIS. Environments must be referenced to projects in order for projects to used them, therefore the ReferenceOnProjects element will allow you to enlist the projects on which you would like to apply these references automatically. Last but not least, a list of variables that do need to be populated for the given environment. Variables will also be automatically referenced in projects if the names are matching with parameters. In the end, for the example in question, you will get the following.

Now that we cleared why do we have the config file and how to set it up, I’ll mention you that it is also checked in the source control as my dtproj and other files. In case you are not a big fan of XML, you can provide the same content in form of JSON file.

Let’s see now what are the necessary parameters for our Deploy SSIS task.

First, the SQL instance on which SSIS is running. That’s an easy one and should be set in the Server name field. You can choose the Authentication type for the connection to be established and it can be the Windows Authentication and SQL Server Authentication. Based on this choice the relevant SQL Connection String that is used to communicate with your server will be set. In case of Windows Authentication, the build agent identity will be used, so make sure that account has the necessary privileges in SQL.

In case you are deploying multiple applications in SSIS, you would like to flag the Share Catalog option because then, the catalog will not be dropped before deploying. Also if you have any other reasons not the drop the catalog on each deployment, this option will do.

SSIS folder Name parameter is self-explanatory. We need to deploy our projects and environments in a folder, that’s the only possible option in SSIS. Thus, we need to choose a name for a folder that we are going to deploy our projects and environments in.

As the last parameter Environment definition file is the location of our configuration file. If not supplied, projects will still be deployed however, no variables will be created and referenced.

I do hope that this is sufficient to get you started with automating your SSIS deployments. If any, don’t hesitate to ask in the comments.

Provisioning WebDeploy in VSTS/TFS release via DSC script

It’s been a while since we got at our disposition some great tooling for the provisioning of our machines. Unfortunately, it is not as used as I would like it to be. For us working on Microsoft platform, there is a tool that can do the job, available out of the box, for free, on every modern windows machine. Obviously, I’m talking about the Windows PowerShell Desired State Configuration or for short, DSC. Although not truly a provisioning tool and more as Microsoft defines it, “a management platform in PowerShell that enables you to manage your IT and development infrastructure with the configuration as code”, it will get easily job done when it comes to provisioning tooling and features.

After this long introduction lets cut the chase. In this post I’m going to show you how to write a DSC script which will make sure that the desired IIS components are installed on a given machine, check for Microsoft WebDeploy and eventually install all of those if not present. Once the script is ready, I’ll show you how to execute it during the deployment of your project in a VSTS/TFS Release. I will not get in details of how does DSC work, how to write DSC configuration functions or create your custom DSC Configuration Resources. I’ll focus on a big picture, on how to combine all of the necessary to actually get the work done. When it comes to the details, it’s quite easy to find the necessary technical guidance by just googling the desired terms.

I wrote a script that, given a machine name, will make sure a DSC configuration is applied to it.

param(
    [parameter(Mandatory=$true)]
    [string]
    $ServerName
)

$ConfigurationData = @{
    AllNodes = @(
        @{
            NodeName=$ServerName
            PSDscAllowPlainTextPassword=$true
            RebootNodeIfNeeded = $true
         }
   )
}

Configuration DashboardProvisioning
{
 	Import-DscResource -ModuleName 'PSDesiredStateConfiguration'
     
	Node $AllNodes.NodeName 
     {
        WindowsFeature IIS
        {
            Ensure = "Present"
            Name = "Web-Server"
        }

        WindowsFeature IISManagementTools
        {
            Ensure = "Present"
            Name = "Web-Mgmt-Tools"
            DependsOn='[WindowsFeature]IIS'
        }

        WindowsFeature IISAspNet45
        {
            Ensure = "Present"
            Name = "Web-Asp-Net45"
            DependsOn='[WindowsFeature]IIS'
        }

        WindowsFeature WebManagementService
        {
            Ensure = "Present"
            Name = "Web-Mgmt-Service"
            DependsOn='[WindowsFeature]IIS'
        }

        Package WebDeploy
        {
             Ensure = "Present"
             Path  = "\\MyShareServer\Software\WebDeploy_amd64_en-US.msi"
             Name = "Microsoft Web Deploy 3.6"
             LogPath = "$Env:SystemDrive\temp\logoutput.txt"
             ProductId = "6773A61D-755B-4F74-95CC-97920E45E696"
             Arguments = "LicenseAccepted='0' ADDLOCAL=ALL"
        }
    }
}

DashboardProvisioning -ConfigurationData $ConfigurationData

Start-DscConfiguration -Path .\DashboardProvisioning -Wait -Force -Verbose

The configuration part will make sure that three Windows features are installed and those are all IIS components, necessary for my website to run. The last part, package configuration entry, is making sure that WebDeploy is present, more precisely version 3.6 of WebDeploy. In case it is not installed on the given machine it will run the installer that is located in this particular case on a share at “\\MyShareServer\Software\WebDeploy_amd64_en-US.msi“. You will need to adjust this setting and adapt it to the path where you have placed the msi installer of WebDeploy 3.6. The agent that executes this configuration script will need to have the sufficient rights to access and read that path.

You can manually test this script from your local PC in order to make sure that is working as expected. Once ready we will execute this script in our deployment pipeline.

An example of the invocation is shown in the following screenshot:

As you can see, I’m using the simple PowerShell build task to run my script and as the argument, I’m passing in the machine name, FQDN of my web server in that particular environment. It is that simple! Now, before I do try to copy my files, create and deploy my website, I’m sure that all of the prerequisites are in place so that my deployment can succeed. This step takes a very short time to execute in case the configuration that I specified is already in place. A major benefit is that I can start with a clean machine and my deployment will take care that all of the necessary is in place before proceeding with the actual deployment. In a more complex environment, this will bring consistency in the configuration between different machines and environments and reduce the manual interventions regarding the configuration to a bare minimum.

Once you start testing, make sure that Windows Management Framework of at least version 4 is installed on both your build server and the destination machine and that WinRM is set up, again, for both of these machines.

Once successful I’ll encourage you to extend this script with all of your custom configuration settings, necessary for your application to run.

Cheers!

Automate setting ‘Retain indefinitely’ flag on your releases

Overview

As a common practice, after a successful release to production, often there is a need to retain the involved artifact and relevant release information for a certain amount of time. In order to avoid that a retention policy removes this information, you will mark that release with a Retain indefinitely flag, by choosing that option from the VSTS UI.

As this is a manual process that I would like to automate, I will use the Retain indefinitely current release task available in VSTS Marketplace.

After installing the extension, in the list of available tasks, check the Utility category and you’ll find the above-mentioned task.

Only a single parameter is presented by the task in a form of a checkbox labelled Mark the current release to be retained indefinitely. By default is set to true. If checked, it will mark the current release with Retain indefinitely flag. Otherwise, it will take the Retain indefinitely flag off the current release.

I will add it only to my production environment process and I will place it as the last task. E.g.

This is because I do not want this task to execute if any of the previous tasks in the process do fail. It should execute only if I managed to deploy my application in production. That is the criteria for retaining this release for a longer time.
The only requirement for this task to run is that the account on which the build agent is running has sufficient privileges to set Retain indefinitely flag.

That’s all. Now you do not need to remember to set the Retain indefinitely flag after every successful production release.

UPDATE:

After extensive testing, I noticed that it’s mostly the case that additional rights do need to be granted for the build agent identity in order for this task to succeed.
In case the permissions are missing, a similar error will be visible in the log:

##[error]VS402904: Access denied: User Project Collection Build Service (mummy) does not have manage releases permission. Contact your release manager.

Edit the security settings for that particular release or for all the releases and set the following to the needed account.

Make sure ‘Manage Releases’ permission is granted for the indicated user.

Another note is that also the cross-platform agents are supported starting from the version 2.x of the extension. If you check on GitHub you’ll see that the task has been re-written and it is now based on node provider with the code written in TypeScript.