Managing VSTS/TFS Release Definition Variables from PowerShell
Couple of days ago I was trying to provision my Release Definitions variables in my VSTS/TFS projects via PowerShell. As this turned out not to be a trivial Web-Request and as some of the calls I discovered are not yet documented, I decided to share my findings with you.
In the following lines I’ll show you a couple of cmdlets that will allow you to manipulate all of the variables in your Release Definition, those on the definition level, environment specific ones and also variable groups.
For the purpose of adding Release definition, Environment level variables and relating Variable Groups I wrote the following cmdlet:
function Add-EnvironmentVariable()
{
    [CmdletBinding()]
    param
    (
        [string][parameter(Mandatory = $true, ValueFromPipeline = $true, ValueFromPipelineByPropertyName = $true)][Alias("name")]$VariableName,
        [string][parameter(Mandatory = $true, ValueFromPipeline = $true, ValueFromPipelineByPropertyName = $true)][Alias("value")]$VariableValue,
        [string][parameter(ValueFromPipeline = $true, ValueFromPipelineByPropertyName = $true)][Alias("env")]$EnvironmentName,
        [bool][parameter(ValueFromPipeline = $true, ValueFromPipelineByPropertyName = $true)]$Secret,
        [int[]]$VariableGroups,
        [string][parameter(Mandatory = $true)]$ProjectUrl,
        [int][parameter(Mandatory = $true)]$DefinitionId,
        [string]$Comment,
        [switch]$Reset
    )
    BEGIN
    {
        Write-Verbose "Entering script $($MyInvocation.MyCommand.Name)"
        Write-Verbose "Parameter Values"
        $PSBoundParameters.Keys | ForEach-Object { if ($Secret -and $_ -eq "VariableValue") { Write-Verbose "VariableValue = *******" } else { Write-Verbose "$_ = '$($PSBoundParameters[$_])'" }}

        $ProjectUrl = $ProjectUrl.TrimEnd("/")

        $url = "$($ProjectUrl)/_apis/release/definitions/$($DefinitionId)?expand=Environments?api-version=3.0-preview"
        $definition = Invoke-RestMethod $url -UseDefaultCredentials

        if ($Reset)
        {
            foreach($environment in $definition.environments)
            {
                foreach($prop in $environment.variables.PSObject.Properties.Where{$_.MemberType -eq "NoteProperty"})
                {
                    $environment.variables.PSObject.Properties.Remove($prop.Name)
                }
            }

            foreach($prop in $definition.variables.PSObject.Properties.Where{$_.MemberType -eq "NoteProperty"})
            {
                $definition.variables.PSObject.Properties.Remove($prop.Name)
            }

            $definition.variableGroups = @()
        }
    }
    PROCESS
    {
        $value = @{value=$VariableValue}

        if ($Secret)
        {
            $value.Add("isSecret", $true)
        }

        if ($EnvironmentName)
        {
            $environment = $definition.environments.Where{$_.name -like $EnvironmentName}

            if($environment)
            {
                $environment.variables | Add-Member -Name $VariableName -MemberType NoteProperty -Value $value -Force
            }
            else
            {
                Write-Warning "Environment '$($environment.name)' not found in the given release"
            }
        }
        else
        {
            $definition.variables | Add-Member -Name $VariableName -MemberType NoteProperty -Value $value -Force
        }
    }
    END
    {
        $definition.source = "restApi"

        if ($Comment)
        {
            $definition | Add-Member -Name "comment" -MemberType NoteProperty -Value $Comment
        }

        if ($VariableGroups)
        {
            foreach($variable in $VariableGroups)
            {
                if ($definition.variableGroups -notcontains $variable)
                {
                    $definition.variableGroups += $variable
                }
            }
        }

        $body = $definition | ConvertTo-Json -Depth 10 -Compress

        Invoke-RestMethod "$($ProjectUrl)/_apis/release/definitions?api-version=3.0-preview" -Method Put -Body $body -ContentType 'application/json' -UseDefaultCredentials | Out-Null
    }
}
Don’t get scared by the number of parameters, or apparent complexity of the cmdlet. I’ll quickly explain those parameters, usage and the expected result.
Let’s start with some why’s. As you can see, in the BEGIN block of my cmdlet (which is triggered once per a pipeline invocation) I retrieve the given build definition, in the PROCESS block I add the desired variables (hopefully from the pipeline) then in the END block I persist all of the changes.
If you are unfamiliar with Windows PowerShell Cmdlet Lifecycle, please consult the following article Windows PowerShell: The Advanced Function Lifecycle.
This is intentional, as I want to have a single call to the API for all of the added variables. In this way in the history of the build definition there will be a single entry for all of the variables we added, no matter the number of them. Otherwise, we would persist the changes for each of the variables and our history would be messy.
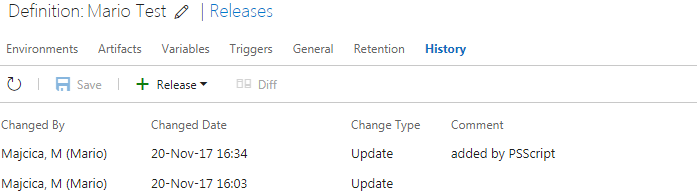
If structured differently, we may see a history entry on per each variable that we do add. This obviously applies only if you are trying to add multiple variable in one go.
Following would be a simple invocation to add a single variable into one of our environments defined in a release template:
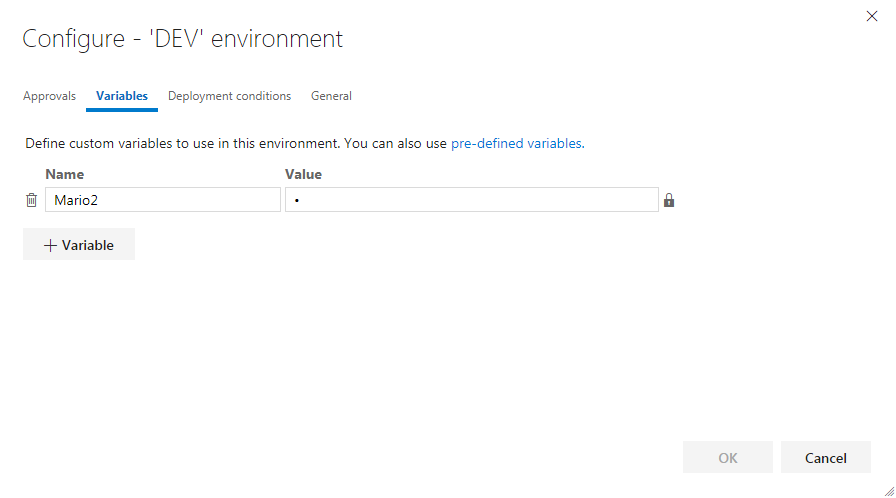
$Project = "https://my.tfs.local:8080/tfs/DefaultCollection/MyProject"
$DefinitionId = 23

Add-EnvironmentVariable -VariableName "Mario2" -VariableValue "1" -EnvironmentName "DEV" -Secret $true -ProjectUrl $Project -DefinitionId $DefinitionId -VariableGroups 25 -Comment "Added by PSScript"
The above command will add a variable named Mario2 with a value 1 in the DEV environment, defined in the definition with id 23. It will also reference the variable group that has id 25.
Following would be the result:
In case you would like to add multiple variables in one go, create an array of PSCustomObject with the following properties:
$variables = @()
$variables += [PSCustomObject]@{ name="var1"; value="123"; secret=$false; env="" }
$variables += [PSCustomObject]@{ name="var2"; value="sdfd"; secret=$false; env="" }
$variables += [PSCustomObject]@{ name="var3"; value="5678"; secret=$false; env="DEV" }
$variables += [PSCustomObject]@{ name="var4"; value="ghjk"; secret=$true; env="DEV" }

$variables | Add-EnvironmentVariable -ProjectUrl $Project -DefinitionId $DefinitionId
This will add two variables to the environment called DEV in your Release Definition and two more variables on the Release Definition level. As you can guess, if we omit the environment name, the variables will be added on the Release Definition level. The last variable, var4, is also marked as secret, meaning that once added will not be visible to the user. Also in this case, we will have only a single entry in the change history as a single call to the REST API will be made.
Other options you can specify are:
- Reset – By setting this switch only the variables that are not passed in the invocation, but are present on the Release definition, will be removed.
- Comment – In case you want a custom message to be visualized in the history for this change, you can specify it here.
- VariableGroups – An integer array indicating id’s of the variable groups you wish to link to the Release definition
In case you are using variable groups you can create those via following cmdlet:
function Add-VariableGroupVariable()
{
    [CmdletBinding()]
    param
    (
        [string][parameter(Mandatory = $true)]$ProjectUrl,
        [string][parameter(Mandatory = $true)]$VariableGroupName,
        [string]$VariableGroupDescription,
        [string][parameter(Mandatory = $true, ValueFromPipeline = $true, ValueFromPipelineByPropertyName = $true)][Alias("name")]$VariableName,
        [string][parameter(Mandatory = $true, ValueFromPipeline = $true, ValueFromPipelineByPropertyName = $true)][Alias("value")]$VariableValue,
        [bool][parameter(ValueFromPipeline = $true, ValueFromPipelineByPropertyName = $true)]$Secret,
        [switch]$Reset,
        [switch]$Force
    )
    BEGIN
    {
        Write-Verbose "Entering script $($MyInvocation.MyCommand.Name)"
        Write-Verbose "Parameter Values"

        $PSBoundParameters.Keys | ForEach-Object { Write-Verbose "$_ = '$($PSBoundParameters[$_])'" }
        $method = "Post"
        $variableGroup = Get-VariableGroup $ProjectUrl $VariableGroupName

        if($variableGroup)
        {
            Write-Verbose "Variable group $VariableGroupName exists."

            if ($Reset)
            {
                Write-Verbose "Reset = $Reset : remove all variables."
                foreach($prop in $variableGroup.variables.PSObject.Properties.Where{$_.MemberType -eq "NoteProperty"})
                {
                    $variableGroup.variables.PSObject.Properties.Remove($prop.Name)
                }
            }

            $id = $variableGroup.id
            $restApi = "$($ProjectUrl)/_apis/distributedtask/variablegroups/$id"
            $method = "Put"
        }
        else
        {
            Write-Verbose "Variable group $VariableGroupName not found."
            if ($Force)
            {
                Write-Verbose "Create variable group $VariableGroupName."
                $variableGroup = @{name=$VariableGroupName;description=$VariableGroupDescription;variables=New-Object PSObject;}
                $restApi = "$($ProjectUrl)/_apis/distributedtask/variablegroups?api-version=3.2-preview.1"
            }
            else
            {
                throw "Cannot add variable to nonexisting variable group $VariableGroupName; use the -Force switch to create the variable group."
            }
        }
    }
    PROCESS
    {
        Write-Verbose "Adding $VariableName with value $VariableValue..."
        $variableGroup.variables | Add-Member -Name $VariableName -MemberType NoteProperty -Value @{value=$VariableValue;isSecret=$Secret} -Force
    }
    END
    {
        Write-Verbose "Persist variable group $VariableGroupName."
        $body = $variableGroup | ConvertTo-Json -Depth 10 -Compress
        $response = Invoke-RestMethod $restApi -Method $method -Body $body -ContentType 'application/json' -Header @{"Accept" = "application/json;api-version=3.2-preview.1"}  -UseDefaultCredentials

        return $response.id
    }
}

function Get-VariableGroup()
{
    [CmdletBinding()]
    param
    (
        [string][parameter(Mandatory = $true)]$ProjectUrl,
        [string][parameter(Mandatory = $true)]$Name
    )
    BEGIN
    {
        Write-Verbose "Entering script $($MyInvocation.MyCommand.Name)"
        Write-Verbose "Parameter Values"
        $PSBoundParameters.Keys | ForEach-Object { Write-Verbose "$_ = '$($PSBoundParameters[$_])'" }
    }
    PROCESS
    {
        $ProjectUrl = $ProjectUrl.TrimEnd("/")
        $url = "$($ProjectUrl)/_apis/distributedtask/variablegroups"
        $variableGroups = Invoke-RestMethod $url -UseDefaultCredentials

        foreach($variableGroup in $variableGroups.value){
            if ($variableGroup.name -like $Name){
                Write-Verbose "Variable group $Name found."
                return $variableGroup
            }
        }
        Write-Verbose "Variable group $Name not found."
        return $null
    }
    END { }
}
This cmdlet will look for the given group and if it exists it will update it with the values you pass in. In case the variable group (matched by name) doesn’t exist, and if the -Force switch is selected, it will create a new group. Working principle is the same as for Add-EnvironmentVariable cmdlet. At the end, it will return the Variable Group Id that you can use later for Add-EnvironmentVariable cmdlet and reference it.
Following an example of invocation:
$ProjectUrl = "https://my.tfs.local:8080/tfs/DefaultCollection/MyProject"

Add-VariableGroupVariable -ProjectUrl $ProjectUrl -VariableGroupName "Mario Test" -Force -VariableName "var1" -VariableValue "1234"
That’s all folks! You now have 2 new cmdlets that will allow you to automate the management of the Release Definition variables. Use these wisely 🙂
Happy coding!
P.S.
A thank you goes to Ted van Haalen who, on my input, actually wrote and tested Add-VariableGroupVariable cmdlet (as you already may have noticed because of the different coding style).