Persisting sensitive information with PowerShell

It often happens that I need to persist a password or another sensitive information strings in a file or database. When it happens I can never recall what was exactly the command I used to do so in the past. That’s why I decided to encapsulate the two operation of encrypting and decrypting a string in a cmdlet so that the next time I can just check my blog post.

A small preface about the operation of encryption. It is based on the ConvertTo-SecureString cmdlet which on its own uses Advanced Encryption Standard (AES) encryption algorithm. Supported key lengths by the AES encryption algorithm in this case are 128, 192, or 256 bits and they do depend on the specified key length.

function Protect-String()
{
    [CmdletBinding()]
    param
    (
        [string][parameter(Mandatory = $true)]$String,
        [string][parameter(Mandatory = $true)]$Key
    )
    BEGIN { }
    PROCESS
    {      
        if (([system.Text.Encoding]::Unicode).GetByteCount($Key) * 8 -notin 128,192,256)
        {
            throw "Given encription key has an invalid lenght. The specified key must have a length of 128, 192, or 256 bits."
        }

        $secureKey = ConvertTo-SecureString -String $Key -AsPlainText -Force
        
        return ConvertTo-SecureString $String -AsPlainText -Force | ConvertFrom-SecureString -SecureKey $secureKey
    }
    END { }
}

As you can see, there are two required parameters, string that you are trying to encrypt and the key to use to encrypt it. As mentioned above, specified key must have a length of 128, 192, or 256 bits. This translate in a string with length respectively equal to 8, 12 or 16 chars. The calculation is simple, strings inside PowerShell are represented as 16-bit Unicode, instances of .NET’s System.String class, thus 16 bits per character. Knowing this, the maths is easy.
For record, if we haven’t specified any key, the Windows Data Protection API (DPAPI) would be used to encrypt the standard string representation and we wouldn’t be capable of decrypting our string on a different computer.
After we invoke our cmdlet, we will get back the encrypted string. We can then persist that information safely in, at example, our configuration file or a database field.

Once we need to read our value back we can use the following cmdlet:

function Unprotect-String()
{
    [CmdletBinding()]
    param
    (
        [string][parameter(Mandatory = $true)]$String,
        [string][parameter(Mandatory = $true)]$Key
    )
    BEGIN { }
    PROCESS
    {
        if (([system.Text.Encoding]::Unicode).GetByteCount($Key) * 8 -notin 128,192,256)
        {
            throw "Given encription key has an invalid lenght. The specified key must have a length of 128, 192, or 256 bits."
        }

        $secureKey = ConvertTo-SecureString -String $Key -AsPlainText -Force
        $secureString = ConvertTo-SecureString $String -SecureKey $secureKey

        $credential = New-Object -TypeName System.Management.Automation.PSCredential -ArgumentList "dummy", $secureString

        return $credential.GetNetworkCredential().Password
    }
    END { }
}

Passing in the encrypted string and the key that should be used to decrypt the information, this cmdlet will return the decrypted string.

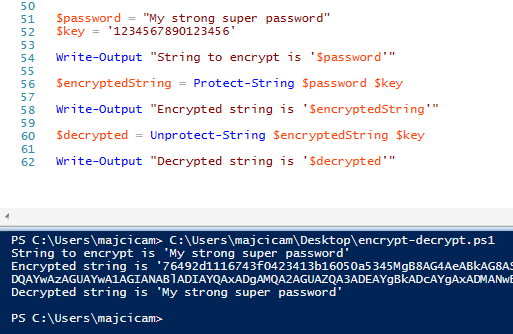
Following an example:

$password = "My strong super password"
$key = '1234567890123456'

$encryptedString = Protect-String $password $key

Unprotect-String $encryptedString $key

You can expect to see outputted console the “My strong super password”.

That’s all folks. Keep your sensitive information safe!

TextTransform issues after VS Project Upgrade

Recently I moved one of my projects from Visual Studio 2012 to Visual Studio 2015. Considering the project type, I was hoping for a smooth upgrade. However that was not the case. Once I tried building my solution I started getting the following error:

The command ""C:\Program Files (x86)\Common Files\Microsoft Shared\TextTemplating\14.0\TextTransform.exe"" -out "bin\LinkSet.xml" "App_Data\LinkSet.tt"" exited with code 3.

A quick search on Google gave me no results. This surprised me and I started to dig deeper hoping to understand what is causing this issue. In my project file I found a curios thing. Under the TextTransform related property group there was the following:

<PropertyGroup>
    <CommonProgramFiles32>$(MSBuildProgramFiles32)\Common Files</CommonProgramFiles32>
    <_TransformExe>$(CommonProgramFiles32)\microsoft shared\TextTemplating\11.0\TextTransform.exe</_TransformExe>
    <_TransformExe Condition="!Exists('$(_TransformExe)')">$(CommonProgramFiles32)\Microsoft Shared\TextTemplating\10.0\TextTransform.exe"</_TransformExe>
    <_TransformExe Condition="!Exists('$(_TransformExe)')">$(CommonProgramFiles32)\Microsoft Shared\TextTemplating\11.0\TextTransform.exe"</_TransformExe>
    <_TransformExe Condition="!Exists('$(_TransformExe)')">$(CommonProgramFiles32)\Microsoft Shared\TextTemplating\12.0\TextTransform.exe"</_TransformExe>
    <_TransformExe Condition="!Exists('$(_TransformExe)')">$(CommonProgramFiles32)\Microsoft Shared\TextTemplating\13.0\TextTransform.exe"</_TransformExe>
    <_TransformExe Condition="!Exists('$(_TransformExe)')">$(CommonProgramFiles32)\Microsoft Shared\TextTemplating\14.0\TextTransform.exe"</_TransformExe>
    <MyOutDir>$(MSBuildProjectDirectory)\bin\$(Configuration)</MyOutDir>
</PropertyGroup>

It is quite hard to spot the difference in these lines, however there is an important one. Lets go trough this MsBuild code:

_TransformExe propery is declared with a value that equals $(CommonProgramFiles32)\microsoft shared\TextTemplating\11.0\TextTransform.exe. In case that given path is not found the value will be overridden with the values in the following lines, until the path is found. In this way, the transformation tool will be found independently of the version of Visual Studio installed on your machine. There is however a small issue as the lines with a Condition set, in the value that is assigned, there is a quote at the end of the path. This quote will, later on, clash during the invocation of the tool at the line:

<Target Name="TransformOnBuild" BeforeTargets="AfterBuild">
    <Exec Command="&quot;$(_TransformExe)&quot; -out &quot;$(OutDir)LinkSet.xml&quot; &quot;App_Data\LinkSet.tt&quot;" />
</Target>

This leads me to the initial error message, you can see that in case Visual Studio 2012 is not installed on the machine I’m building with, the command executed will be like following "C:\Program Files (x86)\Common Files\Microsoft Shared\TextTemplating\14.0\TextTransform.exe"" -out "bin\LinkSet.xml" "App_Data\LinkSet.tt" which has one quote too much.
The solution is quite simple, edit your project file with the text editor of choice, find the incriminated lines and remove the final quote. You should end up with lines being modified like this

<PropertyGroup>
    <CommonProgramFiles32>$(MSBuildProgramFiles32)\Common Files</CommonProgramFiles32>
    <_TransformExe>$(CommonProgramFiles32)\microsoft shared\TextTemplating\11.0\TextTransform.exe</_TransformExe>
    <_TransformExe Condition="!Exists('$(_TransformExe)')">$(CommonProgramFiles32)\Microsoft Shared\TextTemplating\10.0\TextTransform.exe</_TransformExe>
    <_TransformExe Condition="!Exists('$(_TransformExe)')">$(CommonProgramFiles32)\Microsoft Shared\TextTemplating\11.0\TextTransform.exe</_TransformExe>
    <_TransformExe Condition="!Exists('$(_TransformExe)')">$(CommonProgramFiles32)\Microsoft Shared\TextTemplating\12.0\TextTransform.exe</_TransformExe>
    <_TransformExe Condition="!Exists('$(_TransformExe)')">$(CommonProgramFiles32)\Microsoft Shared\TextTemplating\13.0\TextTransform.exe</_TransformExe>
    <_TransformExe Condition="!Exists('$(_TransformExe)')">$(CommonProgramFiles32)\Microsoft Shared\TextTemplating\14.0\TextTransform.exe</_TransformExe>
    <MyOutDir>$(MSBuildProjectDirectory)\bin\$(Configuration)</MyOutDir>
</PropertyGroup>

If you run your build now, it will succeed without the TextTransform.exe exiting with Code 3.

XL Deploy in VSTS/TFS build/release pipelines

Introduction

Circa a year ago I showed you how to use XebiaLabs Team Foundation Server 2015 XL Deploy plugin to create, import and deploy, XL Deploy Deployment Archives, on TFS and VSTS. With a new version of the plugin, that is now renamed into VSTS extension for XL Deploy, XebiaLabs delivers two more build/release tasks. This tasks are supported both by build and release pipelines in VSTS and Team Foundation Server. This will allow us to be more granular and chose to perform only certain operations at each stage, in our pipelines. We can at example choose to create our XL Deploy Deployment Archive during the build and later on, in our release definition, deploy the same artifact in different environments, using XL Deploy.
In the following post, I’ll show you an example on how to achieve this by using our two new tasks, respectively, Package with XL Deploy build task and Deploy with XL Deploy build task.

Building the artifact

As in my previous post, we will keep our Visual Studio Build, however, instead of using the XL Deploy build task, we will add Package With XL Deploy task which you can find in the Package category in the Task Catalog

Once added, we need to point it to the right manifest path, chose if we want the task to set the version of the created package based on the build number and, in our case, Publish the artifact to TFS. In this way once the package is created, it will be uploaded to TFS and associated as an artifact to the current build. At the end the result should be similar to the following.

You can now try your build and at the end, if successful, you should see our DAR package under the build artifacts.

If you can see your artifact uploaded, we can move to the next step.

Deploying from the VSTS Release Management

We are going now to create a new release definition and start with an empty template. As artifact source we are going to indicate a build and select from the relevant drop-down, build definition that we created in our previous step. You also may choose to select a continuous deployment option and a specific build queue for this build.

Once the release definition is created, for your initial Environment, choose Add task and select Deploy with XL Deploy from the task catalog.

This task will allow us to import the DAR package into XL Deploy and trigger the deployment for the desired environment. Bare in mind that it will check if the package is already in XL Deploy and, if so, will skip the import. This means that if you are using it multiple times for different environment definitions, it will behave as efficiently as possible.

Now we need to select the XL Deploy Endpoint, which indicates the instance of XL Deploy we are using for this deployment and fill in the necessary indications about the artifact location and the name of our target environment. For what concerns the XL Deploy Endpoint you can get further information in Add an XL Deploy endpoint in Visual Studio Team Services document. Artifact can be ‘picked up’ from the Server, it means that it will be made available by the release itself, or it can be retrieved from the file share. In our case it will be delivered by the release which will gets it from the associated build.

That’s all! Now we can create a new release and let our task delegate the deployment to XL Deploy.

Conclusion

We saw how can we leverage the new build/release tasks to interact with XL Deploy in different phases of our Build/Release process.

You can find more VSTS specific information at the following link or more information about the VSTS extension for XL Deploy here.