Azure DevOps extension for XL Deploy

XL Deploy and Microsoft development process improvement tools are long date friends. XL Deploy started supporting TFS since the 2010 version. Initially, the integration came in form of custom build activities for XAML templates. With TFS 2015, Microsoft introduced a simpler task and script-driven cross-platform build system and XL Deploy followed up with an extension that delivered the custom tasks that will integrate operations in between our build/releases and XL Deploy. The newly introduced extension was named ‘VSTS extension for XL Deploy’ which was published to the VSTS Marketplace so that all the customers can easily integrate it on their systems. You can find more information on the argument on XebiaLabs blog, for example V7.0 Plugin Adds Fine-Grained Control to Microsoft TFS/VSTS Deployments.

Today XebiaLabs released a new version of the above-mentioned extension. The version number is 8.5 and it brings a lot of interesting improvements.

What’s new?

First of all, the name. The extension is renamed to follow up on Microsoft new naming. The name is “Azure DevOps extension for XL Deploy”.

One of the major changes is laying under the hood. Tasks delivered by the extension are no more implemented with PowerShell, instead, they are based on NodeJs. This allows us to run all of them also on cross-platform agents. This, however, will require the agent version 2.117.0 or newer.

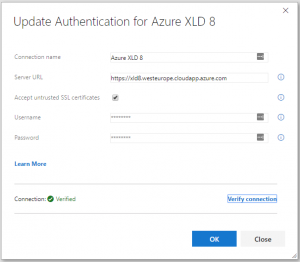
There is an improved endpoint definition. You can now test your connection directly from the endpoint definition window. Also, there is better and more precise handling of the self-signed certificate that you can now ignore by selecting “Accept untrusted SSL certificates” flag on the endpoint service.

Also, “Deploy with XL Deploy” task was simplified by letting you specify an advanced search pattern that will look for your deployment archive.

How will this impact the customers using it?

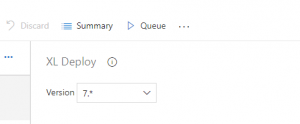
If you are already using ‘VSTS extension for XL Deploy’ extension, you can upgrade it with “Azure DevOps extension for XL Deploy”. Once the upgrade is done, your builds/releases will still continue using the old version of the tasks, until you do not modify them and manually upgrade to the new, version 7, of the task.

In case you encounter any issues with the new version, you can always rollback the task to the previous version.

This is a typical path of the major version update for tasks in Azure DevOps Services, same as many of the out-of-the-box tasks have shown us.

You can find the nex extension here Azure DevOps extension for XL Deploy on Visual Studio Marketplace.

Download a file with TypeScript

This may apparently be a trivial thing to do. Well, it turns out it was not, at least for me. This is why I would like to share my experience with you, it may save someone several hours of fiddling.

As in the past posts, I will be making my HTTP calls via typed-rest-client. This library is again based on the plain NodeJs http.ClientRequest class. This also means that if you do not plan to use this library, you can still follow the method I’m suggesting.

Here is the full example of the code.

import fs = require("fs");
import { HttpClient } from "typed-rest-client/HttpClient";

async function run() {
    const client = new HttpClient("clientTest");
    const response = await client.get("https://some.server.of.mine.com/largeImage.png");
    const filePath = "C:\\temp\\downloadedFile.png";
    const file: NodeJS.WritableStream = fs.createWriteStream(filePath);
    
    if (response.message.statusCode !== 200) {
        const err: Error = new Error(`Unexpected HTTP response: ${response.message.statusCode}`);
        err["httpStatusCode"] = response.message.statusCode;
        throw err;
    }

    return new Promise((resolve, reject) => {
        file.on("error", (err) => reject(err));

        const stream = response.message.pipe(file);

        stream.on("close", () => {
            try { resolve(filePath); } catch (err) {
                reject(err);
            }
        });
    });
}

run();

Let’s check what I wrote here and why.

Initially, I do create an instance of the HttpClient class and pass in the user agent parameter (any string will do here). Then I do call a get method to fetch an URL. At this point, I’m ready to persist the response so I do create a write stream for a given path. Here you can improve this code, at example by looking for Content-Disposition header and if present get the filename out of it, etc. The choice is yours and my goal was to show you how to handle the streams in TypeScript.
Now the tricky part, where I lost plenty of time. We need to pipe the message as it is a readable stream to our writable stream. But the fact is that we need to wait until the close event is triggered. This is where you need to wrap this up in the promise and wait for it to complete. In my example, I also look up for the error event and in case I do reject the promise.

Believe it or not, considering my limited experience with JavaScript and TypeScript, I was not awaiting for those events and my code refused to work. I lost some time figuring things out and google was of no much help. As I couldn’t find any TypeScript specific examples, I decided, even if seems banal, to share this with you.

Please share your thoughts with me in case you think this can be improved, I would love to learn more about it.

Cheers

Node10 provider available for Agent v2.144.0

It’s been a while that developers of Azure DevOps build/release tasks have been stuck on NodeJs v6.10.3 (available since agent v2.117.0). In the past days, a new pre-release of the agent came out that supports NodeJs 10 runtime. This is a great news but a bit ‘under-advertised’.

Let’s see what it is all about.

Starting with version v2.144.0 a new provider, called Node10 is supported. It is still a pre-release, but I’m confident that soon we will get a proper release with this new provider available.

To start using it, your task needs to reference it in the following way. In your task.json file just specify under the execution node, instead of probably just Node, Node10.

Example:

"execution": {
        "Node10": {
            "target": "task.js",
            "argumentFormat": ""
        }
    }

This means that in this case, your task implementation will run on NodeJs v10.13.0.
You are now free to use the Node 10 meanwhile if you are developing in TypeScript, then you can target ES2018 in this case. And if you are using TypeScript 3.2, some new features like BigInt may become available (by adding esnext.bigint to the lib setting in your compiler options).

Also do not forget to set in your task the “minimumAgentVersion” to:

"minimumAgentVersion": "2.144.0"

Cheers