Uploading XL Deploy DAR package via TypeScript

Another day, another language, another challenge

In past I already wrote about multipart/form-data requests that are used to upload files. It was about PowerShell and leveraging .Net libraries to achieve this task. Now it is the turn of TypeScript.

I had a need to implement the file upload to XL Deploy which requires multipart/form-data standard in order to do so. I wrote about the same thing in the past, using PowerShell to upload DAR package to XL deploy. This time, however, I needed to use NodeJs/TypeScript.

This is not meant to be a guide about the TypeScript, I do suppose you already have some knowledge about it. I just would like to show you how did I achieve it, hoping to help others not to go through the same discovery process that brought me to result.

First of all, I will be making my HTTP calls via typed-rest-client. This library is again based on the plain NodeJs http.ClientRequest class. This also means that if you do not plan to use this library, you can still follow the method I’m suggesting.
Creating the multipartform-data message structure and adding the necessary headers will be done with form-data package. It is one of the most popular libraries used to create “multipart/form-data” streams. Yes, I just mentioned the keyword, streams, and yes, we are going to use streams to achieve this and allow us not to saturate resources on our client host in case of large files upload.

Enough talking now, let’s see some code.

Sending multipartform-data messages in Typescript

Before we start, make sure that you install the following packages:

npm install typed-rest-client
npm install form-data
npm install @types/form-data

This is all we need. Note I also installed typings for the form-data library so that we can comfortably use it in TypeScript and make sure that “typed-rest-client” library is at least of version 1.0.11.

Code wise, first of all, we need to create an instance of our client.

import { BasicCredentialHandler } from "typed-rest-client/Handlers";
import { RestClient } from "typed-rest-client/RestClient";

async function run() {
    const requestOptions = { ignoreSslError: true };
    const authHandler = [new BasicCredentialHandler("user", "password")];

    const baseUrl: string = "https://myXLServer:4516";

    const client = new RestClient("myRestClient", baseUrl, authHandler, requestOptions);
}

I will skip commenting on the necessary imports and quickly analyze the remaining code.

I need to create request options and set the ignoreSslError property. This is so to allow my self-signed certificate to be accepted.
Then I do create a basic authentication handler and pass in the requested username and password. Once I have all of the necessary, I create an instance of the RestClient.

You spotted well, it is a RestClient and above I talked about the HttpClient. Do not wary, it is a wrapper around it, helping me to deserialize the response body, verify the status code, etc.

Let’s now prepare our form data.

...
import FormData from "form-data";
import fs from "fs";

async function run() {
	...
	const formData = new FormData();
	formData.append("fileData", fs.createReadStream("C:\\path\\to\\myfile.dar"));
}

We need a couple of extra imports and once that is sorted out, we just do create an instance of the FormData class. Once we have it, we will call the append method, pass in the file name and the stream that points to my file of choice. In order to get my file that is on the disk, I’m using createReadStream function from fs library which is a very common way to setup a stream.

At this point, we are ready to make our HTTP call.

async function run() {
	...
	const response = await client.uploadStream(
		"POST", `deployit/package/upload/myfile.dar`,
		formData,
		{ additionalHeaders: formData.getHeaders() });

	console.log(response.result.id);
}

As you can see, we are invoking the upload stream method from the rest client and passing in the following parameters.
HTTP method to use, POST in our case (XL Deploy), second, rest resource URL that needs to be triggered. Bear in mind that actual URL will be composed with the base you passed in the constructor of the RestClient. Then, the stream containing the body. This is going to be the instance of our FormData class, which is of type stream, and as the fourth parameter, we need to pass the additional headers. The additional headers we are specifying are overriding the content-type as for multipart/form-data it needs to be set to multipart/form-data and contains the correct boundary value. That’s what getHeaders will do, return the necessary content-type header with the necessary correct boundary value.

Once the call has been made, the upload of the file will start. As the response from XL Deploy on a successful import we will receive a message in form of JSON where one of the fields do report the ID of the package, and that’s what I’m printing in the console on my last line.

This may be specific for XL Deploy, however, you can easily adapt this code for any other service where multipart/form-data upload is necessary.

Following the complete code sample.

import FormData from "form-data";
import fs from "fs";
import { BasicCredentialHandler } from "typed-rest-client/Handlers";
import { RestClient } from "typed-rest-client/RestClient";

async function run() {
    const requestOptions = { ignoreSslError: true };
    const authHandler = [new BasicCredentialHandler("user", "password")];

    const baseUrl: string = "https://myXLServer:4516";

    const client = new RestClient("myRestClient", baseUrl, authHandler, requestOptions);

    const formData = new FormData();
    formData.append("fileData", fs.createReadStream("C:\\path\\to\\myfile.dar"));

    const response = await client.uploadStream<any>(
        "POST", `deployit/package/upload/myfile.dar`,
        formData,
        { additionalHeaders: formData.getHeaders() });

    // tslint:disable-next-line:no-console
    console.log(response.result.id);
}

run();

Good luck!
Living Documentation and test reports in VSTS/TFS pipelines

Introduction

In order to truly get advantage from all of the hard work that we put into our tests, we need to present our test run results and share our specifications in more convenient and accessible way. On Windows platform in order to make this tasks happen, we can leverage tools that you are probably already using, SpecFlow itself and a sidekick project of it called Pickles. If none of what I just said does make sense, you are reading the wrong post, so please check the SpecFlow documentation and read about BDD which is partly in PDF so using software as Soda PDF could be useful for this. However, if you are already familiar with it, you are using SpecFlow and are looking for a decent way to automate the above-mentioned tasks, please continue reading as I may have a valid solution to it.

All of the implementations that I came across till now, involved scripts, MSBuild tasks and a lot of other cumbersome solutions. I saw potential in VSTS/TFS build/release pipeline that through some specific build/release tasks are a neat solution automating these requirements.

Let’s start.

Generating SpecFlow reports in VSTS

Generating a nice and easy to consult report over our your test runs is relatively easy. SpecFlow NuGet package already includes all of the necessary to do so, that is the SpecFlow executable itself. In my demo case, I am using NUnit 3, however other frameworks are also supported.

Let’s check first what are the necessary manual steps to get the desired report.
After executing my tests with NUnit Console Runner with the following parameters

nunit3-console.exe --labels=All "--result=TestResult.xml;format=nunit2" SpecFlowDemo.dll

I am ready to generate my report. Now I just need to invoke the SpecFlow executable with the following parameters

specflow.exe nunitexecutionreport SpecFlowDemo.csproj /xmlTestResult:TestResult.xml /out:MyReport.html

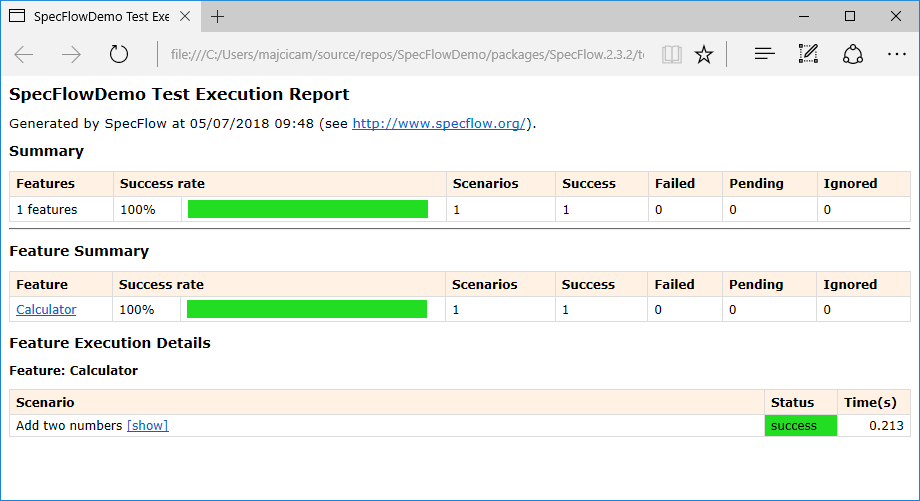
And voila, the report is generated and it looks like following

Details over the various parameters accepted by SpecFlow executable can be found here, Test Execution Report.

Now, how do we integrate this into our VSTS build pipeline?

First, we need to run our tests in order to get the necessary test results. These may vary based on the testing framework that we are using. Two supported ones are NUnit or MSTest.

Be aware that if you run your MsTest’s with vstest runner, the output trx file will not be compatible with the format generated by mstest runner and the report will not render correctly. For that to work, you’ll need a specific logger for your vstest runner.

Once the tests are completed we are going to use the SpecFlow Report Generator task that is part of the homonymous extension that you can find here.
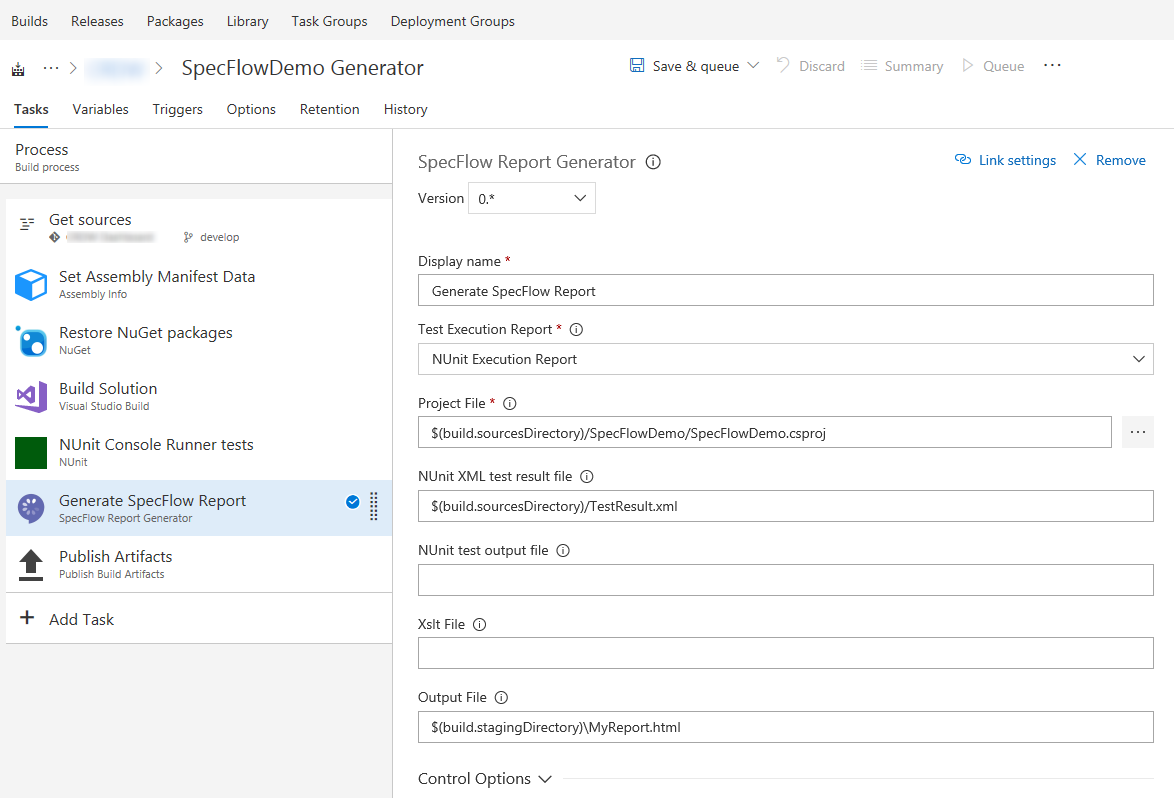
After adding the SpecFlow Report Generator task in your build definition, it will look similar to this.

In case you are interested in how each parameter influences the end result, check the above-mentioned link pointing to the SpecFlow documentation as the parameters are the same as on per tool invocation via the console.

Now that your report is ready you can process it further like making it part of the artifact or send it via email to someone.

Generating Pickles living documentation

Support documentation based on your specifications can be generated by Pickles in many ways, such us MSBuild task that could be part of your project, PowerShell library or simply by invoking the Pickles executable on the command line.

In case of trying to automate this task, you will probably use the console application or PS cmdlets. Let’s suppose the first case, then the command that we are looking for is like following

Pickles.exe --feature-directory=c:\dev\my-project\my-features --output-directory=c:\Documentation --documentation-format=dhtml

All of the available arguments are described here.

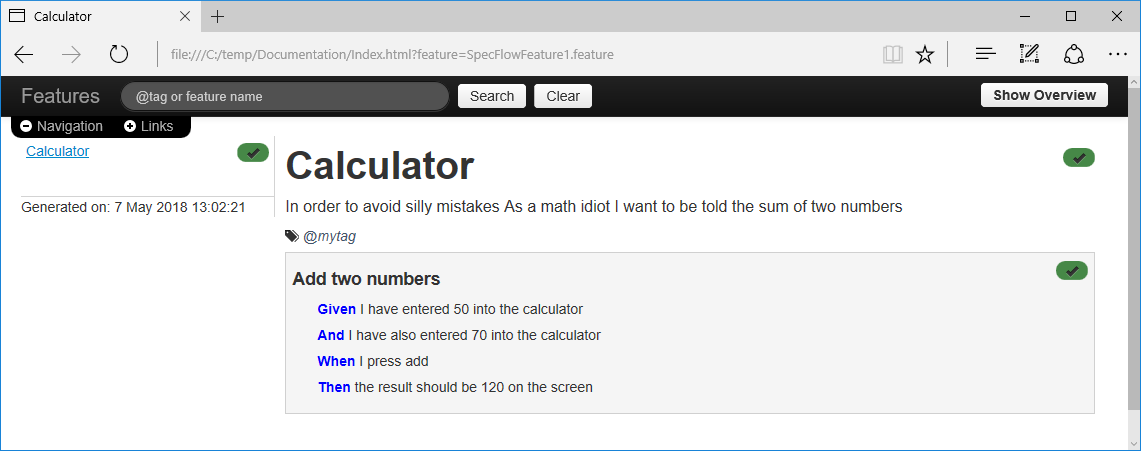
As the result you will get all of the necessary files to render the following page:

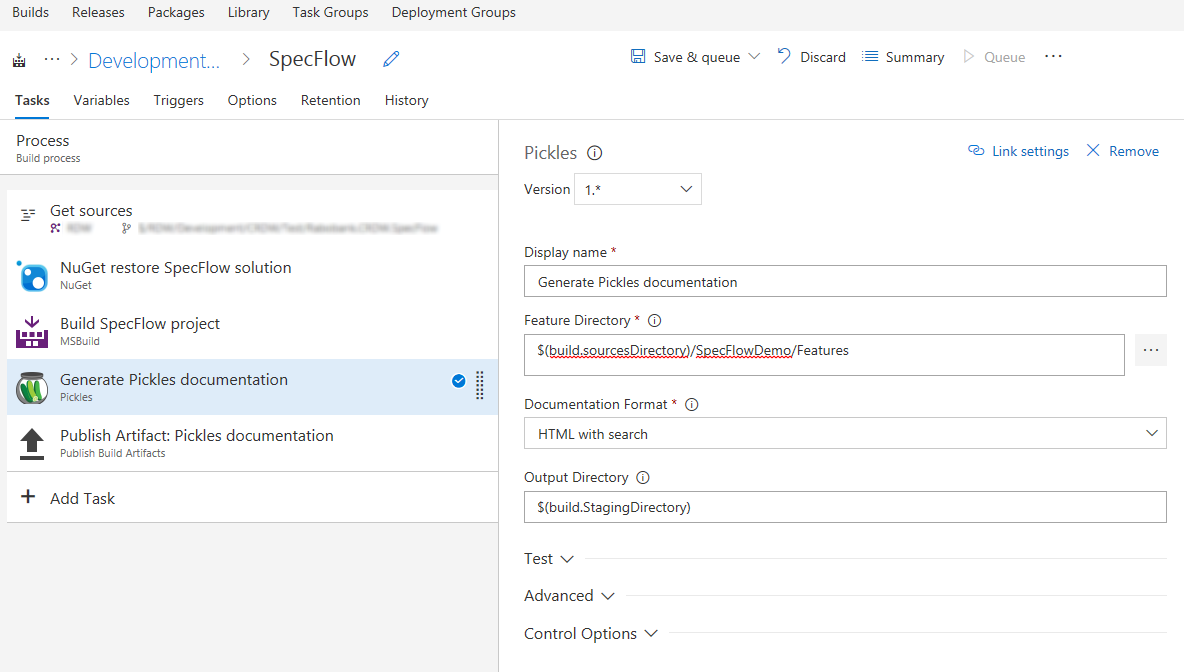
Back to VSTS. In order to replicate the same in your build definition, you can use the Pickles documentation generator task. Add the task to your definition and it should look like somewhere like this

All of the parameters do match the ones offered by the console application. You are now left to choose how and where further to ship this additional material.

Conclusion

In this post, I illustrated a way on how to get more out of the tooling that you are probably already using. Once you automate these steps chance is that they are going to stay up to date and thus probably get to be actually used. All of the tasks I used can also be used in the VSTS/TFS release pipeline.

I hope it helps.

Deploy SSIS packages from TFS/VSTS Build/Release

Automating BI projects, based on Microsoft tooling, was always a bit painful. Personally, all of the things shipped with SSDT seemed a bit unloved from a Microsoft side.

What I would like to show you in this post is how I managed to automate the build and deployment of my Integration Services Projects (.dtproj type). We will build our project in order to get the necessary ispac files, upload this artifact in TFS and then deploy it via a TFS Release.

Let’s start with the build. As you may already know, IS Projects are not based, as most of Visual Studio projects, on MSBuild. This is the first difficulty everyone faces once they start setting a CI/CD pipeline for this type of projects. The only way to build it is to use devenv.com executable that is part of the Visual Studio installation. For that, you will need a custom build task or you’ll need to execute a script that will handle the necessary.

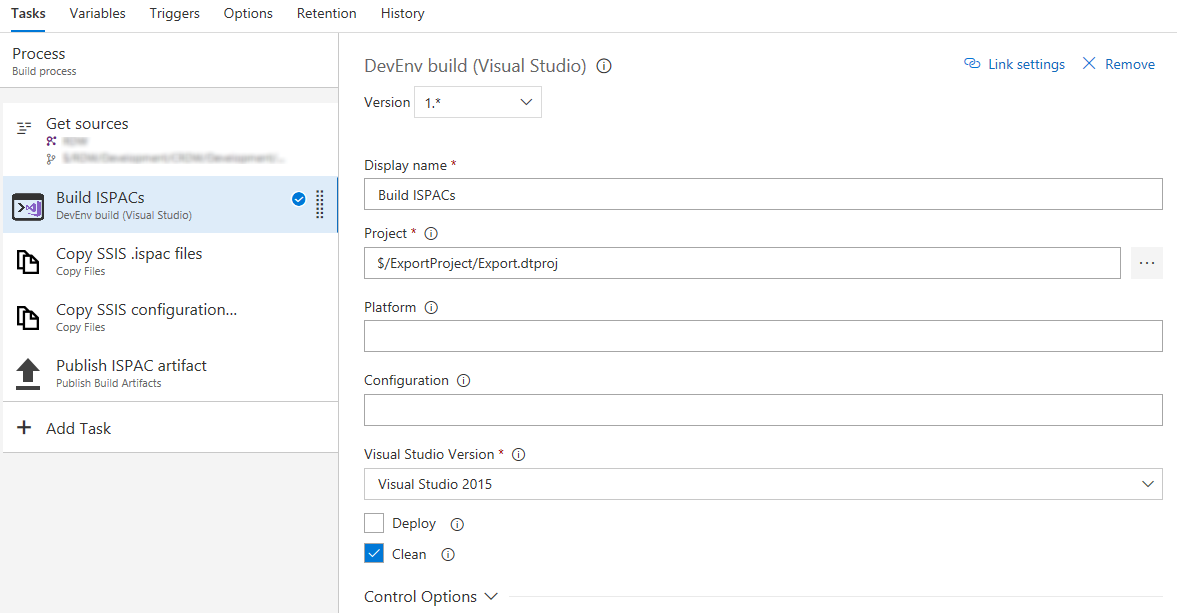
In my case, I made a custom build task for it (which can be found here) and thus my build definition looks like this:

Following are the steps of my build. First I will ‘compile’ the SSIS project, then copy the ispac files that were generated to the Build Staging folder, again I’ll copy my SSIS configuration file (more about the configuration file later) to the same location and at the end, I’ll upload all of the files in the Staging folder to TFS as my build artifact.

Now that my artifact is ready, we can proceed with the deployment in the release.

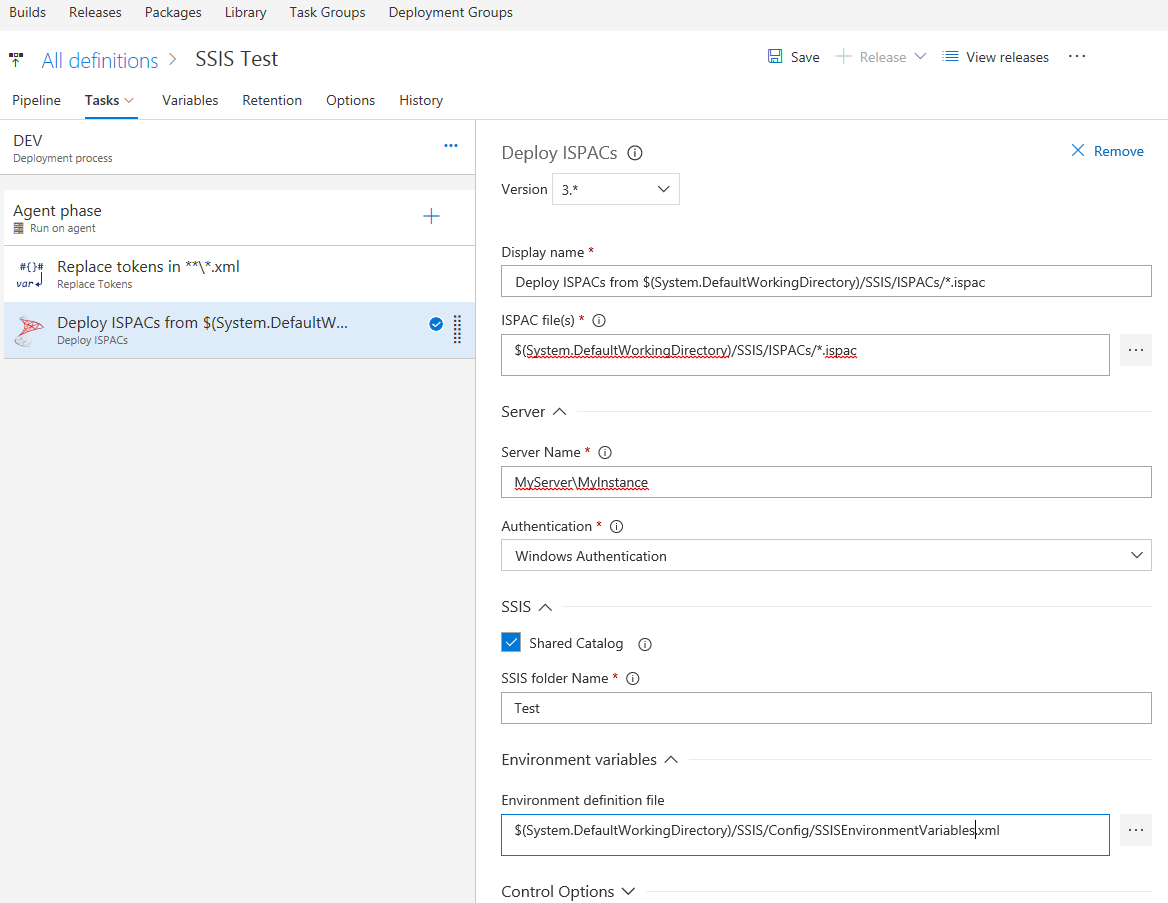
In order to deploy the SSIS package, I’ll use my own build/release task called Deploy SSIS.

The release steps will look like the following.

As you can see I will start with replacing the placeholders in the configuration file. The configuration file contains some environment dependent values and in the first step, I’ll make sure that those are substituted with the correct values that are coming from the environment variables in the release.
But what is this configuration file I already mentioned a couple of times? It is a file that my deploy task is capable of processing and it contains a list of SSIS environments and variables. There are no other ways of supplying this information, considering that it is not part of the ispacs, and as it was a necessity for my automation to provide them, I came up with a schema from which my Deployment task will pick those up, add them to my SSIS instance and eventually make all of the necessary references. Following is an example of the configuration file.

<?xml version="1.0" encoding="UTF-8" ?>
<environments>
    <environment>
        <name>MyEnv</name>
        <description>My Environments</description>
        <ReferenceOnProjects>
            <Project Name="BusinessDataVault" />
            <Project Name="Configuration" />
        </ReferenceOnProjects>
        <variables>
            <variable>
                <name>CLIENTToDropbox</name>
                <type>Boolean</type>
                <value>1</value>
                <sensitive>false</sensitive>
                <description></description>
            </variable>
            <variable>
                <name>InitialCatalog</name>
                <type>String</type>
                <value>DV</value>
                <sensitive>false</sensitive>
                <description>Initial Catalog</description>
            </variable>
            <variable>
                <name>MaxFilesToLoad</name>
                <type>Int32</type>
                <value>5</value>
                <sensitive>false</sensitive>
                <description>Max Files To Load by dispatcher </description>
            </variable>
        </variables>
    </environment>
</environments>

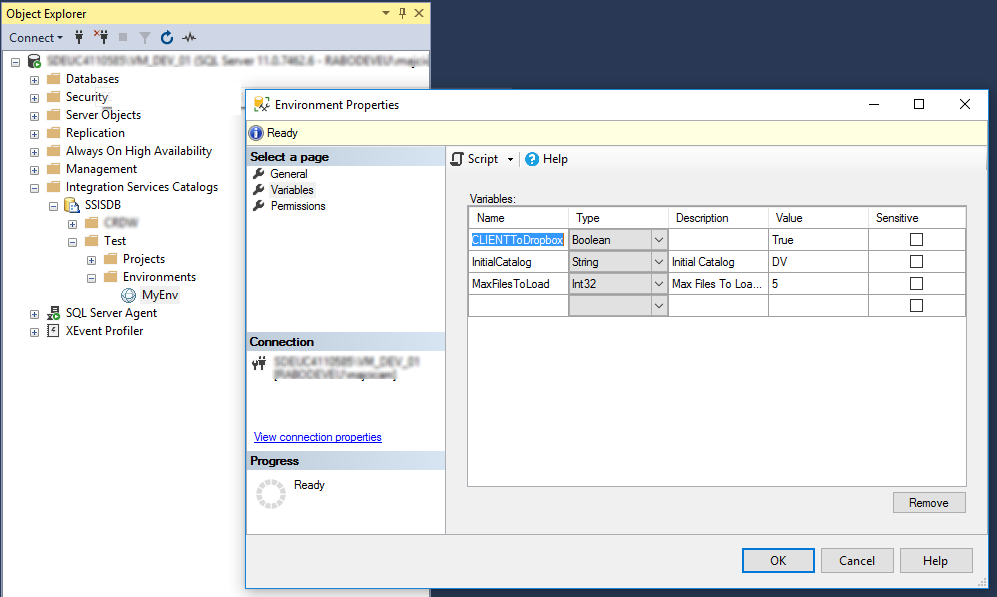
It represents a set of environments. Each environment needs a name. Once defined the task will proceed to create them in SSIS. Environments must be referenced to projects in order for projects to used them, therefore the ReferenceOnProjects element will allow you to enlist the projects on which you would like to apply these references automatically. Last but not least, a list of variables that do need to be populated for the given environment. Variables will also be automatically referenced in projects if the names are matching with parameters. In the end, for the example in question, you will get the following.

Now that we cleared why do we have the config file and how to set it up, I’ll mention you that it is also checked in the source control as my dtproj and other files. In case you are not a big fan of XML, you can provide the same content in form of JSON file.

Let’s see now what are the necessary parameters for our Deploy SSIS task.

First, the SQL instance on which SSIS is running. That’s an easy one and should be set in the Server name field. You can choose the Authentication type for the connection to be established and it can be the Windows Authentication and SQL Server Authentication. Based on this choice the relevant SQL Connection String that is used to communicate with your server will be set. In case of Windows Authentication, the build agent identity will be used, so make sure that account has the necessary privileges in SQL.

In case you are deploying multiple applications in SSIS, you would like to flag the Share Catalog option because then, the catalog will not be dropped before deploying. Also if you have any other reasons not the drop the catalog on each deployment, this option will do.

SSIS folder Name parameter is self-explanatory. We need to deploy our projects and environments in a folder, that’s the only possible option in SSIS. Thus, we need to choose a name for a folder that we are going to deploy our projects and environments in.

As the last parameter Environment definition file is the location of our configuration file. If not supplied, projects will still be deployed however, no variables will be created and referenced.

I do hope that this is sufficient to get you started with automating your SSIS deployments. If any, don’t hesitate to ask in the comments.