Provisioning WebDeploy in VSTS/TFS release via DSC script
It’s been a while since we got at our disposition some great tooling for the provisioning of our machines. Unfortunately, it is not as used as I would like it to be. For us working on Microsoft platform, there is a tool that can do the job, available out of the box, for free, on every modern windows machine. Obviously, I’m talking about the Windows PowerShell Desired State Configuration or for short, DSC. Although not truly a provisioning tool and more as Microsoft defines it, “a management platform in PowerShell that enables you to manage your IT and development infrastructure with the configuration as code”, it will get easily job done when it comes to provisioning tooling and features.
After this long introduction lets cut the chase. In this post I’m going to show you how to write a DSC script which will make sure that the desired IIS components are installed on a given machine, check for Microsoft WebDeploy and eventually install all of those if not present. Once the script is ready, I’ll show you how to execute it during the deployment of your project in a VSTS/TFS Release. I will not get in details of how does DSC work, how to write DSC configuration functions or create your custom DSC Configuration Resources. I’ll focus on a big picture, on how to combine all of the necessary to actually get the work done. When it comes to the details, it’s quite easy to find the necessary technical guidance by just googling the desired terms.
I wrote a script that, given a machine name, will make sure a DSC configuration is applied to it.
param(
    [parameter(Mandatory=$true)]
    [string]
    $ServerName
)

$ConfigurationData = @{
    AllNodes = @(
        @{
            NodeName=$ServerName
            PSDscAllowPlainTextPassword=$true
            RebootNodeIfNeeded = $true
         }
   )
}

Configuration DashboardProvisioning
{
 	Import-DscResource -ModuleName 'PSDesiredStateConfiguration'

	Node $AllNodes.NodeName
     {
        WindowsFeature IIS
        {
            Ensure = "Present"
            Name = "Web-Server"
        }

        WindowsFeature IISManagementTools
        {
            Ensure = "Present"
            Name = "Web-Mgmt-Tools"
            DependsOn='[WindowsFeature]IIS'
        }

        WindowsFeature IISAspNet45
        {
            Ensure = "Present"
            Name = "Web-Asp-Net45"
            DependsOn='[WindowsFeature]IIS'
        }

        WindowsFeature WebManagementService
        {
            Ensure = "Present"
            Name = "Web-Mgmt-Service"
            DependsOn='[WindowsFeature]IIS'
        }

        Package WebDeploy
        {
             Ensure = "Present"
             Path  = "\\MyShareServer\Software\WebDeploy_amd64_en-US.msi"
             Name = "Microsoft Web Deploy 3.6"
             LogPath = "$Env:SystemDrive\temp\logoutput.txt"
             ProductId = "6773A61D-755B-4F74-95CC-97920E45E696"
             Arguments = "LicenseAccepted='0' ADDLOCAL=ALL"
        }
    }
}

DashboardProvisioning -ConfigurationData $ConfigurationData

Start-DscConfiguration -Path .\DashboardProvisioning -Wait -Force -Verbose
The configuration part will make sure that three Windows features are installed and those are all IIS components, necessary for my website to run. The last part, package configuration entry, is making sure that WebDeploy is present, more precisely version 3.6 of WebDeploy. In case it is not installed on the given machine it will run the installer that is located in this particular case on a share at “\\MyShareServer\Software\WebDeploy_amd64_en-US.msi“. You will need to adjust this setting and adapt it to the path where you have placed the msi installer of WebDeploy 3.6. The agent that executes this configuration script will need to have the sufficient rights to access and read that path.
You can manually test this script from your local PC in order to make sure that is working as expected. Once ready we will execute this script in our deployment pipeline.
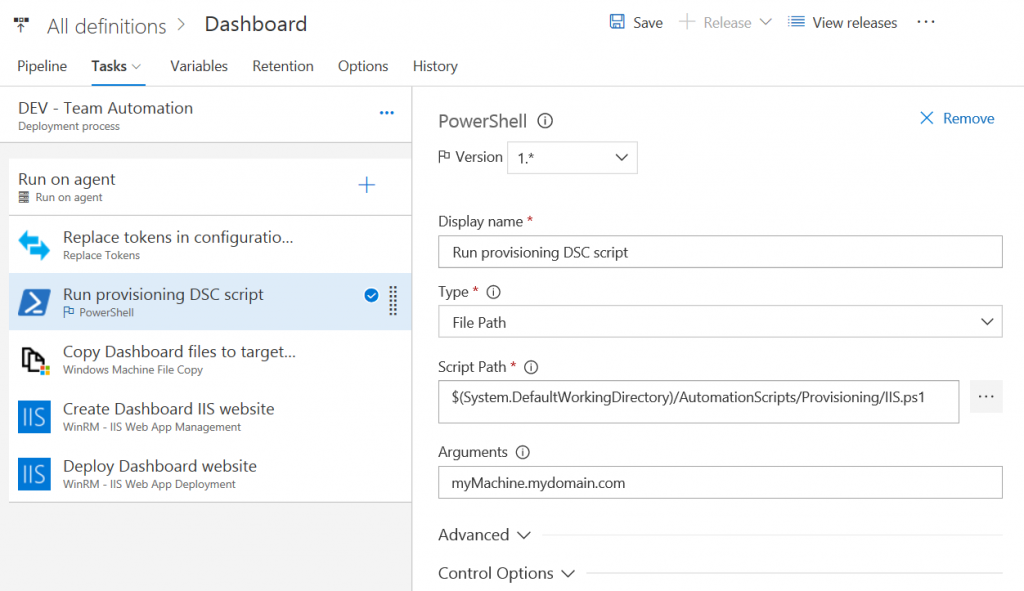
An example of the invocation is shown in the following screenshot:

As you can see, I’m using the simple PowerShell build task to run my script and as the argument, I’m passing in the machine name, FQDN of my web server in that particular environment. It is that simple! Now, before I do try to copy my files, create and deploy my website, I’m sure that all of the prerequisites are in place so that my deployment can succeed. This step takes a very short time to execute in case the configuration that I specified is already in place. A major benefit is that I can start with a clean machine and my deployment will take care that all of the necessary is in place before proceeding with the actual deployment. In a more complex environment, this will bring consistency in the configuration between different machines and environments and reduce the manual interventions regarding the configuration to a bare minimum.
Once you start testing, make sure that Windows Management Framework of at least version 4 is installed on both your build server and the destination machine and that WinRM is set up, again, for both of these machines.
Once successful I’ll encourage you to extend this script with all of your custom configuration settings, necessary for your application to run.
Cheers!