Building Visual Studio projects with DevEnv.com

Introduction

This post is about my most successful Azure DevOps extension. Before I tell you more about the newest version, let me tell you something more about the history of it.

Several years ago, just after the TFS 2015 was released, this was one of the first build tasks I built. I had a team who demanded it as not all of the projects they were running were based on MSBuild. Also, the necessary script to perform this action was quite simple, thus, a great practice ground to start writing a custom build task (I emphasise build as the release was back then not there yet).
It turned out to be very useful, however, considering its simplicity, I never thought it may be of interest to others. It was until I wrote and published the Deploy SSIS extension that I realized that may be handy to publish this task as an extension. It is not that I suddenly changed my mind, it just made sense to describe the whole process of building and deploying SSIS projects in a blog post and I missed a building part. It turns out I was wrong a big time as this is the most used extension I wrote with over a thousand downloads from the Azure DevOps Marketplace.

What’s new in version 2

My initial implementation stayed untouched for quite some time. In the end, it is a simple task that just worked. However, some users made me notice an obvious flaw. In the project was set to be built, all of the projects in the containing solution would be built. Strangely enough the same is stated in the help page of the tool itself, it just that I never noticed it.

The first argument for devenv is usually a solution file or project file.
You can also use any other file as the first argument if you want to have the
file open automatically in an editor. When you enter a project file, the IDE
looks for an .sln file with the same base name as the project file in the
parent directory for the project file. If no such .sln file exists, then the
IDE looks for a single .sln file that references the project. If no such single
.sln file exists, then the IDE creates an unsaved solution with a default .sln
file name that has the same base name as the project file.

I address this issue by adding a separate filed for the solution and for the project. As this is a breaking change for the existing users, I published a new major version of the task.
Some minor improvements are also now included in the new version.
The first issue ever to be reported was actually a feature request. It was asked if the search for the solution file can be performed so that the wildcards can be used as parameters for the solution input field. This is now addressed.
Also, all of the dependency libraries are now updated to the latest available version. These are ‘Task Library’ which is now v0.11.0 and ‘VSSetup library’ that was boosted to v2.2.5. This also bring some changes to the retrieval of the path of the DevEnv come to accommodate the newly added Visual Studio 2019 option.

What’s next

Although the task is focusing on windows tooling and needs windows only tooling to be present on the build agent, the PowerShell implementation is somewhere limiting. The next step will be rewriting the task in TypeScript. Not a huge added value, however, it is making this extension easier to maintain in the future.

Truly my hopes are in Microsoft basing all of their projects on MSBuild (as they recently did for SSRS projects) and making this extension obsolete. However, for time being, this is one of the puzzle pieces, that could help you in automating your MS BI pipelines.
Living Documentation and test reports in VSTS/TFS pipelines

Introduction

In order to truly get advantage from all of the hard work that we put into our tests, we need to present our test run results and share our specifications in more convenient and accessible way. On Windows platform in order to make this tasks happen, we can leverage tools that you are probably already using, SpecFlow itself and a sidekick project of it called Pickles. If none of what I just said does make sense, you are reading the wrong post, so please check the SpecFlow documentation and read about BDD which is partly in PDF so using software as Soda PDF could be useful for this. However, if you are already familiar with it, you are using SpecFlow and are looking for a decent way to automate the above-mentioned tasks, please continue reading as I may have a valid solution to it.

All of the implementations that I came across till now, involved scripts, MSBuild tasks and a lot of other cumbersome solutions. I saw potential in VSTS/TFS build/release pipeline that through some specific build/release tasks are a neat solution automating these requirements.

Let’s start.

Generating SpecFlow reports in VSTS

Generating a nice and easy to consult report over our your test runs is relatively easy. SpecFlow NuGet package already includes all of the necessary to do so, that is the SpecFlow executable itself. In my demo case, I am using NUnit 3, however other frameworks are also supported.

Let’s check first what are the necessary manual steps to get the desired report.
After executing my tests with NUnit Console Runner with the following parameters

nunit3-console.exe --labels=All "--result=TestResult.xml;format=nunit2" SpecFlowDemo.dll

I am ready to generate my report. Now I just need to invoke the SpecFlow executable with the following parameters

specflow.exe nunitexecutionreport SpecFlowDemo.csproj /xmlTestResult:TestResult.xml /out:MyReport.html

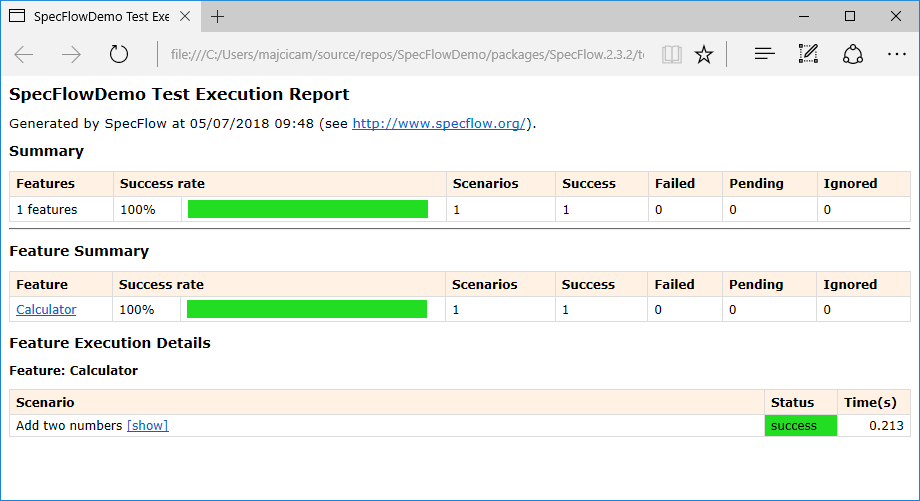
And voila, the report is generated and it looks like following

Details over the various parameters accepted by SpecFlow executable can be found here, Test Execution Report.

Now, how do we integrate this into our VSTS build pipeline?

First, we need to run our tests in order to get the necessary test results. These may vary based on the testing framework that we are using. Two supported ones are NUnit or MSTest.

Be aware that if you run your MsTest’s with vstest runner, the output trx file will not be compatible with the format generated by mstest runner and the report will not render correctly. For that to work, you’ll need a specific logger for your vstest runner.

Once the tests are completed we are going to use the SpecFlow Report Generator task that is part of the homonymous extension that you can find here.
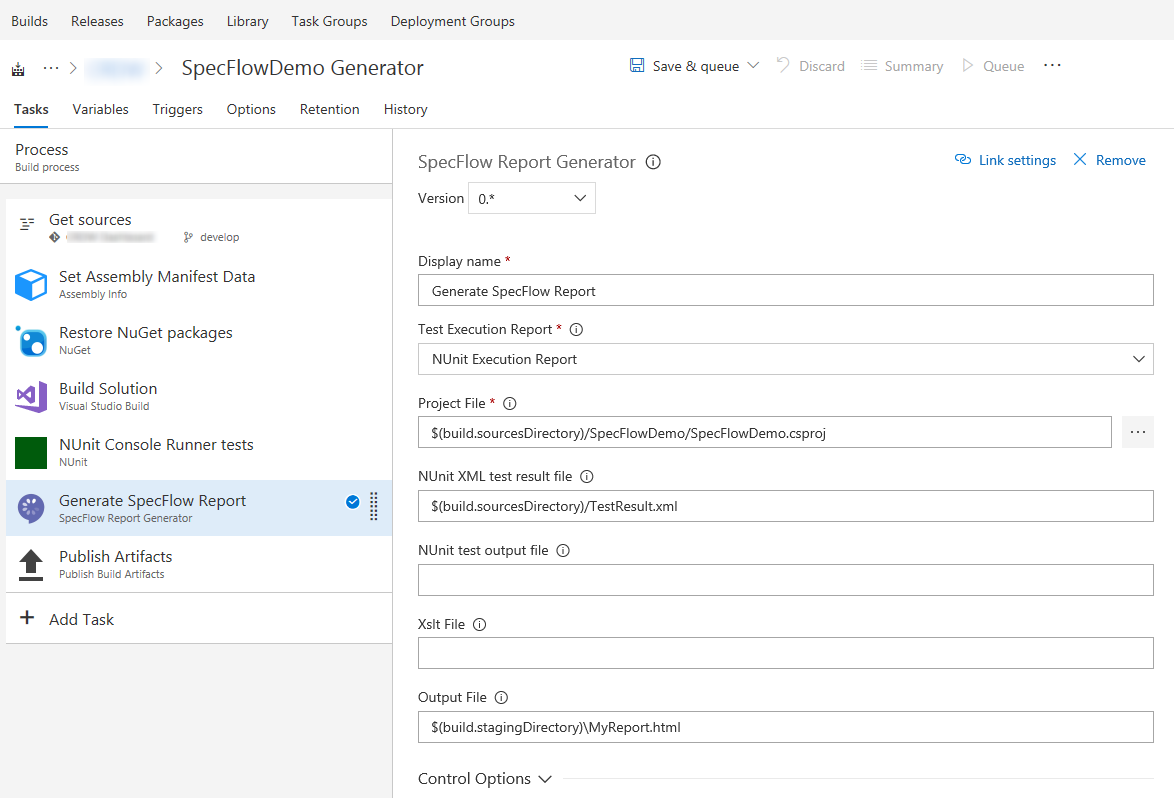
After adding the SpecFlow Report Generator task in your build definition, it will look similar to this.

In case you are interested in how each parameter influences the end result, check the above-mentioned link pointing to the SpecFlow documentation as the parameters are the same as on per tool invocation via the console.

Now that your report is ready you can process it further like making it part of the artifact or send it via email to someone.

Generating Pickles living documentation

Support documentation based on your specifications can be generated by Pickles in many ways, such us MSBuild task that could be part of your project, PowerShell library or simply by invoking the Pickles executable on the command line.

In case of trying to automate this task, you will probably use the console application or PS cmdlets. Let’s suppose the first case, then the command that we are looking for is like following

Pickles.exe --feature-directory=c:\dev\my-project\my-features --output-directory=c:\Documentation --documentation-format=dhtml

All of the available arguments are described here.

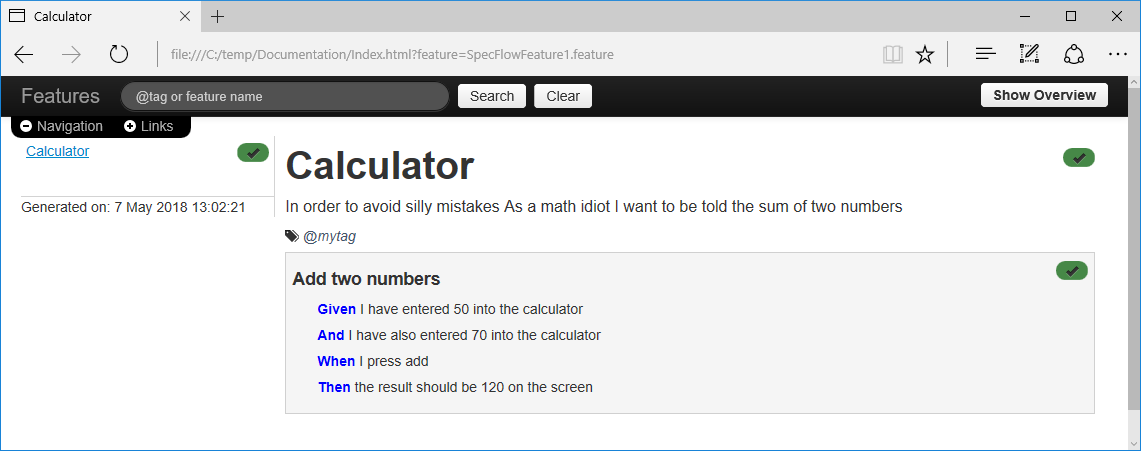
As the result you will get all of the necessary files to render the following page:

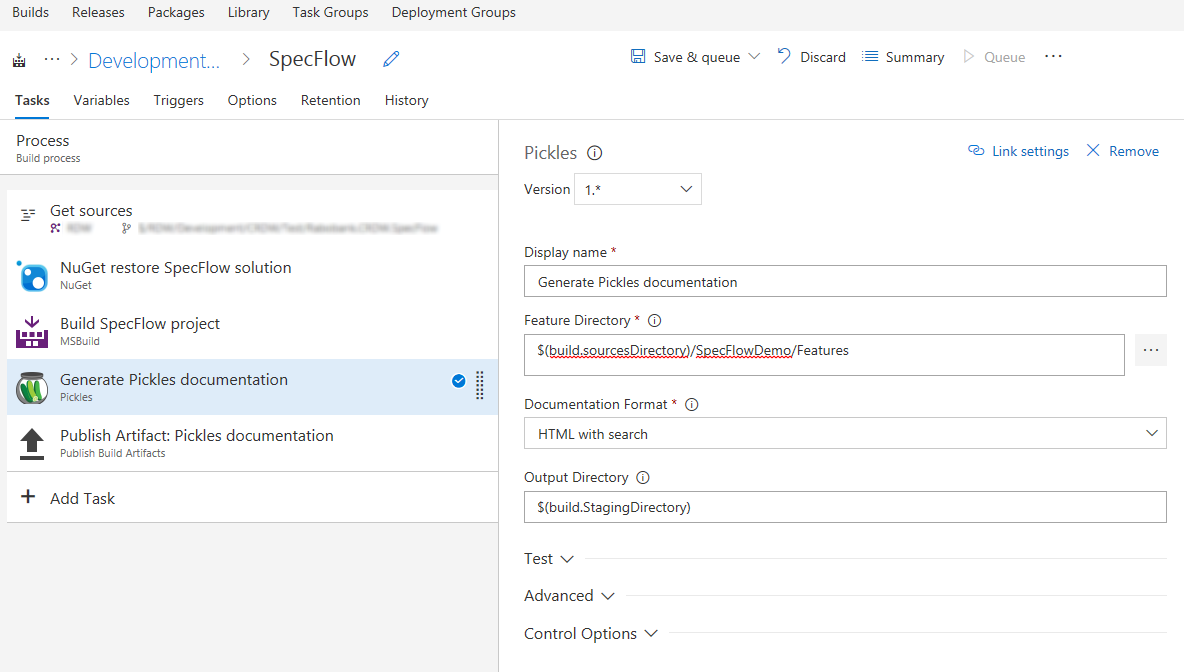
Back to VSTS. In order to replicate the same in your build definition, you can use the Pickles documentation generator task. Add the task to your definition and it should look like somewhere like this

All of the parameters do match the ones offered by the console application. You are now left to choose how and where further to ship this additional material.

Conclusion

In this post, I illustrated a way on how to get more out of the tooling that you are probably already using. Once you automate these steps chance is that they are going to stay up to date and thus probably get to be actually used. All of the tasks I used can also be used in the VSTS/TFS release pipeline.

I hope it helps.

Deploy SSIS packages from TFS/VSTS Build/Release

Automating BI projects, based on Microsoft tooling, was always a bit painful. Personally, all of the things shipped with SSDT seemed a bit unloved from a Microsoft side.

What I would like to show you in this post is how I managed to automate the build and deployment of my Integration Services Projects (.dtproj type). We will build our project in order to get the necessary ispac files, upload this artifact in TFS and then deploy it via a TFS Release.

Let’s start with the build. As you may already know, IS Projects are not based, as most of Visual Studio projects, on MSBuild. This is the first difficulty everyone faces once they start setting a CI/CD pipeline for this type of projects. The only way to build it is to use devenv.com executable that is part of the Visual Studio installation. For that, you will need a custom build task or you’ll need to execute a script that will handle the necessary.

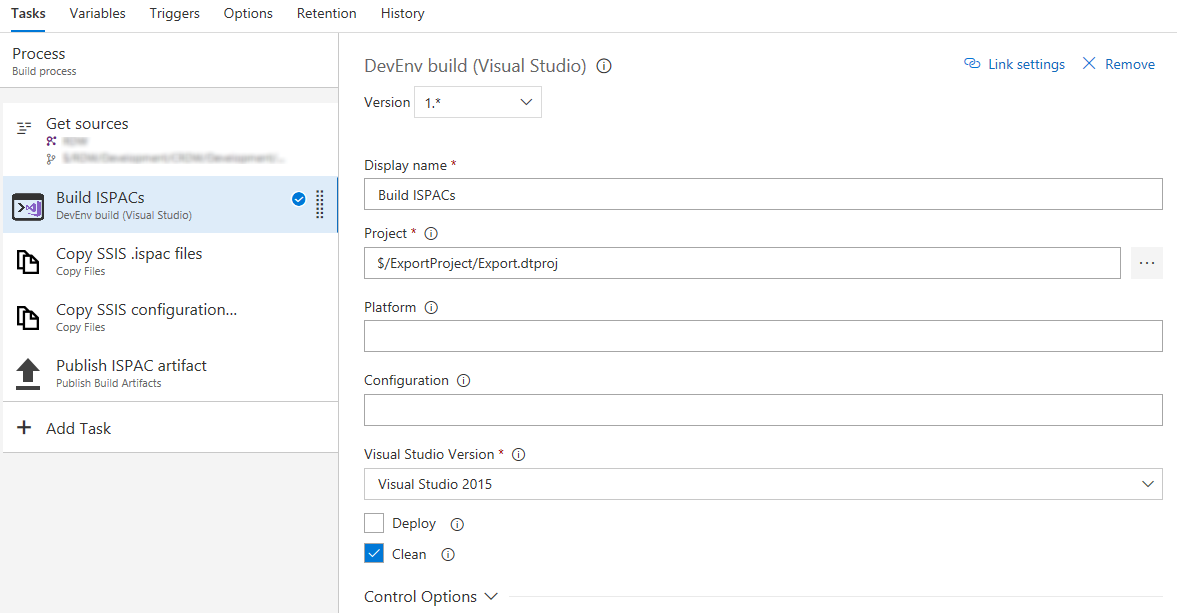
In my case, I made a custom build task for it (which can be found here) and thus my build definition looks like this:

Following are the steps of my build. First I will ‘compile’ the SSIS project, then copy the ispac files that were generated to the Build Staging folder, again I’ll copy my SSIS configuration file (more about the configuration file later) to the same location and at the end, I’ll upload all of the files in the Staging folder to TFS as my build artifact.

Now that my artifact is ready, we can proceed with the deployment in the release.

In order to deploy the SSIS package, I’ll use my own build/release task called Deploy SSIS.

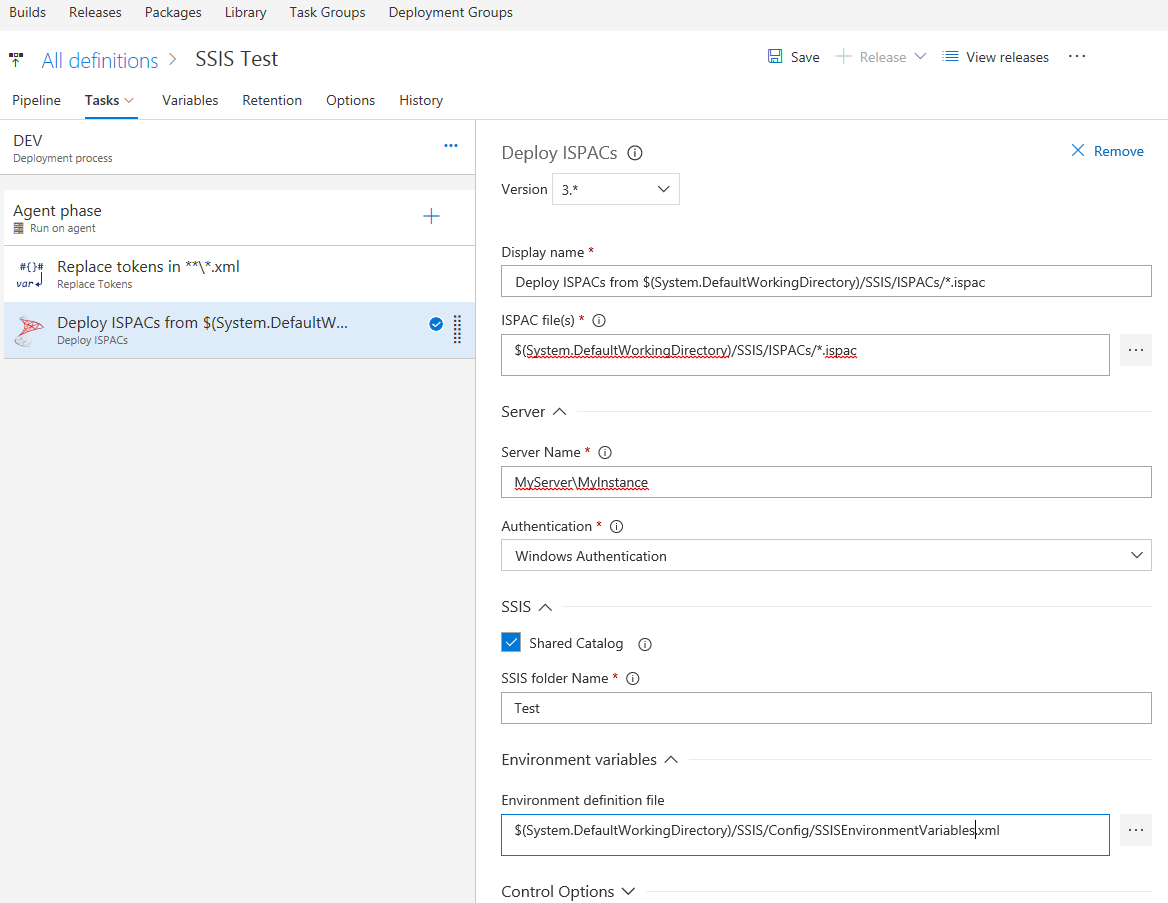
The release steps will look like the following.

As you can see I will start with replacing the placeholders in the configuration file. The configuration file contains some environment dependent values and in the first step, I’ll make sure that those are substituted with the correct values that are coming from the environment variables in the release.
But what is this configuration file I already mentioned a couple of times? It is a file that my deploy task is capable of processing and it contains a list of SSIS environments and variables. There are no other ways of supplying this information, considering that it is not part of the ispacs, and as it was a necessity for my automation to provide them, I came up with a schema from which my Deployment task will pick those up, add them to my SSIS instance and eventually make all of the necessary references. Following is an example of the configuration file.

<?xml version="1.0" encoding="UTF-8" ?>
<environments>
    <environment>
        <name>MyEnv</name>
        <description>My Environments</description>
        <ReferenceOnProjects>
            <Project Name="BusinessDataVault" />
            <Project Name="Configuration" />
        </ReferenceOnProjects>
        <variables>
            <variable>
                <name>CLIENTToDropbox</name>
                <type>Boolean</type>
                <value>1</value>
                <sensitive>false</sensitive>
                <description></description>
            </variable>
            <variable>
                <name>InitialCatalog</name>
                <type>String</type>
                <value>DV</value>
                <sensitive>false</sensitive>
                <description>Initial Catalog</description>
            </variable>
            <variable>
                <name>MaxFilesToLoad</name>
                <type>Int32</type>
                <value>5</value>
                <sensitive>false</sensitive>
                <description>Max Files To Load by dispatcher </description>
            </variable>
        </variables>
    </environment>
</environments>

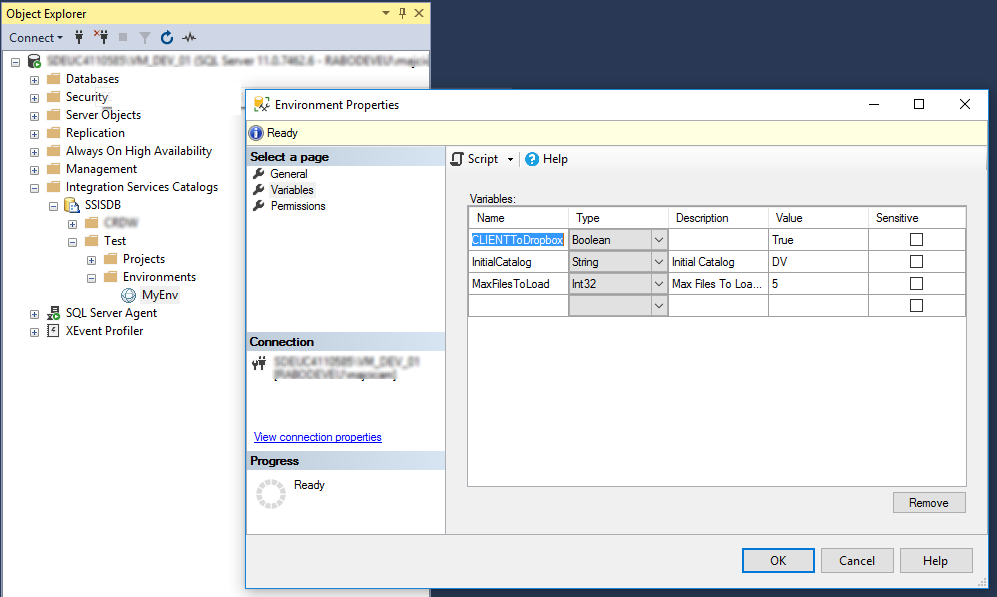
It represents a set of environments. Each environment needs a name. Once defined the task will proceed to create them in SSIS. Environments must be referenced to projects in order for projects to used them, therefore the ReferenceOnProjects element will allow you to enlist the projects on which you would like to apply these references automatically. Last but not least, a list of variables that do need to be populated for the given environment. Variables will also be automatically referenced in projects if the names are matching with parameters. In the end, for the example in question, you will get the following.

Now that we cleared why do we have the config file and how to set it up, I’ll mention you that it is also checked in the source control as my dtproj and other files. In case you are not a big fan of XML, you can provide the same content in form of JSON file.

Let’s see now what are the necessary parameters for our Deploy SSIS task.

First, the SQL instance on which SSIS is running. That’s an easy one and should be set in the Server name field. You can choose the Authentication type for the connection to be established and it can be the Windows Authentication and SQL Server Authentication. Based on this choice the relevant SQL Connection String that is used to communicate with your server will be set. In case of Windows Authentication, the build agent identity will be used, so make sure that account has the necessary privileges in SQL.

In case you are deploying multiple applications in SSIS, you would like to flag the Share Catalog option because then, the catalog will not be dropped before deploying. Also if you have any other reasons not the drop the catalog on each deployment, this option will do.

SSIS folder Name parameter is self-explanatory. We need to deploy our projects and environments in a folder, that’s the only possible option in SSIS. Thus, we need to choose a name for a folder that we are going to deploy our projects and environments in.

As the last parameter Environment definition file is the location of our configuration file. If not supplied, projects will still be deployed however, no variables will be created and referenced.

I do hope that this is sufficient to get you started with automating your SSIS deployments. If any, don’t hesitate to ask in the comments.