TextTransform issues after VS Project Upgrade

Recently I moved one of my projects from Visual Studio 2012 to Visual Studio 2015. Considering the project type, I was hoping for a smooth upgrade. However that was not the case. Once I tried building my solution I started getting the following error:

The command ""C:\Program Files (x86)\Common Files\Microsoft Shared\TextTemplating\14.0\TextTransform.exe"" -out "bin\LinkSet.xml" "App_Data\LinkSet.tt"" exited with code 3.

A quick search on Google gave me no results. This surprised me and I started to dig deeper hoping to understand what is causing this issue. In my project file I found a curios thing. Under the TextTransform related property group there was the following:

<PropertyGroup>
    <CommonProgramFiles32>$(MSBuildProgramFiles32)\Common Files</CommonProgramFiles32>
    <_TransformExe>$(CommonProgramFiles32)\microsoft shared\TextTemplating\11.0\TextTransform.exe</_TransformExe>
    <_TransformExe Condition="!Exists('$(_TransformExe)')">$(CommonProgramFiles32)\Microsoft Shared\TextTemplating\10.0\TextTransform.exe"</_TransformExe>
    <_TransformExe Condition="!Exists('$(_TransformExe)')">$(CommonProgramFiles32)\Microsoft Shared\TextTemplating\11.0\TextTransform.exe"</_TransformExe>
    <_TransformExe Condition="!Exists('$(_TransformExe)')">$(CommonProgramFiles32)\Microsoft Shared\TextTemplating\12.0\TextTransform.exe"</_TransformExe>
    <_TransformExe Condition="!Exists('$(_TransformExe)')">$(CommonProgramFiles32)\Microsoft Shared\TextTemplating\13.0\TextTransform.exe"</_TransformExe>
    <_TransformExe Condition="!Exists('$(_TransformExe)')">$(CommonProgramFiles32)\Microsoft Shared\TextTemplating\14.0\TextTransform.exe"</_TransformExe>
    <MyOutDir>$(MSBuildProjectDirectory)\bin\$(Configuration)</MyOutDir>
</PropertyGroup>

It is quite hard to spot the difference in these lines, however there is an important one. Lets go trough this MsBuild code:

_TransformExe propery is declared with a value that equals $(CommonProgramFiles32)\microsoft shared\TextTemplating\11.0\TextTransform.exe. In case that given path is not found the value will be overridden with the values in the following lines, until the path is found. In this way, the transformation tool will be found independently of the version of Visual Studio installed on your machine. There is however a small issue as the lines with a Condition set, in the value that is assigned, there is a quote at the end of the path. This quote will, later on, clash during the invocation of the tool at the line:

<Target Name="TransformOnBuild" BeforeTargets="AfterBuild">
    <Exec Command="&quot;$(_TransformExe)&quot; -out &quot;$(OutDir)LinkSet.xml&quot; &quot;App_Data\LinkSet.tt&quot;" />
</Target>

This leads me to the initial error message, you can see that in case Visual Studio 2012 is not installed on the machine I’m building with, the command executed will be like following "C:\Program Files (x86)\Common Files\Microsoft Shared\TextTemplating\14.0\TextTransform.exe"" -out "bin\LinkSet.xml" "App_Data\LinkSet.tt" which has one quote too much.
The solution is quite simple, edit your project file with the text editor of choice, find the incriminated lines and remove the final quote. You should end up with lines being modified like this

<PropertyGroup>
    <CommonProgramFiles32>$(MSBuildProgramFiles32)\Common Files</CommonProgramFiles32>
    <_TransformExe>$(CommonProgramFiles32)\microsoft shared\TextTemplating\11.0\TextTransform.exe</_TransformExe>
    <_TransformExe Condition="!Exists('$(_TransformExe)')">$(CommonProgramFiles32)\Microsoft Shared\TextTemplating\10.0\TextTransform.exe</_TransformExe>
    <_TransformExe Condition="!Exists('$(_TransformExe)')">$(CommonProgramFiles32)\Microsoft Shared\TextTemplating\11.0\TextTransform.exe</_TransformExe>
    <_TransformExe Condition="!Exists('$(_TransformExe)')">$(CommonProgramFiles32)\Microsoft Shared\TextTemplating\12.0\TextTransform.exe</_TransformExe>
    <_TransformExe Condition="!Exists('$(_TransformExe)')">$(CommonProgramFiles32)\Microsoft Shared\TextTemplating\13.0\TextTransform.exe</_TransformExe>
    <_TransformExe Condition="!Exists('$(_TransformExe)')">$(CommonProgramFiles32)\Microsoft Shared\TextTemplating\14.0\TextTransform.exe</_TransformExe>
    <MyOutDir>$(MSBuildProjectDirectory)\bin\$(Configuration)</MyOutDir>
</PropertyGroup>

If you run your build now, it will succeed without the TextTransform.exe exiting with Code 3.
Using Git with self-signed certificate at the user level

Introduction

Some time ago I wrote about Installing self-signed certificates into Git cert store.
With the advent of Visual Studio 2017 and updates of the Git client I noticed the limitation of this approach. Also, updates of Visual Studio brought updates to a git client and after each update, my self signed certificate was gone. As this fact annoyed me quite a bit, I looked for a better approach.

A better approach

In order to solve this issue, I needed to move my certificate authority file to a place where it will not be rewritten by installing a new version of Git client. I went moving it to my users directory, which on my PC equals to C:\Users\majcicam. So after adding my self signed certificate into ca-bundle.crt file that is located, again, in my case at C:\Program Files\Git\mingw64\ssl\certs, I moved it to the C:\Users\majcicam. You can read more about adding your self signed certificate into the ca-cert file in my previous post at Installing self-signed certificates into Git cert store.

After I moved my file, I needed to indicate to the Git client that he should use this file to verify certificates. This can be done by issuing the following command:

git config --global http.sslCAInfo C:/Users/majcicam/ca-bundle.crt

This command will add the new path into a Git global config file which is a place where all of the user wide settings are stored and it is not subjective to the installation of Git or a particular repository.

Note that I used a slashes in the path instead of back-slashes.

This means that now we can update our Git client and that these settings will be maintained. As a standard on Windows platform, it is located in your user folder, in my case the global config file is at C:/Users/majcicam/.gitconfig. You can verify the values of all the Git config files and their location by issuing the following command:

git config --list --show-origin

This simple trick should make your lazy developer life a bit easier.

Happy coding

Custom nuget.exe for TFS 2015 build

Introduction

I had a couple of users complaining about not being able to restore a specific version of AutoMapper package during their build. A quick search showed me that they are not the only one facing this issues and that this is quite a common problem. I verified that I’m able to reproduce this issue and I saw that it is presented based on the version of nuget client. As by default the build agent does use the nuget.exe that ships with the agent itself, I verified the version of it and saw that in my case (TFS 2015.3) it is 3.2.1.10581. With the 3.2.1.10581 version of nuget client I was unable to restore the package in question (AutoMapper.5.1.1) meanwhile from Visual Studio with version 3.4.3.855 all went well. The error I could see in the log is the following:

##[error]Unable to find version '5.1.1' of package 'AutoMapper'.

Without digging into details of why this is happening, I’ll show you how to push your build to use a different version of a nuget client.

Preparing the build server

As a first thing, let’s “install” the latest nuget version on our build server. Just download the latest version of nuget client and place it in a folder of your choice. Make sure that account on which your build agent is running has sufficient rights to access that path. For me it will be ‘D:\Program Files(x86)\Nuget‘.
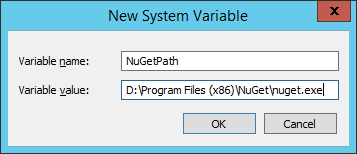
Once placed your nuget.exe in the above mentioned folder, let’s add a system environment variable that will point to this executable. Open Control Panel > System and Security > System and choose Advanced system settings. In System properties dialog click Environment variables button and add a new System variable by click the new button (and be sure it is a System property and not a user variable). As a variable name choose NugetPath and as value set the path towards your nuget.exe file, which in my case is D:\Program Files(x86)\Nuget\nuget.exe

nuget-path-system

Now you should restart your agent services so that the new system variable is picked up by the agents. If everything went well you should see the following capability in the agent capability list:

agent-capability-nuget

If you can see it listed correctly, it all went well till now.

Setting up the build

Now it’s the time for the build. I suppose you are using the NuGet Installer build step in order to restore your packages before the build. If not, you should, as resorting the packages from Visual Studio Build step is obsolete and should not be used.
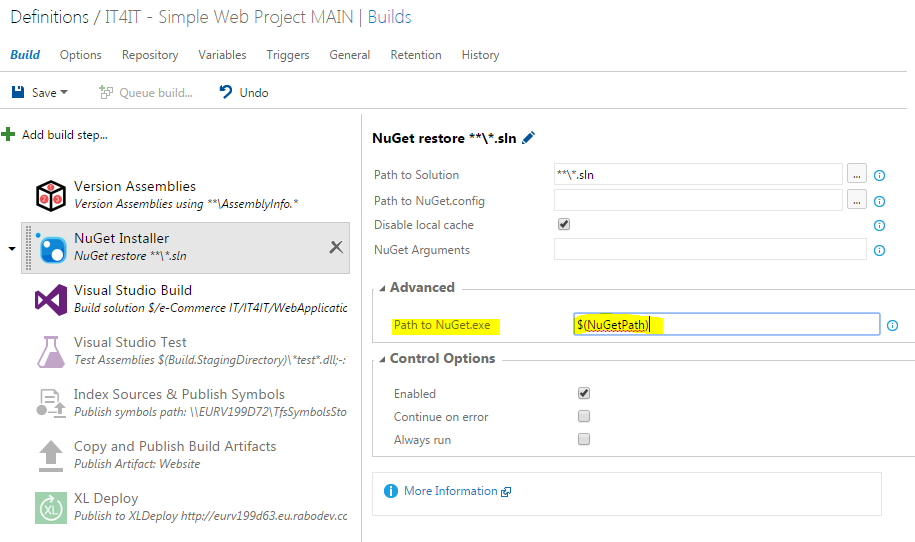
In order to force NuGet Installer build step to use our new nuget client, we need to expand the Advance group settings and set the Path to NuGet.exe option value to $(NuGetPath):

nuget-installer-build-step

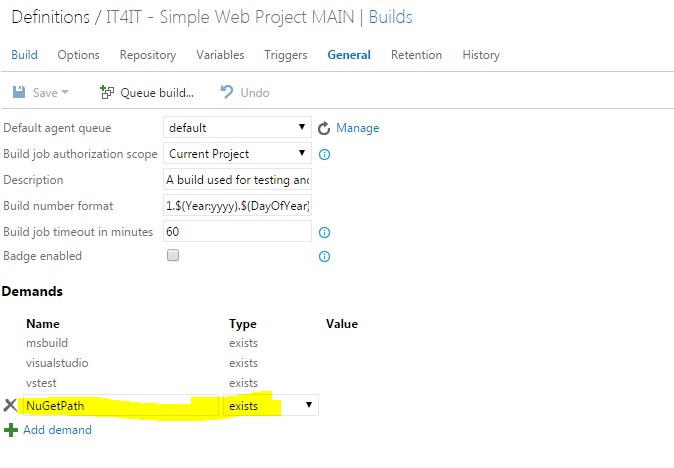
Once this is done, just to be sure that only the build agents having the custom nuget version installed will be used, we are going also to specify a demand for our build. In the general tab of you build definition add new demand of type exists and set it to NuGetPath:

nugetpath-demand

Now, queue a new build and check in the log file that our new nuget client is used instead of the default one that ships with the build agent. You should find a similar line in your log:

D:\Program Files (x86)\NuGet\nuget.exe restore "E:\a1\_work\29\s\SimpleWebProject.sln" -NoCache -NonInteractive

That’s all folks, an easy way to push you build to use a specific version of the NuGet client instead of the default one.