Querying XL TestView via PowerShell

Since the version 1.4.0 XL TestView started exposing several functionality via REST API. This is inline with other XebiaLabs products and it is a welcome characteristic. If you tried invoking a web request towards your XL TestView server, you may be surprised that the authentication fails (no matter the usual technique of passing the credentials). This is due to the fact that XL TestView doesn’t support the challenge-response authentication mechanism.
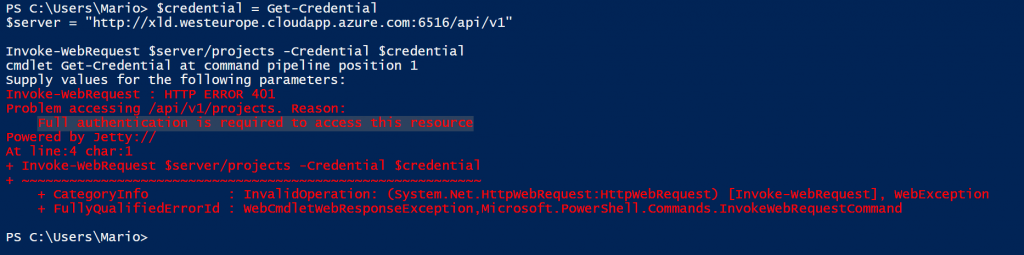
An example:

$credential = Get-Credential
$server = "http://xld.westeurope.cloudapp.azure.com:6516/api/v1"
    
Invoke-WebRequest $server/projects -Credential $credential

After executing this code you will receive a 401 Unauthorized response with Jetty (XL TestView web server) stating “Full authentication is required to access this resource”.

ps401

Invoke-WebRequest cmdlet doesn’t send the authentication headers with the first call and it expects a
401 response with the correct WWW-Authenticate header as described in RFC2617. Then, based on the authentication schema token received, prepares a call with a proper authentication method if supported.
Unfortunately this behavior is not supported by XL TestView. Still, do not desperate, there is a way to interact with XL TestView via your PowerShell scripts.

Authentication header

In order to authenticate on the first call, we need to provide the authentication header manually and include it in our web request. Knowing that XL TestView uses the Basic authentication we need to prepare the necessary for this operation. First of all we need to create the value that we are going to provide for the header called Authorization. It is following the well know standard described in RFC1945 which states that the username and password are combined into a string separated by a colon, e.g.: username:password, that the resulting string is encoded using the RFC2045-MIME variant of Base64, except not limited to 76 char/line and that the authorization method and a space i.e. “Basic ” is then put before the encoded string.

In order to create such a header I created a cmdlet that sums those steps.

function Get-AuthorizationHeader
{
	[CmdletBinding()]
	param
	(
	[string][parameter(Mandatory = $true)]$Username,
	[string][parameter(Mandatory = $true)]$Password
	)
	BEGIN { }
	PROCESS
	{
		$base64AuthInfo = [Convert]::ToBase64String([Text.Encoding]::ASCII.GetBytes(("{0}:{1}" -f $UserName, $Password)))
		
		return @{Authorization=("Basic {0}" -f $base64AuthInfo)}
	}
	END { }
}

Invoking this cmdlet and providing the requested username and password, will return the requested header object that we can include in our call towards the XL TestView REST API.

Invoking the web request

Once our cmdlet for the necessary authentication header is set, we can invoke our call simply as follows:

$Username = "username"
$Password = "password"
Invoke-WebRequest $url -Headers (Get-AuthorizationHeader $Username $Password)

You can see that we are not telling the Invoke-WebRequest to used credentials to authenticate, however we are specifying the necessary header for the authentication. This will pass all of the necessary on the first request towards XL TestView and our call should succeed.

Be aware that with the Basic authentication the credentials are passed in clear (encoded as base64 string) and an encrypted connection is advised (https).

This technique is valid for all of the services that do not use challenge-response authentication mechanism, not only XL TestView.

Running XL TestView as a service

Introduction

If you started working with XL TestView you may have noticed in the user manual the following: ‘To run XL TestView as a service on Microsoft Windows, use a service runner.’. This differs quite a bit from other products of XebiaLabs that you may have used, as XL Deploy, where a yajsw (Yet Another Java Service Wrapper) is provided. Yet Another Java Service Wrapper will take care of adding the service into your system and handling all of the necessary. This is however not the case with XL TestView. I’m going to show you a proven way of running XL TestView as a service via NSSM.

The Non-Sucking Service Manager

NSSM – the Non-Sucking Service Manager is a tool which allows any application/executable to run as a windows service without much hassles. As an advantage above other tools of this kind is the fact that it handles failure of the application running as a service. Also the users are helped with a graphic interface during the configuration.
In order to start, download NSSM and extract the content of the zip file in a folder that we are going to create in program files, like C:\Program Files\NSSM. NSSM should work under Windows 2000 or later. Specifically, Windows 7 and Windows 8 are supported. 32-bit and 64-bit binaries are included in the download and I will use for this example the 64 bit version. For installing NSSM correctly the last thing left to do is to add the NSSM path to the system path.
Open Control Panel > System and Security > System and choose Advanced System Settings. This will open the System Properties window.

SystemProperties

In System Properties window choose Environment Variables and the namesake window will open.

EnvironmentVariables

In lower part of that window you will find system variables. Search for the system variable called Path, select it and choose edit. Now, this is the part which defers in between different versions of Windows. In Windows 10 and Windows Server 2016 you will be presented with an editor and previous versions will show all of the variables in a text box. I will show you how this is done on Windows 10, however on earlier versions of Windows get at the end of the string in the text box, and add ;C:\Program Files\nssm\win64. Notice that the semicolon at the beginning is not a typo. Multiple items in that string are separated by semicolon. In case of Windows 10 just choose New and add the path to the list.

EditEnvironmentVariables

In order to verify that is all setup correctly, open the command prompt and execute the following command, nssm. You should see something similar to what shown in the following figure.

CommandNSSM

If this is the case, you installed NSSM correctly.

Creating the service

Before proceeding any further make sure that you are able to run XL TestView interactively as indicated in the user manual. Once XL TestView is installed correctly and capable of starting, stop it (CTRL+C).
Now execute the following command, nssm install xltv. This will launch NSSM graphic interface which will allow you to create a new service called xltv. You should see the following

NSSMInstaller

Fill in the path to the server.cmd (starting point for XL TestView) in the path box as in the picture, and start-up directory will get preset by NSSM. Select then the second tab named Details and set the values as indicated in the following figure:

NSSMInstallerDetails

As you can see, I have chosen a friendlier display name for my service and a meaningful description.

In case you would like to set other parameters, as specific user to run the service or specify dependencies, you can do so in other tabs. Once done it is sufficient to choose Install service and in case everything went fine, you will receive the following message:

NSSMInstalled

You can now check in the Services panel, that a new service is present. In case it hasen’t been started, you can start it and verify that XL TestView is up and running.

Services

Be aware that XL TestView can take a bit to start. I would suggest also to set the startup type to Automatic (Delayed start) and this can be done directly from the service properties.

I you would like to modify the NSSM setup, run nssm edit xltv. In case you would like to remove the service, try nssm remove xltv.

That’s all folks, now also XL TestView runs as a service!