Installing TFS 2017 Code Search on a separate server
Yesterday a new and a very welcome feature was announced together with the RTM version of Team Foundation Server 2017. A feature that provides fast, flexible, and accurate search across your code in TFS. You can read more about it here, Announcing Code Search on Team Foundation Server 2017.
As my Application Tier servers are already under a substantial load, I decided to install the Code Search engine on a separate server (further in this text I will call this machine, Code Search server). Unfortunately, this approach is not well documented and I will share with you my recent experience.
Installing Code Search on a separate server
First of all, where to find the necessary installation files? Well, the folder containing the necessary is in the folder you have chosen to install TFS in (on your application tier machine). By default this is C:\Program Files\Microsoft Team Foundation Server 15.0. Now, you will see underneath another folder called Search, just copy it to a folder of your choice on the machine you intend to use as the Code Search server.
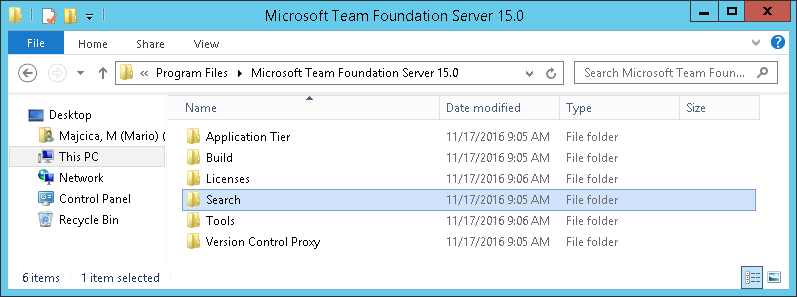
This is sufficient to setup the Code Search server. Make sure however that JRE (Java SE Runtime Environment) is installed on your machine before proceeding. JRE 7 Update 55 or higher, or, JRE 8 Update 20 or higher are required and my advice is to go for the latest version of JRE 8 which you can find here, Java SE Runtime Environment 8u111.
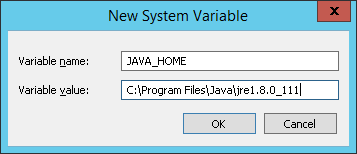
Once you have downloaded and installed the JRE, you will need to add a system environment variable called JAVA_HOME that will point to the folder in which JRE is installed. Open Control Panel > System and Security > System and choose Advanced system settings. In System properties dialog click Environment variables button and add a new System variable by click the new button (and be sure it is a System property and not a user variable). As a variable name choose JAVA_HOME and as value set the path of the folder where JRE is installed, which by default and in my case is C:\Program Files\Java\jre1.8.0_11.
Now that you installed the only prerequisite, we can focus on the installation of the search server. All you need is located in the Search folder. Inside you’ll find another folder called zip and again in between other files a PowerShell script called Configure-TFSSearch.ps1. This is actually the installation script. In case you run it (and make sure you do so as an Administrator) you will be prompted for a couple of parameters which also can be passed as arguments during the invocation. The parameters in question are TFSSearchInstallPath, indicating the location where Elasticsearch is going to be installed and TFSSearchIndexPath location where Elasticsearch indices\data will be stored. In order to achieve optimal performance, the last path where Elasticsearch store it’s data, locate it on a drive that can produce a high IOPS such as an SSD drive or SAN. You can also check the hardware requirements that Microsoft recommends at Code Search Hardware requirements.
Now, let’s invoke the installation script. I will also pass the -Verbose parameter so that we do get more detailed information on actions this script is performing.
.\Configure-TFSSearch.ps1 -TFSSearchInstallPath C:\ES -TFSSearchIndexPath C:\ESDATA -Verbose
Once invoked you should see something similar:
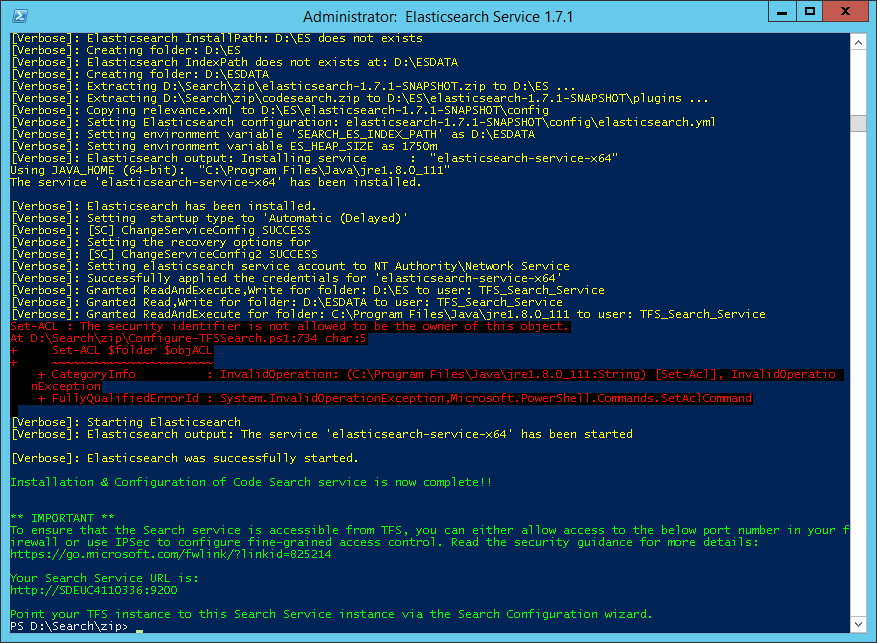
If the error Set-ACL : The security identifier is not allowed to be the owner of this object.
is shown, do not worry, it is just the script that tries to assign the rights on the JAVA_HOME directory and it is doing so with constructing them with the Get-Acl cmdlet.
Get-Acl cmdlet always reads the full security descriptor even if you just want to modify the DACL. That’s why Set-ACL also wants to write the owner even if you have not changed it. And changing the owner in this case is not possible.
But do not worry it is not a show stopper and your installation will conclude just fine as far as the NETWORK SERVICE (account used to run Elasticsearch service) is authorized to execute Java VM (which it should be).
That’s it. All done. Installed.
Some other notes about the installation procedure
In case you pass no parameters meanwhile invoking the Configure-TFSSearch script, it will run in the interactive mode and will prompt you for these mandatory values.
Some other parameters that you can influence during the invocation are:
| Argument | Description |
|---|---|
Port |
Set’s a different port than the default one 9200 and must be in range of 9200-9299 |
Quiet |
Bypasses the first confirmation from user to make the script fully non interactive |
RemoveTFSSearch |
Uninstalls the Code Search from the current machine |
Also note that this is a customized version of Elasticsearch, fine-tuned for Code Search on Team Foundation Server, thus no default version of Elasticsearch is advised for this machine (in case you have it already installed somewhere).
Configuring TFS 2017 for Code Search
In case you already configured the code search on you AppTier server during the upgrade or you wish to move the search to another server you need to unconfigure it first. It is not that obvious on how it is done.
Removing Code Search server
Open the TFS Administration Console and select the server node:
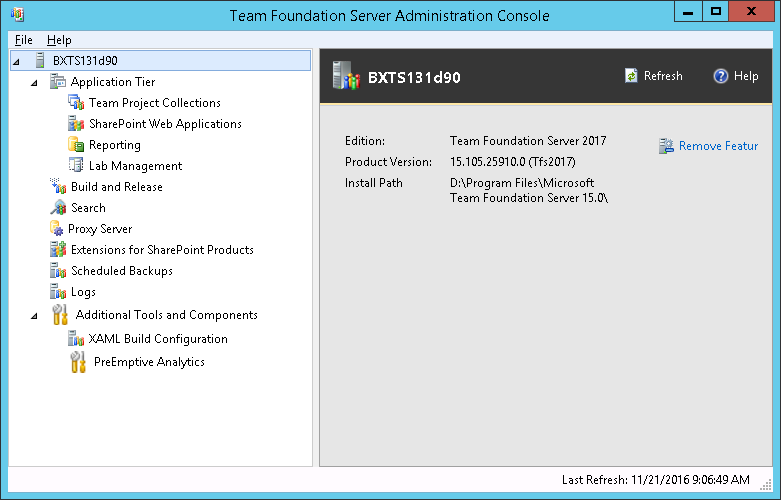
Then choose remove feature button. A new dialog will appear.
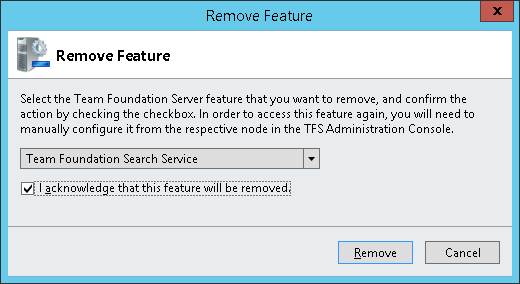
Choose “Team Foundation Search Service” from the drop-down and mark the acknowledge option, then click on Remove.
This will disassociate the Code Search server from TFS but will not remove it. In case you wish to remove it from your AppTier Server, go to the above mentioned folder (in my case C:\Program Files\Microsoft Team Foundation Server 15.0\Search\zip) and invoke .\Configure-TFSSearch.ps1 -RemoveTFSSearch -Verbose.
Now that the association with TFS and the old, local instance, are removed, we can continue with our configuration.
Configuring code Search
In the TFS Administration Console move to the search tab and choose “Configure Installed Features”
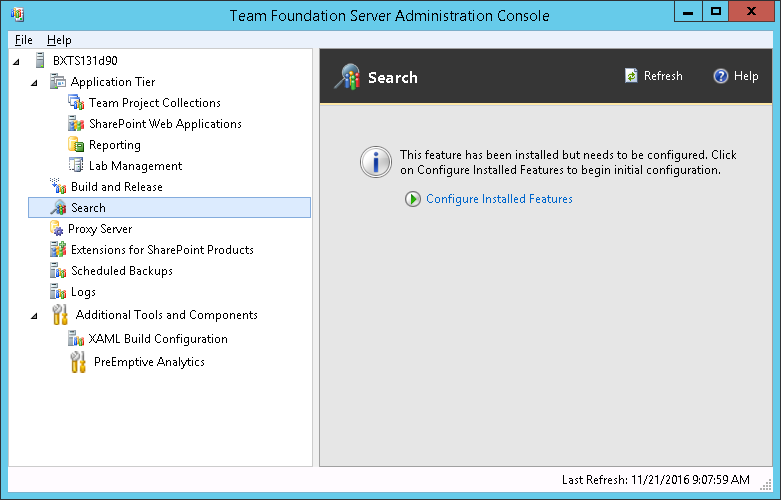
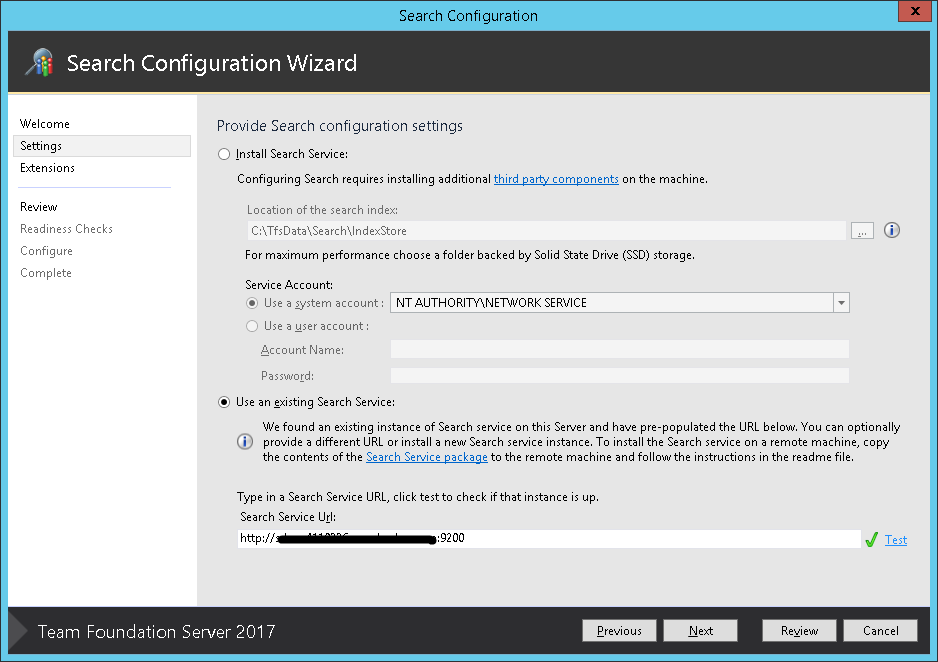
At this point the search configuration wizard will start. In the settings step, choose “Use an existing Search Service” and provide the “Search service Url”. Search service url will equal to the FQDN of your search server plus the port that you set during the installation (9200 by default).
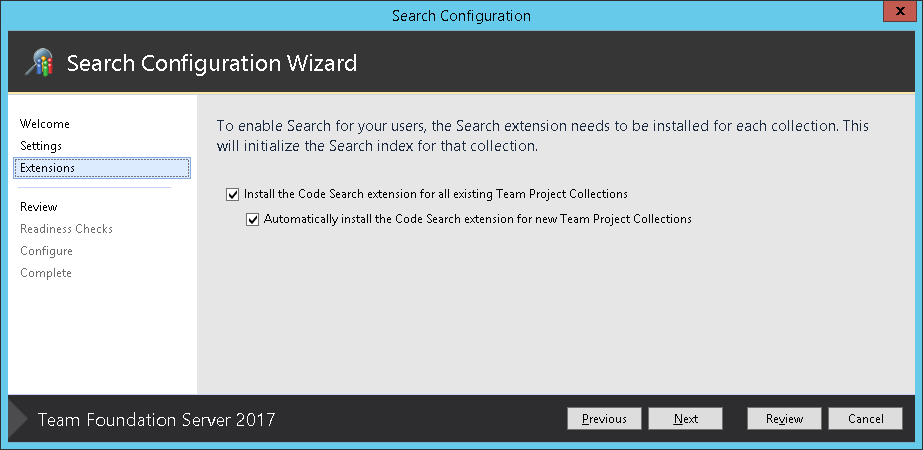
In the next step, install the extension in case you feel this should be available to all of the collections.
Now just do conclude the procedure till the end and you should see the following
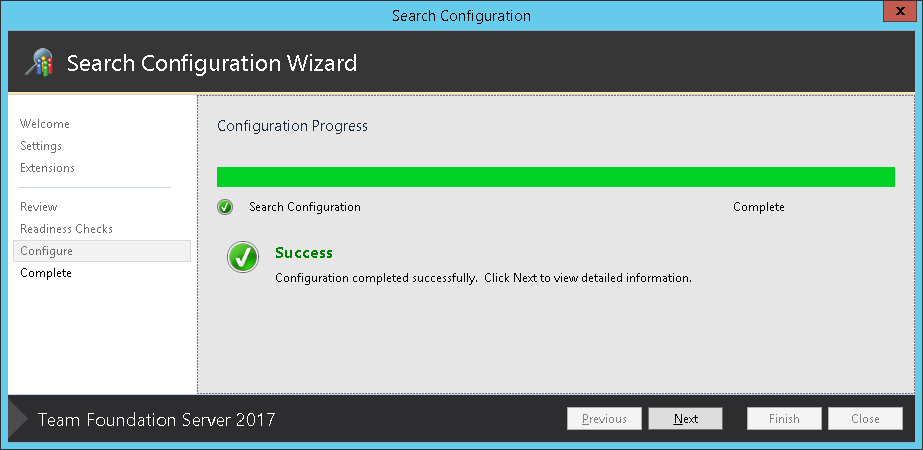
All done. Be aware that once you set this up, it can have a performance impact on your server as the source code will start being read, so on large and busy systems it will be best to set it up during a less busy hours.
You can check the indexing state by using the Code Search managing scripts that are hosted on GitHub.
Read more about this argument here.
Other considerations
Due to my server setup, I went to install the code search on the D: drive and this brought me some problems. This issues are not due to the installation procedure itself, still I will share my experience hoping it can help someone else.
The rights on my drive where not setup correctly so that the installation procedure couldn’t assign the right ACL rights on the Elasticsearch folder. This was solved by adding the CREATOR OWNER group on the drive level and assigning it the default rights (Full control over Subfolders and files only).
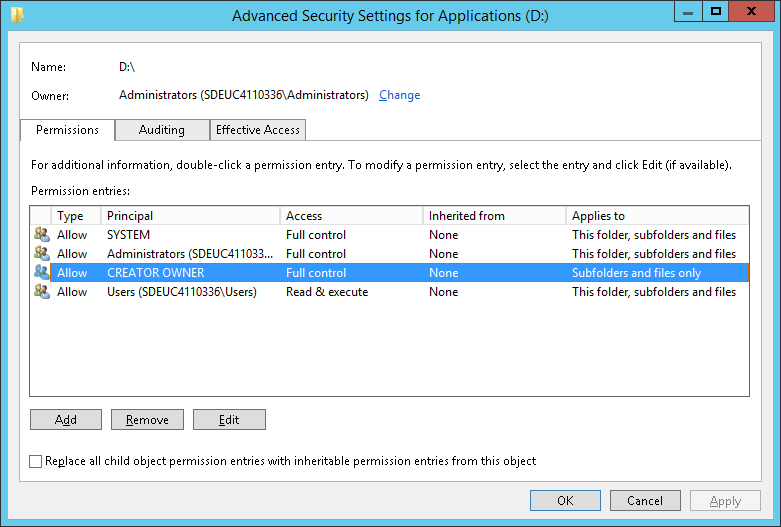
Once this was done, the installation was concluded successfully however the Elasticsearch service couldn’t be started. In the installation folder you will find the Elasticsearch folder which contains logs in which you could check why the service hasn’t started. In my case I could see the following:
[2016-11-20 08:07:04] [info]  [ 1756] Commons Daemon procrun (1.0.15.0 64-bit) started

[2016-11-20 08:07:05] [info]  [ 1756] Service elasticsearch-service-x64 name Elasticsearch 1.7.1 (elasticsearch-service-x64)

[2016-11-20 08:07:05] [info]  [ 1756] Service 'elasticsearch-service-x64' installed

[2016-11-20 08:07:05] [info]  [ 1756] Commons Daemon procrun finished

[2016-11-20 08:07:05] [info]  [ 4768] Commons Daemon procrun (1.0.15.0 64-bit) started

[2016-11-20 08:07:05] [info]  [ 4768] Starting service 'elasticsearch-service-x64' ...

[2016-11-20 08:07:06] [error] [ 4768] Failed to start 'elasticsearch-service-x64' service

[2016-11-20 08:07:06] [error] [ 4768] Access is denied.

[2016-11-20 08:07:06] [info]  [ 4768] Start service finished.

[2016-11-20 08:07:06] [error] [ 4768] Commons Daemon procrun failed with exit value: 5 (Failed to start service)

[2016-11-20 08:07:06] [error] [ 4768] Access is denied.
Turns out that the NETWORK SERVICE had no rights to execute on that drive. I just granted local users that right and the service managed to start. Now I could see in my services the following
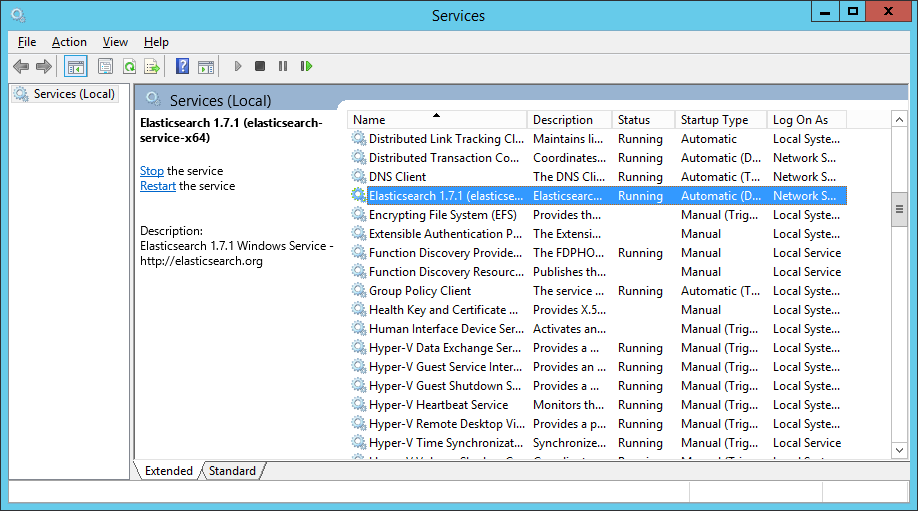
Happy days! It is now all running as supposed. Can’t wait to go in production with TFS 2017 and get some feedback from my users!
Good luck!