Installing TFS 2017 Code Search on a separate server

Yesterday a new and a very welcome feature was announced together with the RTM version of Team Foundation Server 2017. A feature that provides fast, flexible, and accurate search across your code in TFS. You can read more about it here, Announcing Code Search on Team Foundation Server 2017.
As my Application Tier servers are already under a substantial load, I decided to install the Code Search engine on a separate server (further in this text I will call this machine, Code Search server). Unfortunately, this approach is not well documented and I will share with you my recent experience.

Installing Code Search on a separate server

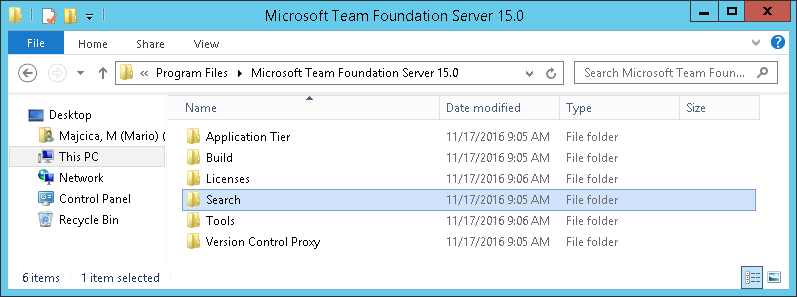
First of all, where to find the necessary installation files? Well, the folder containing the necessary is in the folder you have chosen to install TFS in (on your application tier machine). By default this is C:\Program Files\Microsoft Team Foundation Server 15.0. Now, you will see underneath another folder called Search, just copy it to a folder of your choice on the machine you intend to use as the Code Search server.

search-folder

This is sufficient to setup the Code Search server. Make sure however that JRE (Java SE Runtime Environment) is installed on your machine before proceeding. JRE 7 Update 55 or higher, or, JRE 8 Update 20 or higher are required and my advice is to go for the latest version of JRE 8 which you can find here, Java SE Runtime Environment 8u111.
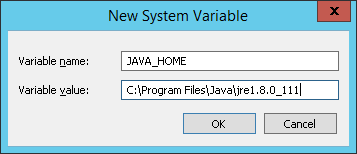
Once you have downloaded and installed the JRE, you will need to add a system environment variable called JAVA_HOME that will point to the folder in which JRE is installed. Open Control Panel > System and Security > System and choose Advanced system settings. In System properties dialog click Environment variables button and add a new System variable by click the new button (and be sure it is a System property and not a user variable). As a variable name choose JAVA_HOME and as value set the path of the folder where JRE is installed, which by default and in my case is C:\Program Files\Java\jre1.8.0_11.

new-system-var-java-home

Now that you installed the only prerequisite, we can focus on the installation of the search server. All you need is located in the Search folder. Inside you’ll find another folder called zip and again in between other files a PowerShell script called Configure-TFSSearch.ps1. This is actually the installation script. In case you run it (and make sure you do so as an Administrator) you will be prompted for a couple of parameters which also can be passed as arguments during the invocation. The parameters in question are TFSSearchInstallPath, indicating the location where Elasticsearch is going to be installed and TFSSearchIndexPath location where Elasticsearch indices\data will be stored. In order to achieve optimal performance, the last path where Elasticsearch store it’s data, locate it on a drive that can produce a high IOPS such as an SSD drive or SAN. You can also check the hardware requirements that Microsoft recommends at Code Search Hardware requirements.
Now, let’s invoke the installation script. I will also pass the -Verbose parameter so that we do get more detailed information on actions this script is performing.

.\Configure-TFSSearch.ps1 -TFSSearchInstallPath C:\ES -TFSSearchIndexPath C:\ESDATA -Verbose

Once invoked you should see something similar:

search-error-setacl

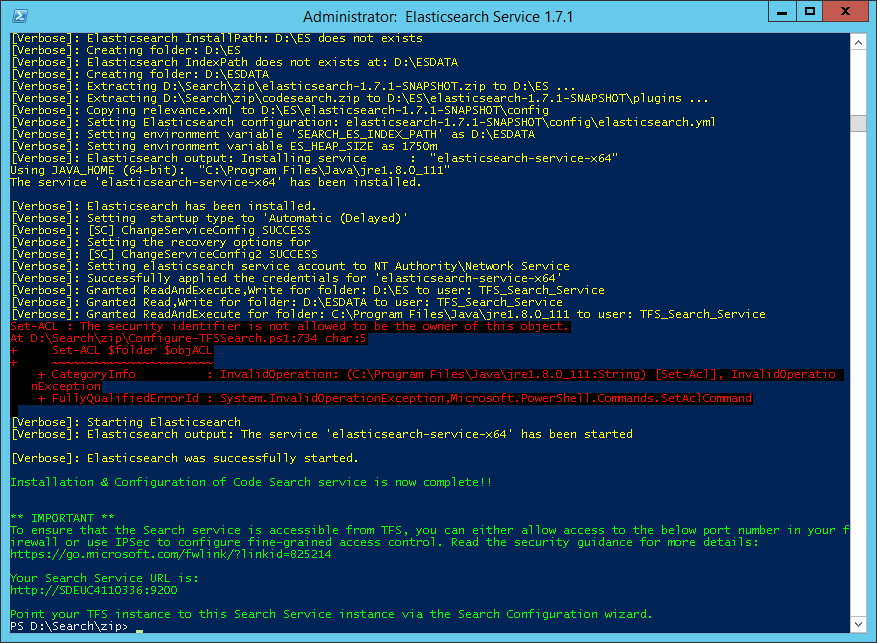
If the error Set-ACL : The security identifier is not allowed to be the owner of this object.
is shown, do not worry, it is just the script that tries to assign the rights on the JAVA_HOME directory and it is doing so with constructing them with the Get-Acl cmdlet.
Get-Acl cmdlet always reads the full security descriptor even if you just want to modify the DACL. That’s why Set-ACL also wants to write the owner even if you have not changed it. And changing the owner in this case is not possible.
But do not worry it is not a show stopper and your installation will conclude just fine as far as the NETWORK SERVICE (account used to run Elasticsearch service) is authorized to execute Java VM (which it should be).

That’s it. All done. Installed.

Some other notes about the installation procedure

In case you pass no parameters meanwhile invoking the Configure-TFSSearch script, it will run in the interactive mode and will prompt you for these mandatory values.
Some other parameters that you can influence during the invocation are:

Argument Description
Port Set’s a different port than the default one 9200 and must be in range of 9200-9299
Quiet Bypasses the first confirmation from user to make the script fully non interactive
RemoveTFSSearch Uninstalls the Code Search from the current machine

Also note that this is a customized version of Elasticsearch, fine-tuned for Code Search on Team Foundation Server, thus no default version of Elasticsearch is advised for this machine (in case you have it already installed somewhere).

Configuring TFS 2017 for Code Search

In case you already configured the code search on you AppTier server during the upgrade or you wish to move the search to another server you need to unconfigure it first. It is not that obvious on how it is done.

Removing Code Search server

Open the TFS Administration Console and select the server node:

remove-feature

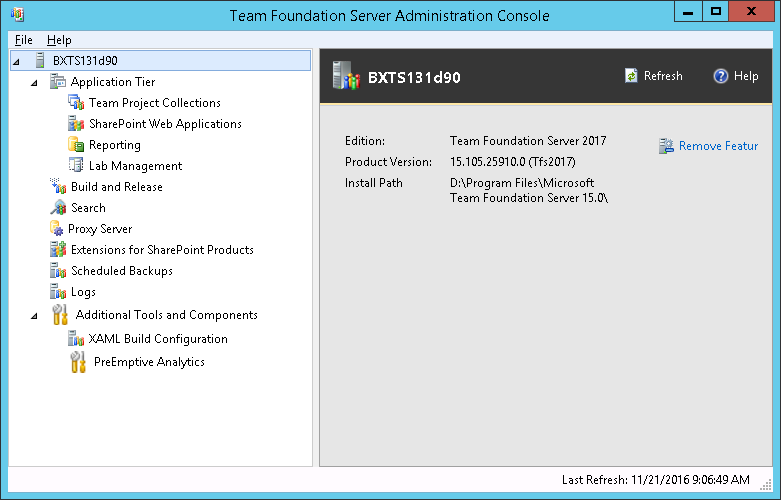
Then choose remove feature button. A new dialog will appear.

remove-feature-dialog

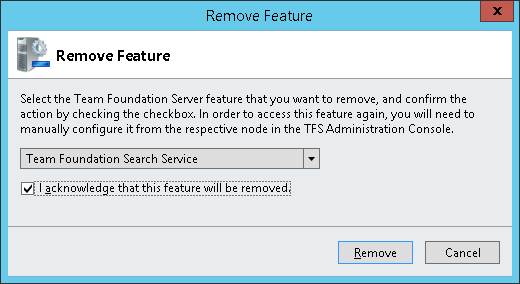
Choose “Team Foundation Search Service” from the drop-down and mark the acknowledge option, then click on Remove.
This will disassociate the Code Search server from TFS but will not remove it. In case you wish to remove it from your AppTier Server, go to the above mentioned folder (in my case C:\Program Files\Microsoft Team Foundation Server 15.0\Search\zip) and invoke .\Configure-TFSSearch.ps1 -RemoveTFSSearch -Verbose.

Now that the association with TFS and the old, local instance, are removed, we can continue with our configuration.

Configuring code Search

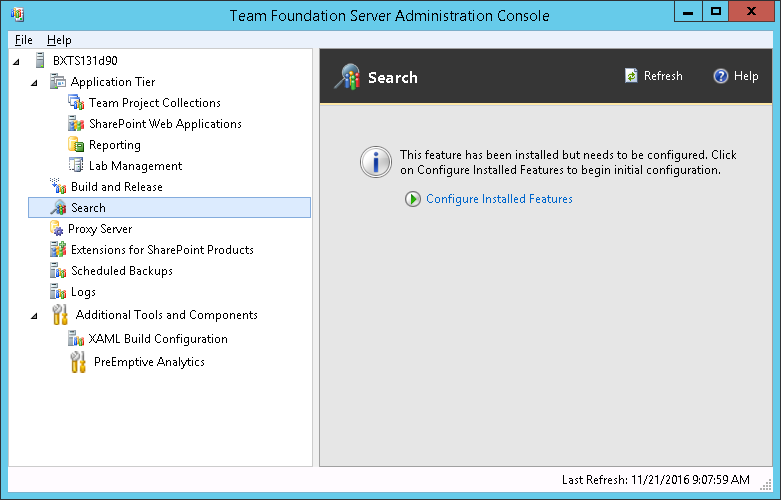
In the TFS Administration Console move to the search tab and choose “Configure Installed Features”

configure-search

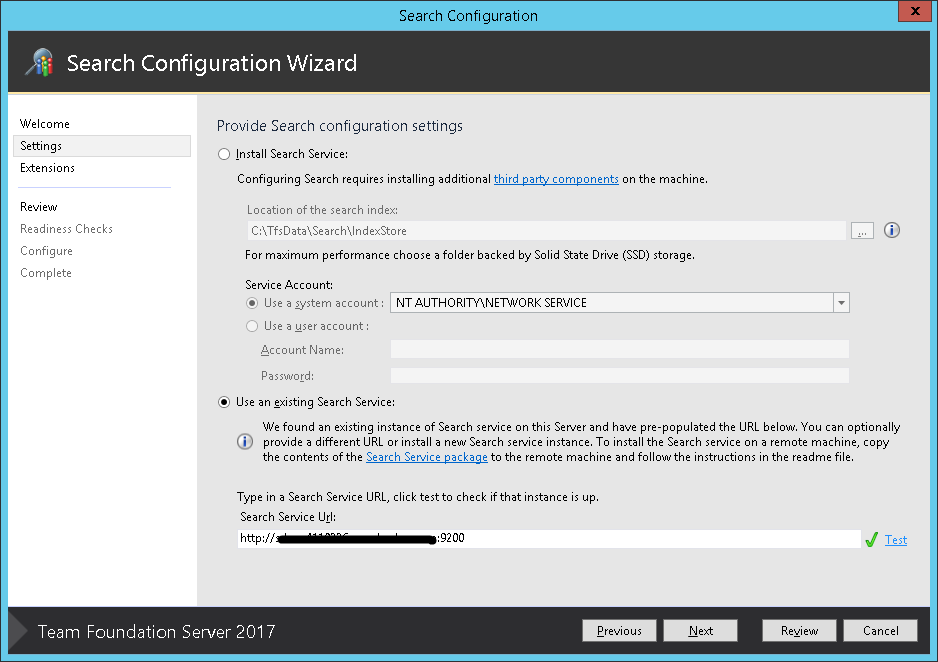
At this point the search configuration wizard will start. In the settings step, choose “Use an existing Search Service” and provide the “Search service Url”. Search service url will equal to the FQDN of your search server plus the port that you set during the installation (9200 by default).

search-conf-wizard-settings

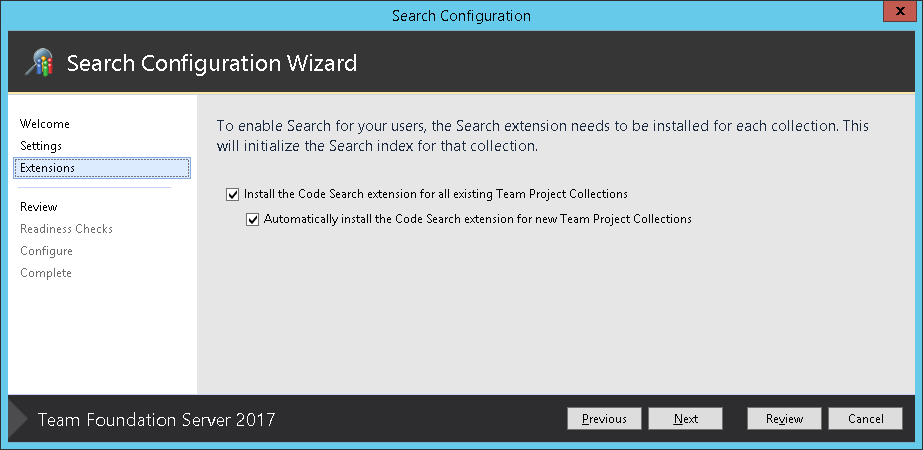
In the next step, install the extension in case you feel this should be available to all of the collections.

search-conf-wizard-extension

Now just do conclude the procedure till the end and you should see the following

conf-complete

All done. Be aware that once you set this up, it can have a performance impact on your server as the source code will start being read, so on large and busy systems it will be best to set it up during a less busy hours.
You can check the indexing state by using the Code Search managing scripts that are hosted on GitHub.
Read more about this argument here.

Other considerations

Due to my server setup, I went to install the code search on the D: drive and this brought me some problems. This issues are not due to the installation procedure itself, still I will share my experience hoping it can help someone else.
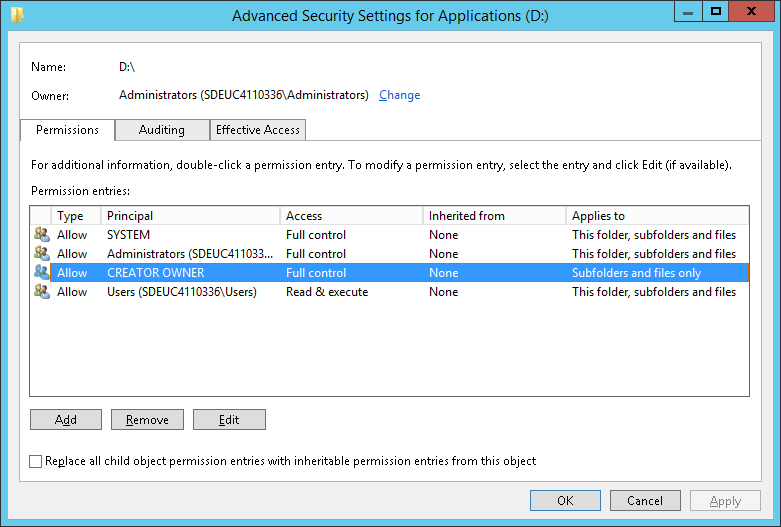
The rights on my drive where not setup correctly so that the installation procedure couldn’t assign the right ACL rights on the Elasticsearch folder. This was solved by adding the CREATOR OWNER group on the drive level and assigning it the default rights (Full control over Subfolders and files only).

advanced-security-creator-owner

Once this was done, the installation was concluded successfully however the Elasticsearch service couldn’t be started. In the installation folder you will find the Elasticsearch folder which contains logs in which you could check why the service hasn’t started. In my case I could see the following:


[2016-11-20 08:07:04] [info] [ 1756] Commons Daemon procrun (1.0.15.0 64-bit) started
[2016-11-20 08:07:05] [info] [ 1756] Service elasticsearch-service-x64 name Elasticsearch 1.7.1 (elasticsearch-service-x64)
[2016-11-20 08:07:05] [info] [ 1756] Service 'elasticsearch-service-x64' installed
[2016-11-20 08:07:05] [info] [ 1756] Commons Daemon procrun finished
[2016-11-20 08:07:05] [info] [ 4768] Commons Daemon procrun (1.0.15.0 64-bit) started
[2016-11-20 08:07:05] [info] [ 4768] Starting service 'elasticsearch-service-x64' ...
[2016-11-20 08:07:06] [error] [ 4768] Failed to start 'elasticsearch-service-x64' service
[2016-11-20 08:07:06] [error] [ 4768] Access is denied.
[2016-11-20 08:07:06] [info] [ 4768] Start service finished.
[2016-11-20 08:07:06] [error] [ 4768] Commons Daemon procrun failed with exit value: 5 (Failed to start service)
[2016-11-20 08:07:06] [error] [ 4768] Access is denied.

Turns out that the NETWORK SERVICE had no rights to execute on that drive. I just granted local users that right and the service managed to start. Now I could see in my services the following

elasticsearch-running-service

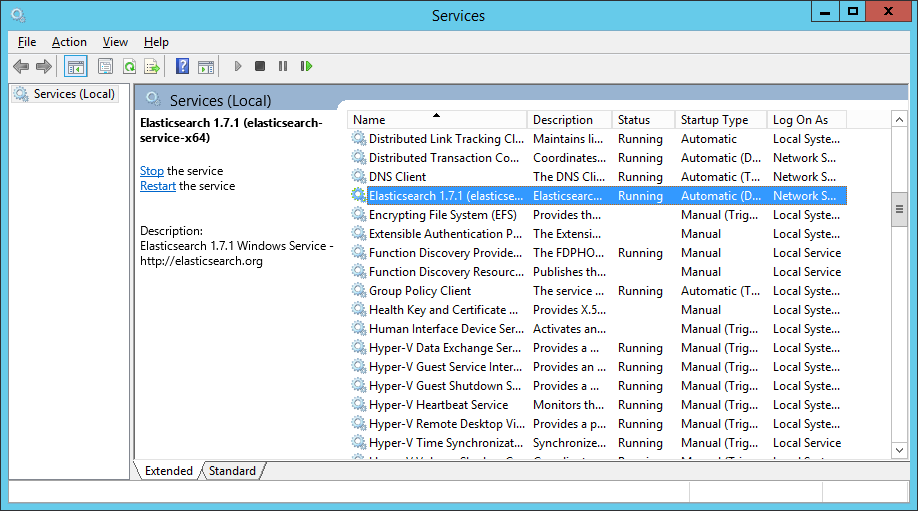
Happy days! It is now all running as supposed. Can’t wait to go in production with TFS 2017 and get some feedback from my users!

Good luck!

Installing VSIX package via WiX installer

Introduction

WiX Toolset is a powerful set of tools used to create Windows installations packages. Unfortunately it’s learning curve is quite steep and the documentation is not it’s strong point. That’s why I decided to show you, step by step, how to create an installer for your VSIX packages. I will not cover all of the WiX features as this is not intended to be an exhaustive WiX guide but I will describe in detail what is necessary to deploy a VSIX package. Also I will add some interesting details that can be useful more in general when creating WiX installers. The end result should be a MSI installation file that will correctly install and uninstall your VSIX package. Let’s start.

It’s true that VSIX leverages an installer on it’s own. Still you should consider this approach if your installation is more complex and/or requires other components to be installed.

Prerequisites

In order to follow this example you will need any version of Visual Studio starting from 2010 till the most recent 2015. Also any sku except the Express is fine. You will need a Visual Studio SDK and WiX Toolset installed. The examples you will find are made w Visual Studio 2013 and WiX 3.9 R2. You can download them from here (SDK and WiX).

Creating the necessary projects

In order to start our practical example, let’s first create the necessary project that we are going to use by our installer later. Create a new project in Visual Studio and choose a “VSIX Project”.
I will name it MyAwesomeExtension.

MyAwesomeExtension

Once the project is created you will be presented by the vsixmanifest designer. You can leave all the defaults. Make sure only that the Product ID is set in the unique way and that, for commodity, it doesn’t contain spaces.

EmptyVSIXProjectWiX

This should be it for what concerns our extension. I will not focus on creating Visual Studio extensions and this is just enough to have an extension registered and working. If you hit F5 you should start another instance of Visual Studio, by default in Experimental Mode, and if you check inside Tools > Extensions and Updates menu you should find your newly created extension.

The next thing is adding a WiX Setup Project into your solution. I will simply call it Installer.

AddingInstaller

This was about it. In the next paragraph I will show you how to install your VSIX package using WiX.

WiX Toolset installer

First thing first. We are going to take advantage of a standard custom action offered by WixVSExtension. In order to do so, we need to reference the WixVSExtension.dll. You can find it inside the WiX installation folder which in my case is C:\Program Files (x86)WiX Toolset v3.9bin. Be aware that the Add reference panel for the WiX setup projects is custom and it slightly differs from the default one. Aside of having the necessary to help us installing (and uninstalling) VSIX packages, it also contains many other useful properties and custom actions that will ease interacting with Visual Studio. You can find a list of the properties and custom actions here.
After the reference to the project is added we need to include the WixVSExtension namespace in our main wxs file (by default Product.wxs). In the Wix element next to the default namespace add the following xmlns:VSExtension="http://schemas.microsoft.com/wix/VSExtension". The end result should look like this:


...

Now we are going to add another reference to our Wix project and it will point to our VSIX project. This is done for commodity so that we can point Wix to the output of our VSIX project. Once this is done we need to define a component that will leverage the custom action defined in WixVSExtension that will actually install our VSIX. Inside the fragment where an example of ComponentGroup is defined, we are going to remove all of the code inside it, comprehensive of ComponentGroup itself. Define the following:


Let’s analyze what we added.
First element we added is a Component, that we called for convenience C_MyAwesomeExtension, we assigned a unique identifier to our component (so that MSI can track this element) and we specified the folder in which this component should be deployed. I will not get into details of what a component is and how it works, I do suppose you already know that and if not you can find more info here.

Inside our component we specified two elements. The simpler one to understand is for sure the File element. We gave an id to the file that we do need in order to deploy our VSIX and named it by using the name of the compiled assembly. In order to retrieve the name I used a variable that was generated by Wix because of the reference to the project we added, appending to the result the .vsix string. Now, each time you reference a project Wix will create several variables dynamically and they will be at your service. A full list of them you can find at this link. In case we were referencing a project that will output an executable or a library, we could use the TargetFileName variable and omit the .visx. However as by default Wix doesn’t know nothing about VSIX project types and outputs, we need to use TargetName property and concatenate .vsix to it in order to get a file name with the correct extension.

Same thing we did with the source attribute. With it we do specify where this file should be copied from in order to be placed inside the MSI installation file. As for the Name attribute, we are going to use some of auto generated variables to get to the correct path of our compiled VSIX.

VSExtension:VsixPackage element

Let’s focus on the main character of this article, the VSExtension:VsixPackage element. I will describe all of the attributes I used and also the one I haven’t and describe the behavior that they do produce.

File
File, as the name suggest, requires to be set to the file name that we used in our MSI tables and points to our VSIX installer. Simply said it needs to be the same as the Id attribute we used for the File element that we discussed earlier. In this way the custom action will know where is the VSIX file that we are planning to install.

PackageId
This is a very important value. Earlier I mentioned the Product ID, when we were creating our VSIX extension. Well that’s it, the unique product ID that is set inside vsixmanifest file in your extension. Make sure that it does not contain any spaces and if so add quote marks and escape them properly.

Target
You can specify one of the following values: integratedShell, professional, premium, ultimate, vbExpress, vcExpress, vcsExpress, vwdExpress. It will indicate which edition (SKU) of Visual Studio is required in order to register this extension.

TargetVersion
Specifies the version of Visual Studio for which to register the extension. Should contain a version number as at example 11.0 in case of Visual Studio 2012 or 14.0 in case of Visual Studio 2015.

Vital
In indicates if the failure of the installation of the VSIX extension will cause a rollback of the whole installation.

Permanent
Often underestimated and forgotten parameter. This is the reason of many complains about the extension not uninstalling on msi uninstall. And that’s all about it. If set to no, your extension will be uninstalled once you try to uninstall your product. If set to yes, your extension will not be removed in case the user uninstalls the product.

VsixInstallerPathProperty
As this custom action relies on VsixInstaller.exe to trigger the installation of the VSIX, it needs to know where the VsixInstaller.exe is located in order to use it. It is recommended not to set this attribute and let it be populated by the custom action itself. By default, the latest VsixInstaller.exe on the machine will be used to install the VSIX package.

Believe it or not this is sufficient to let the Wix install your VSIX extension. In our case we do target the Visual Studio 2013 and accepting any edition from professional above.

Behind the scene

So what’s the magic behind this custom action? The simplest way to verify what is happening is to compile our project and launch the installation. Before we are able to this there are two minor things we need to take care of. Inside our Feature element we need to change the ComponentGroupRef to ComponentRef and point the id to our C_MyAwesomeExtension component. Also to make the output a single file, we will tell Wix to integrate the cabinet inside the msi itself. To do so under the MediaTemplate element we are going to add the EmbedCab attribute and set it’s value to yes.


We can compile now our project and position our self in the build output directory. A file called Installer.msi should be there.
In order to see what is happening we can’t just double click our newly created msi. We need to launch the installation from the command prompt and request the verbose logging to be activated. To request the log file being emitted we need to launch the following command: msiexec /i Installer.msi /l*v install.log. This will tell the msi installer to install our application and output a verbose log inside the file named install.log.
If you execute this command, you will briefly see installation starting and that’s it. This is because we haven’t chosen any UI for this installation. It’s not in our scope showing how to create/choose and UI for the installer.
Let’s check our default install folder at C:\Program Files (x86)Installer. Bingo! Our extension is there. Now open your Visual Studio 2013 instance and check the Extensions and updates window. Again, MyAwesomeExtension is there!

MyAwesomeExtensionInstalled

Open the newly created log file to see what was done in order to achieve this. Open the install.log file and search for “/skuName:Pro /skuVersion:12.0”. The line you landed on is the command that was executed by our VSExtension:VsixPackage custom action. The full command is following:

C:\Program Files (x86)Microsoft Visual Studio 12.0Common7IDEVSIXInstaller.exe /q /skuName:Pro /skuVersion:12.0 “C:\Program Files (x86)InstallerMyAwesomeExtension.vsix” /admin

What happened here? Well nothing special. When you double click your vsix file, the vsix extension is associated with VSIXInstaller.exe and it will show you the following window:

MyAwesomeExtensionVSIXInstaller

Same thing with our custom action, it calls directly VSIXInstaller.exe and triggers the quite mode (so no UI is shown) and passes the necessary parameters in order for VSIXInstaller.exe to preform the installation. Do you recognize the other parameters? That’s right, the do match what we have specified with the attributes on our VSExtension:VsixPackage element. Execept the last /admin parameter. It implies that the extension will be installed to the admin extension location. If you prefer it to be installed on per user basis, you will need to create a perUser installation, thus, set the Package InstallScope to perUser.

You can get through the log file and probably you will find plenty of interesting information, like the search for the VSIXInstaller.exe and the values that are set in order to accommodate it, etc.

The same thing is done for what concerns the uninstall. We can launch the uninstall with the following command: msiexec /x Installer.msi /l*v unistall.log. As you can see it is similar to the install except that instead of /i we used a /x parameter. Once you execute it you will be prompted for the confirmation:

MyAwesomeExtensionUninstall

By confirming that, the uninstallation will be preformed.

Get inside the log file and search again for /skuName:Pro /skuVersion:12.0. You will land on line that triggers the following command:

C:\Program Files (x86)Microsoft Visual Studio 12.0Common7IDEVSIXInstaller.exe /q /skuName:Pro /skuVersion:12.0 /u:”MyAwesomeExtension.majcica.com.420d4ff9-340c-4867-9247-c85ab370ec7b” /admin

Please notice that the /u parameter is passed which will indicate to VSIXInstaller.exe to remove the extension with product Id (and not the vsix file anymore) that matches the unique ID of our extension.

Tuning the installer

There are a couple of things we could take care of. One of them is to check if the requested Visual Studio is installed. This in order to prevent an eventual exception and a consequent installation failure. As this is fairly simple I will add the necessary info to this post.

Everything we need to know about the Visual Studio been installed. WixVSExtension puts on our disposition this info in form of a property. In case Visual Studio is installed, the property will be populated, otherwise will not. Only thing we need to do is to reference the property, which in our case is called VS2013DEVENV, and create a condition that verifies if it is set.


After adding this code inside the product element, compile, and launch your installation, you will get the following message, which eventually will interrupt and prevent the installation.

NoVS2013

Another thing I can think of is installing the extension to multiple versions of Visual Studio. You could declare several components, each one targeting the same file but different TargetVersion, and add a condition to each of them. Example:


  VS2012DEVENV


  VS2013DEVENV
  

Conclusion

I hope I answered all of the questions you may have regarding installing VSIX packages via Wix. If there is anything I omitted and you would like to know more about, please do not hesitate to ask in the comments.
For completeness I will now list the complete content on the Product.wxs file.


Happy coding!