Signing Git Commits

What does it mean to sign a Git commit and why would you like to do that?

From Latin, signāre, or putting a mark.

As the word itself says, signing, putting a mark, ensures that the commit you made and the code contained can’t be tempered.
Git is cryptographically secure, but it’s not foolproof. In order to ensure the repository integrity, Git can sign tags and commits with a GPG key.

In this post, I’ll show you how to set up all of the necessary toolings in order to be able to sign your git commits. Aside from having the latest version of Git installed, you’ll need also the GnuPG. So let’s start.

GPG Introduction

GnuPG, also known as GPG, is a complete and free implementation of the OpenPGP standard. All of the details about OpenPGP are defined in RFC4880 (also known as PGP).
First of all, you need to download GPG, configure it and create/add your personal key.
On the following address https://www.gnupg.org/download/index.html and under “GnuPG binary releases” under windows section choose “Simple installer for the current GnuPG” and download the installer.
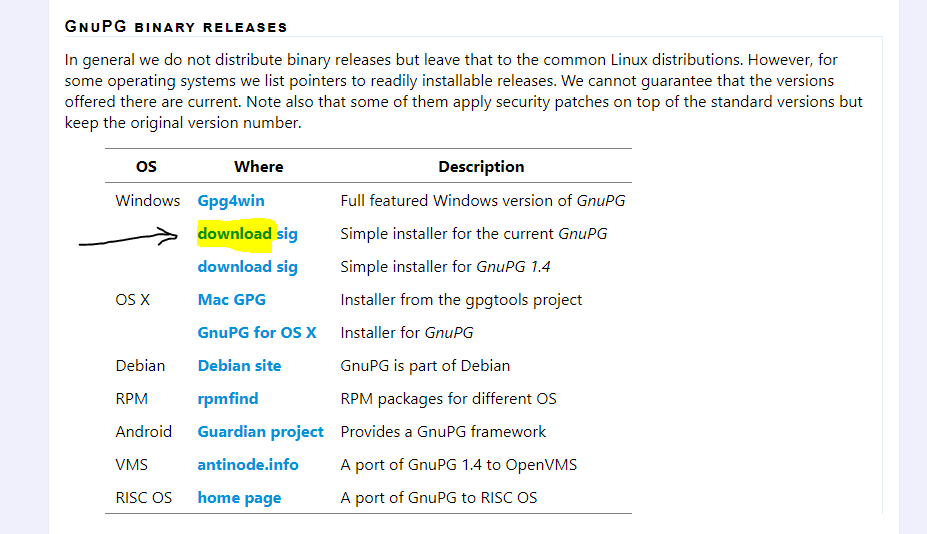
When downloaded, please install the application. The installation procedure is a simple one as no particular options are available.
Once installed you are ready to create a new key, which is the fundamental thing in getting to sign our commit.

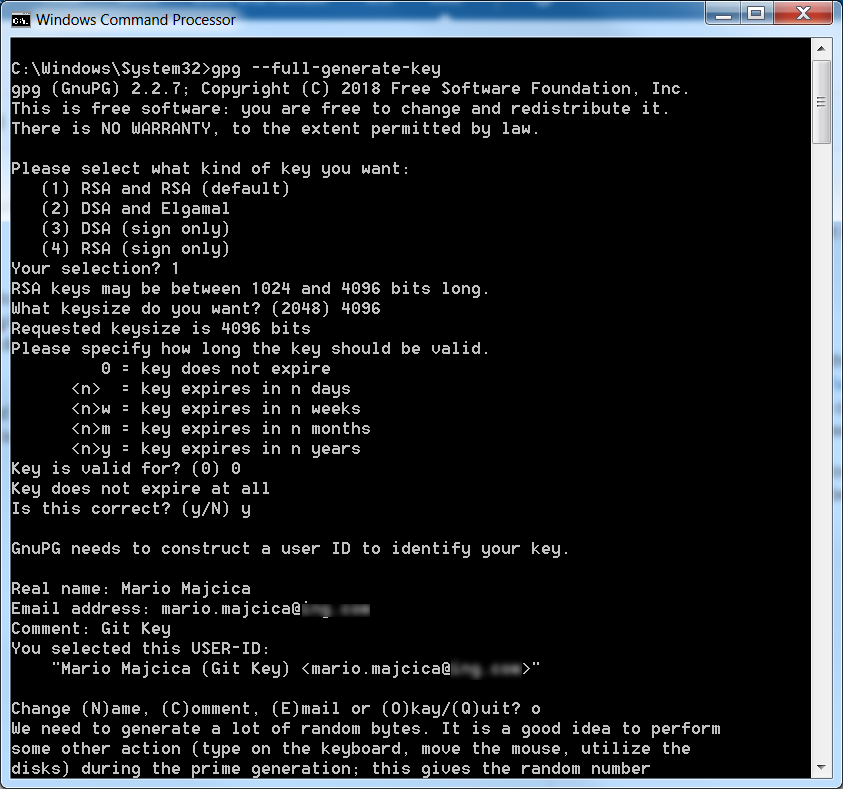
In command prompt issue the following command gpg --full-generate-key At this point, you will be asked several questions you will need to answer before your key is going to be created. Check the following example:
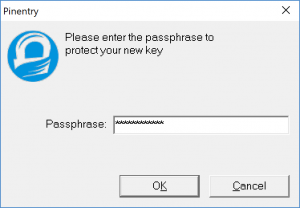
At the end of the process you will be asked, in a pop-up window, for a password that needs to be assigned to this key, please provide one.
Once the key is created you need to let Git know about it. First issue the following command gpg --list-secret-keys --keyid-format LONG which will list the necessary information about the newly created key. You should see something like this.
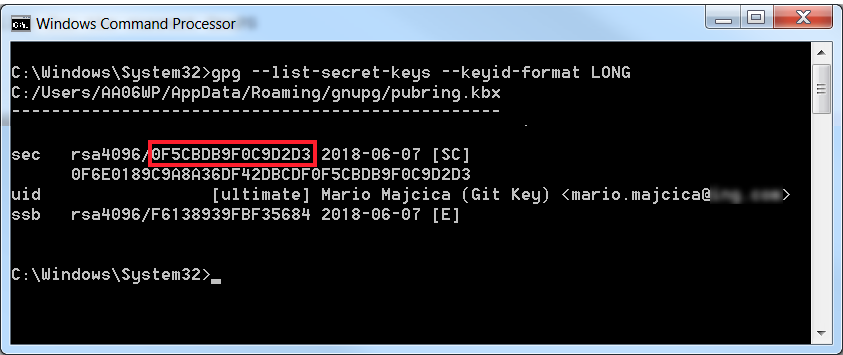
Now copy the value that is highlighted in red (key id) and issue the following command git config --global user.signingkey 0F5CBDB9F0C9D2D3 (where 0F5CBDB9F0C9D2D3 is your key id).

This is necessary so that Git knows what key it should use in order to sign your commits.

However, we are still not ready to go and sign our first commit. What we are missing is to set the `gpg.program` setting in our global git config. To do so we first need to retrieve the path of our gpg executable. The easiest way to do so is to run the where gpg command. It will return you the path on where gpg was installed. Now we can set the configuration by running the git config --global gpg.program "C:\Program Files (x86)\GnuPG\bin\gpg.exe" command (obviously in case your path differs from this one, you should adjust it).

Also, before proceeding make sure that the git user.name and user.email are set. In case this was not yet initialized try with, git config --global user.name "Mario Majcica" and git config --global user.email your@yemail.com.

Now we are ready to sign our first commit. Initialize a new git repository, add a file and run git commit -S -m "signed commit". At this point you should be prompted for the password of your key, the one you have chosen during the creation of the key itself:
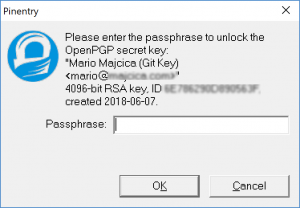
Once you enter your password, your commit will be made and it is going to be signed, e.g.
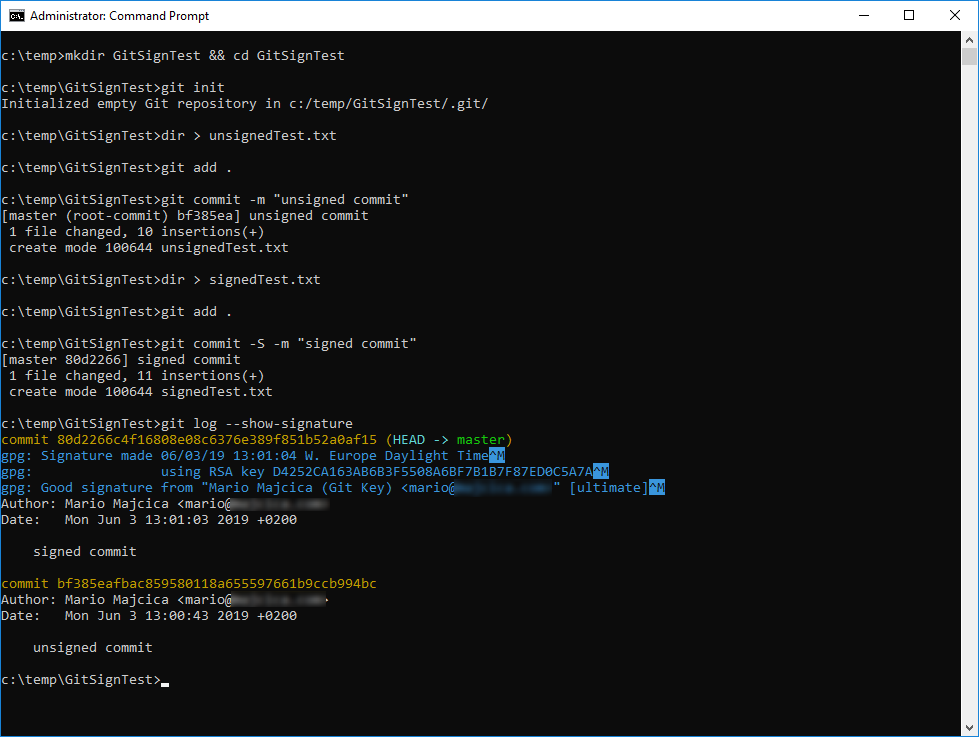
Let’s now verify that are signature is there. In order to achieve that issue the following command git log --show-signature -1 or a in a more kind of overview printout git log --pretty="format:%h %G? %aN %s".

You can learn more about Git and the available command regard signing commits here https://git-scm.com/book/en/v2/Git-Tools-Signing-Your-Work.

Export/Import

Next step is to export our key. Why would we do that? Well, an example, so that you can import it on another machine of yours, or import it to services like Github who can then validate your signature.

Let’s first export our public key. To do so, use the following command: gpg --export -a 0F5CBDB9F0C9D2D3> publicKey.asc
Obviously, 0F5CBDB9F0C9D2D3 is my key id in this case, sobstitute this value with your key id.
This command will create a file called publicKey.asc in the current folder of yours. Edit this file with a text editor of choice. The content of it will be necessary information for your Github account. Now open your Github.com page and log in. Under the settings, you will find a menu called “SSH and GPG keys”. Open this menu then choose “New GPG Key”:
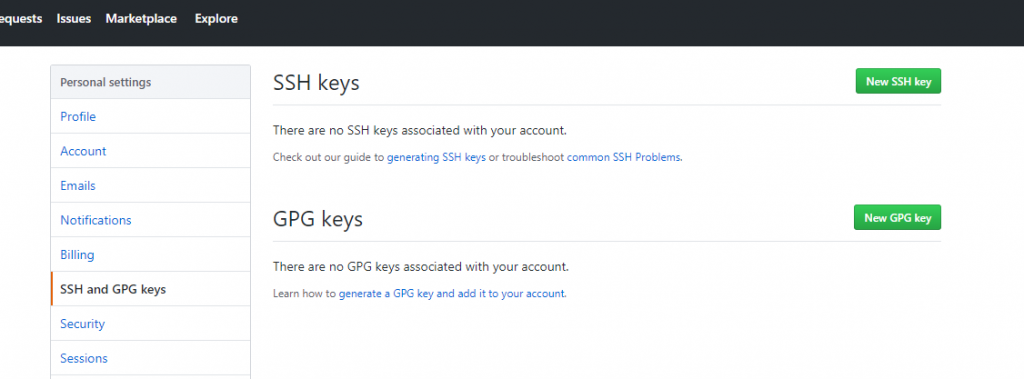
Now, copy the content of publicKey.asc and paste it in the page on GitHub, then just click “Add GPG Key”.
Once done, you should see your new key listed in the GitHub page “SSH and GPG keys” under the GPG Keys. I’ll now edit one of the projects in GitHub and push a signed commit. As you can see, it is now listed that the commit is verified.
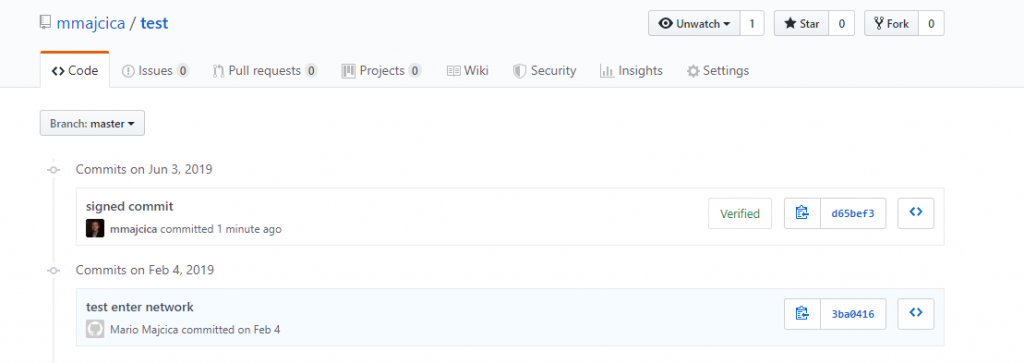
In case you click on the Verified icon you will be able to see the details about the signature:
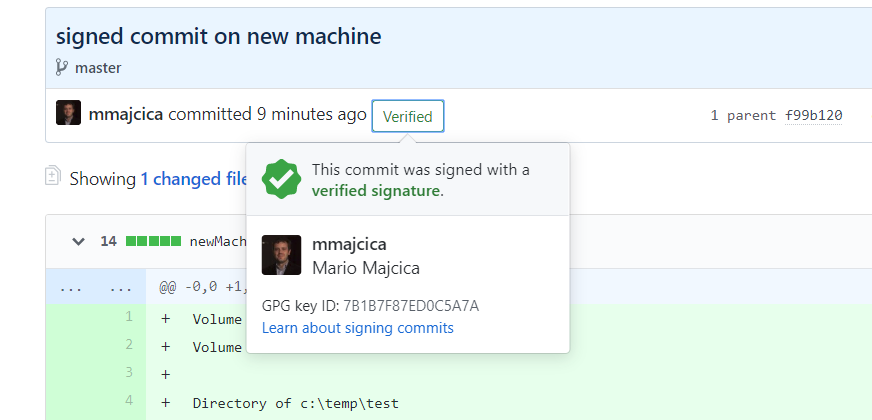
Before we move to the import part, let me show you a trick on how to automate this in a popular IDE, Visual Studio Code.
Now that we are all set up, we can instruct Visual Studio Code, to sign the commits that are made from the IDE. To do that, open the settings page in Visual Studio Code
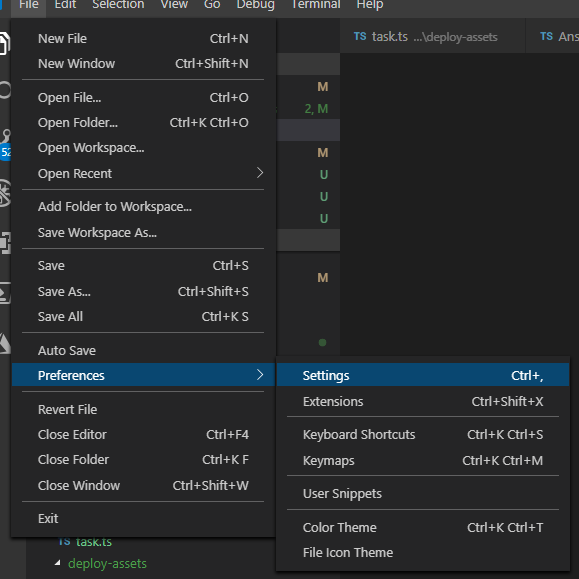
then search for ‘git signing’ and the relevant setting should be listed:
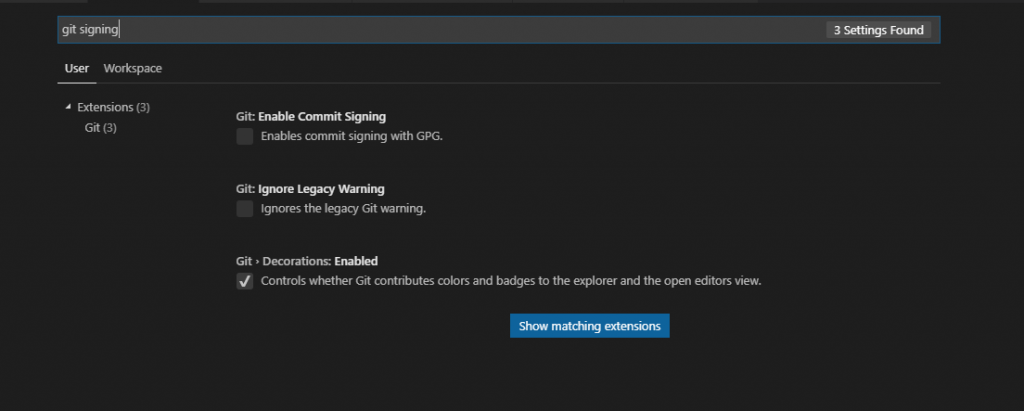
The setting in question is ‘Enable Commit Signing’. Check it, then make a new commit. List your commit log and you’ll see that now also the commits made directly from Visual Studio Code are now signed.

However, the export doesn’t end here. We need to export the private key in order to be able to import it and use it on another machine. To do so run the following command, gpg --export-secret-keys -a 0F5CBDB9F0C9D2D3 > privateKey.asc (where 0F5CBDB9F0C9D2D3 should be your key id). Store this file carefully and do not expose it to the public. It is protected by the password, still, however, in this case, the password itself becomes the weak link.

It is now time to import it. For that, it is sufficient to issue the following command gpg --import privateKey.asc. You do not need to import the public key, the private key always contains the public key. One last thing, if imported on another machine, you need to indicate the level of trust towards the newly imported key. You can easily achieve that with the command gpg --edit-key 0F5CBDB9F0C9D2D3 trust quit where 0F5CBDB9F0C9D2D3 is again the key id of the key on that machine. After you issue the command you will see the following screen:
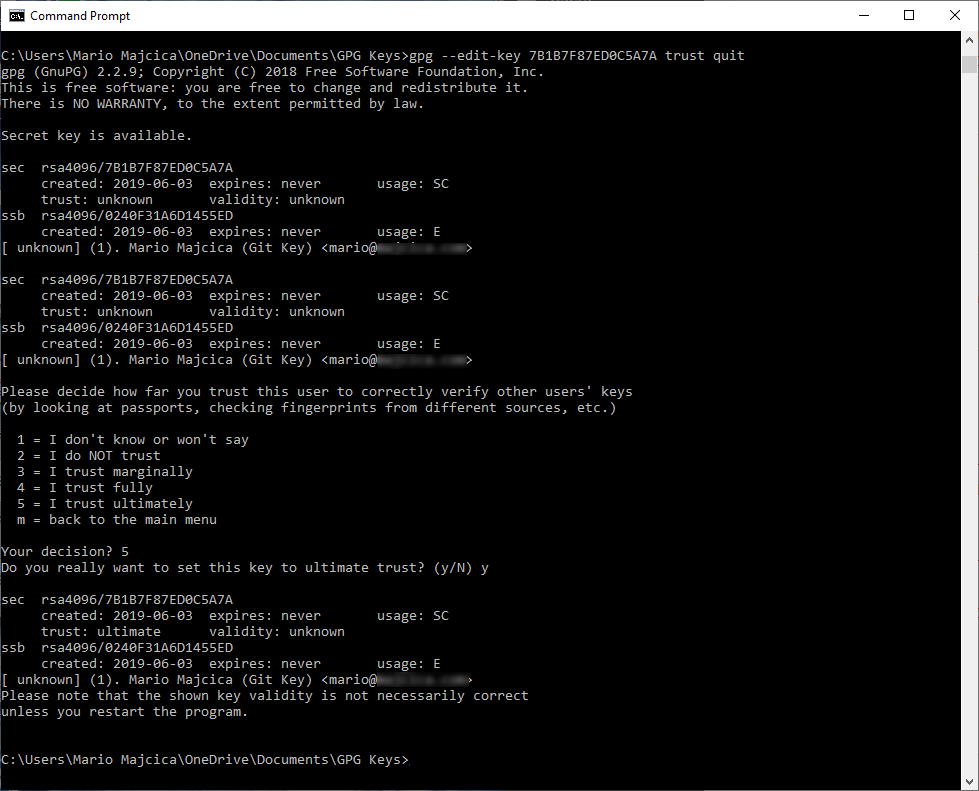
and at this stage, you will be asked for a decision. Hit 5 to indicate you trust ultimately the given key and your job is done.
If the key already existed on the new machine, the import will fail to say ‘Key already known’. You will have to delete both the private and public key first (gpg –delete-keys and gpg –delete-secret-keys).

Conslusion

Aside from the commits, you can also sign tags. If you are not familiar with public key cryptography, check this video on YouTube, it is one of the simplest explanations that I heard.
Some of the useful commands in our case:
gpg --list-keys and gpg --list-secret-keys, both will list your keys, public and private ones and the trust state.
git config --list --show-origin will show you all of the git settings so that you can check if the necessary is already set.

To configure your Git client to sign commits by default for a local repository, in Git versions 2.0.0 and above, run git config commit.gpgsign true. To sign all commits by default in any local repository on your computer, run git config --global commit.gpgsign true.

To store your GPG key passphrase so you don’t have to enter it every time you sign a commit, I recommend using Gpg4win.

That’s all folks, don’t forget to sign your work!
Installing self-signed certificates into Git cert store

Introduction

Since it’s introduction, Git repositories in TFS became quite a popular choice. Most of early adopters used the integrated Visual Studio tooling to interact with their repositories. It is all straight forward, simple and easy, clone your repository are you are ready to go. Now, if you ever tried to use the command line Git client or another IDE as Visual Studio Code (which relies on the command line tool), and communication with your Git repositories is based on SSL connection (https), you may have noticed that things do not work out of the box. Visual Studio will take care of certain things for us, as authentication and certificates (Windows cert store), and make it transparent (in case certificates are distributed via domain). If we intend to use the Git client we need to set a couple of things up. I will illustrate here how to retrieve your TFS certificate and install it in the Git certificate store.

Certificates

Often, in the enterprise environments, access to Team Foundation Server is made possible only through Transport Layer Security cryptographic protocol. This means that the client will need to validate a certificate before establishing the connection. Often the certificate is a self-signed and if you try to clone a repository you are going to receive the following error:

SSL certificate problem: unable to get local issuer certificate

This is due to the fact that the root certificate which vouches for the authenticity of your SSL certificate is private to your organization. That root certificate is distributed to all domain-joined machines in your organization via group policy, and it is stored in the Windows certificate store for your machine.

Any application written to use the Windows crypto APIs will have access to that root certificate, and will consider your TFS deployment to be trusted. Applications using the Windows certificate store include Internet Explorer, Google Chrome, Visual Studio and others. However, Git for Windows (git.exe) uses OpenSSL for its crypto stack, and the Git for Windows distribution includes a set of trusted root certificates in a simple text file. Your organization’s root certificate is not in this list, and if you try to use git.exe to perform network operations against your TFS server, you’ll get the error specified above.

In order to solve this problem we need to include our self signed certificate in the list of certificates used by Git.

Retrieve the TFS root certificate

In order to get the certificate I will use IE 11. However you can achieve the same result in multiple ways, following different steps.

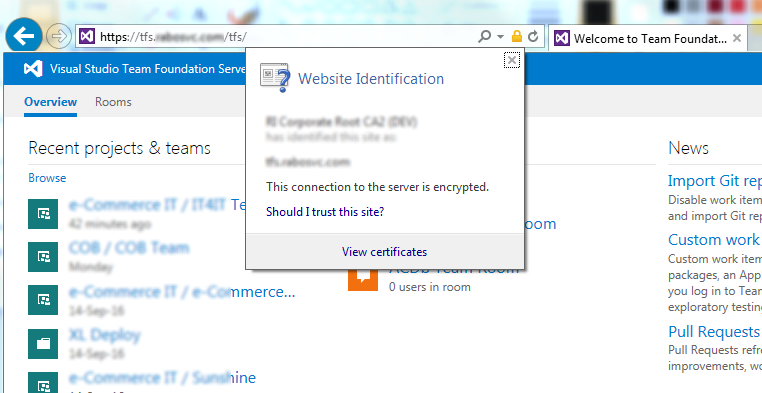
First open your TFS portal in IE and once opened, click on the lock icon in the address bar:

select-certificate

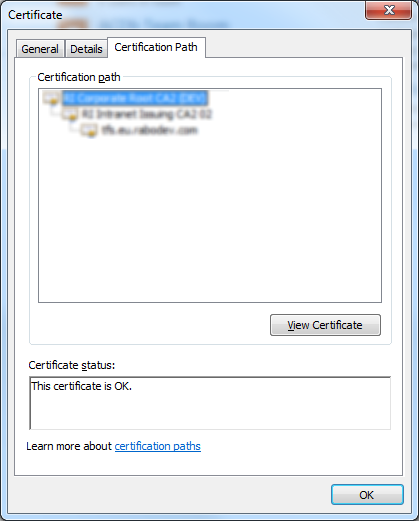
Choose to view the certificate by clicking on the View certificates button. A new window will open showing the certificate details. Move to the Certification path tab as show here:

certification-path

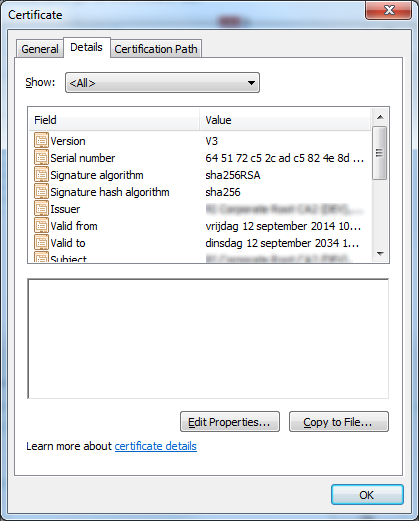
Make sure that the top level certificate is selected, same as in this screenshot and click on View certificate button. Another certificate details window will now open. In it, choose the Details tab:

certification-details

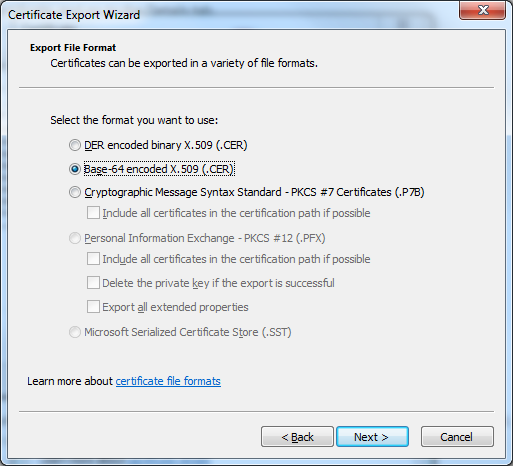
Now, choose Copy to file option and follow the wizard that you will be presented with. You will need to export the certificate as Base64 encoded:

export-base64-certificate

Save the certificate somewhere on your disk, name it lets say tfs.crt and close all of the open windows. Now we have the certificate in a format that we need, next step is adding it to the certificate store used by git.

Add TFS certificate to Git certificate store

On most of modern computers since the Git for Windows version 2.5, the certificate store is located in the following directory:
C:\Program Files\Git\mingw64\ssl\certs

Note that in some cases the folder may be located here:
C:\Users\\AppData\Local\Programs\Git\mingw64\ssl\certs

In case that you are using an older version this can differ. In that case an upgrade is advised.
Open the above mentioned directory and you should find a file called ca-bundle.crt.

certs-folder

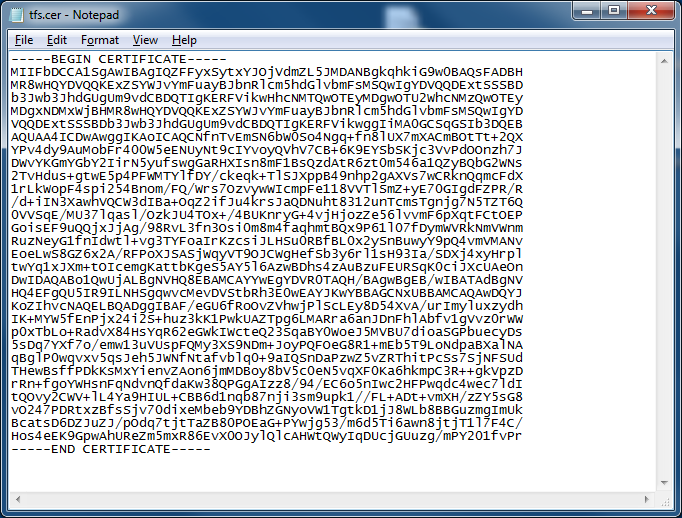
Now, first open our certificate file, tfs.crt, with a text editor of your choice, select all content and copy it.

tfs-cer

Then open the ca-bundle.crt file with the same text editor and position yourself at the end of the file. Now paste the previously copied content, save and close the all files.

Try again to clone a repository in TFS via git.exe. You should not receive the error message anymore and you should be prompted about credentials. By entering correct credentials the operation should succeed.

Securing Nexus Repository Manager OSS

Recently one of my articles got published on SonaType web site. It is based on my blog post Nexus Repository Manager OSS as Nuget server, which, after reviewing it for SonaType blog, somehow didn’t seemed complete. Thus, I decided to add an extra chapter about the security which I would like to share with you, also on my personal blog, here.

Security

I suppose that your computers are part of an Active Directory domain. I will propose here a setup to make your new Nexus instance dialogue with your domain controller when it comes to authenticating users. Why? Well, uploading packages to the hosted repository requires an API-key and it is assigned on per user basis. If you wish that your users (services) to be distinguished and limit some of them, you would need to setup the authentication and roles correctly. You could do this by simply using Nexus internal database, however, as we all know, adding users manually and creating another identity, from convenience and maintenance prospective is not recommendable. Not to speak about the security implications.

Setting up LDAP connection

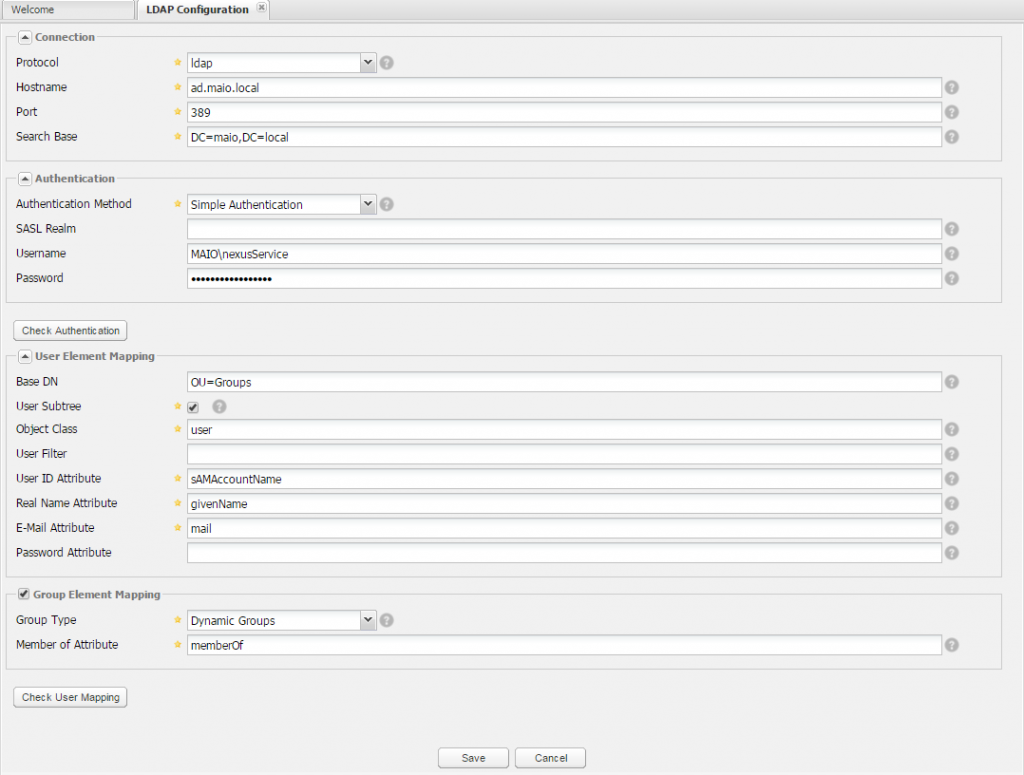
In the left-hand main menu panel expand the security group and select the LDAP Configuration option. A new tab will open and you will be presented with a long list of parameters:

ldap-configuration

We are going to analyze them one by one and explain the values you do need to enter in order to make this connection work.

Protocol
Here you have two choices Lightweight Directory Access Protocol and the Lightweight Directory Access Protocol over SSL. Probably you are going to use just a simple LDAP protocol and not the

Hostname
The hostname or IP address of the LDAP server. Simply add the FQDN towards your domain controller.

Port
The port on which the LDAP server is listening. Port 389 is the default port for the ldap protocol, and port 636 is the default port for the ldaps.
If you have a multi domain, distributed Active Directory forest, you should connect to the Active Directory through port 3268. Connecting directly to port 389 might lead to errors. Port 3268 exposes Global Catalog Server that exposes the distributed data. The SSL equivalent connection port is 3269.

Search Base
The search base is the Distinguished Name (DN) to be appended to the LDAP query. The search base usually corresponds to the domain name of an organization. For example, the search base on my test domain server could be dc=maio,dc=local.

Authentication Method
Simple authentication is what we are going to use in first instance for our Active Directory authentication. It is not recommended for production deployments not using the secure ldaps protocol as it sends a clear-text password over the network. You can change

Username
For the LDAP service to establish the communication with the AD server, a valid account is necessary. Usually you will create a service account in your AD for this purpose only.

Password
Password for the above mentioned account.

This is the first part of configuration. Now we need to check if what we entered is valid and if the connection can be established.
Click on Check Authentication button and if the configuration is valid, you should get the following message:

authentication-test

Base DN
You should indicate in which organizational unit Nexus should search for user accounts. By default it can equal to ‘cn=users’ however if you store your user accounts in a different OU, please specify the full path. An example, if you created an OU at the root level called MyBusiness then an OU called Users, you will need to specify the following value as base DN, ‘OU=Users,OU=MyBusiness’.

User Subtree
This needs to be check only if you are having other OU’s, under the one specified in Base DN, in which users are organized. If that is not the case, you can leave it unchecked.

Object Class
For AD it needs to be set yo ‘user’.

User ID Attribute
In the MS AD implementation this value equals to sAMAccountName

Real Name Attribute
You can set this to ‘givenName’ attribute, or simply to cn if givenName is not used during the user creation.

E-Mail Attribute
This attribute should map to ‘mail’

Group Type
Group Type needs to be set to Dynamic Groups.

Member Of Attribute
In case of MS AD this equals to ‘memberOf’.

Now that we have set all of the relevant values, we can ask Nexus OSS to give us a preview of retrieved accounts and mappings to make sure everything is set up correctly. Click on the Check User Mapping button and you should see a preview of the retrieved values and how they are mapped into Nexus OSS. If everything looks fine , save your configuration.

Once the configuration is persisted, the last thing to do is to let Nexus know that you would like to use this new setup for the authentication. This is done by enabling the LDAP Authentication Realm.

In the left-hand main menu panel, from the administration group, choose Server. In the nexus tab that opens, go to the security settings

selected-realms

You will find the OSS LDAP Authentication Realm in the group shown on the right side, called Available Realms. Move it to Selected realms (as shown in the picture above) and save this settings.

Configuring roles

Now that we are able to authenticate through LDAP (AD) we need to set who can do what. This is when the roles do get handy. I usually create security groups and then associate them to roles as this moves the operations of granting the access rights to merely assigning a user to a group.
You can still associate roles to the user in more or less the same way, however I’m going to show you my favorite approach.

From the left-hand main menu panel, in the Security group, select Roles. A new tab showing a list of roles will appear.

external-role-mapping

Choose Add and then External Role Mapping option. You will then be presented with the following dialog:

map-external-role

As you can see from this screenshot, choose LDAP as Realm and the role (an AD security group to be precise) you wish to map. Be aware that in some cases, not all of the groups will be listed. It is a well know bug. If this is your case, there is a workaround. Add a Nexus Role instead of the External Role Mapping and name the role precisely as your missing group is named. This should do the trick until this issue gets solved.

Once the mapping is added, you will need to assign roles (actual rights) to selected security group.

external-role-mapping

On the Role/Privilege Management bar, choose Add button and select the following roles:

  • Nexus API-Key Access
  • Nexus Deployment Role
  • Repo: All NuGet Repositories (Full Control)
  • Artifact Upload

These set of rights will enable whoever part of that group to login in Nexus OSS, manually upload packages, get the API-Key, and generally to control all NuGet repositories. In other words, a sort of developers role when it comes to NuGet.

When it comes to administrator role, it is sufficient to assign only the Nexus Administrator Role.
At the end of selecting roles, do not forget to click on Save button and persist this configuration.

This two basic profiles should be sufficient to start using Nexus. If further profiles are necessary, check the managing roles guide.

You can now test all of our security setup. Make sure you AD user account is part of the administrative security group that you just mapped to Nexus Administrator Role. Log out and log back in with your domain account. If you succeed to login, congratulations LDAP is set correctly.