Monitoring TFS 2015 availability from F5 LTM

Introduction

If redundancy and performance are the thing you are looking for your TFS application tier setup, for sure you stumbled upon the term Network Load Balancing (NLB). Microsoft describes the benefits of such a setup and prerequisites in the document named How to: Create a Team Foundation server farm (high availability), thus I will not go in the details about these topics if you continue reading. However, in the documentation, Microsoft encourages you to setup the NLB feature that is integrated in the Windows Server operating system. In many situations that is not an option due to the network restrictions or company policies and the only choice is to use preexisting networking appliances. Reasons for using a hardware based NLB can also be a performance as it offloads the AppTier machines from this task that, for how minor it can be on today’s machines, it adds some load.

Monitoring

In case of using the Windows NLB feature, nodes participating in the pool of the machines used for the load distribution are monitored directly by the system itself, meanwhile for the hardware based solutions we need to setup a health monitor. This is essential as the load balancer needs to know if the node is available and in healthy state, otherwise it is excluded from the pool and the traffic is not sent towards that node.

Now, what is the best practice when it comes to the health status of TFS? Googling around you can’t find much, there are some pointers towards a SOAP method called GetServerStatus exposed, however it doesn’t bring the necessary information.
Luckily there is a non documented rest resource that is exposed on TFS 2015 and beyond and you can reach it at the URL

http(s)://your.tfs.address:port/tfs/_apis/health

It will return just a simple current time stamp by default using the JSON notation. Accessing this resource still requires the user to be authenticated.

When it comes to the F5 in particular, you need to create HTTPS Health Monitor (Local Traffic > Monitors > Create…)

f5-health-monitor

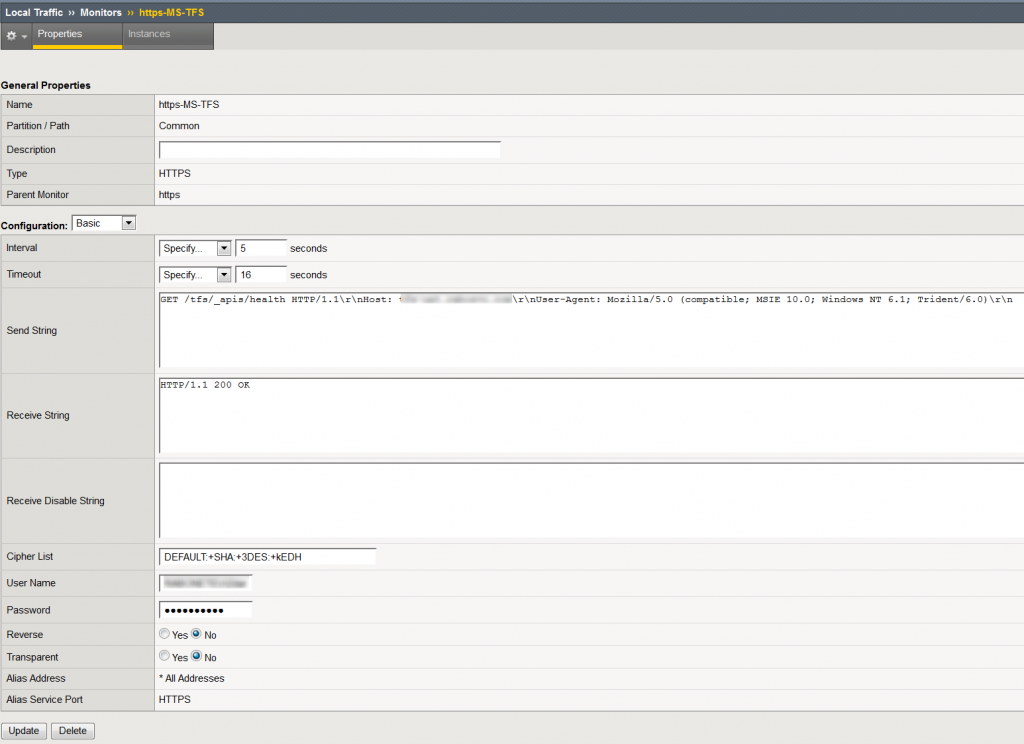
The most important fields to set are Send and Receive string. Here we will send a request towards TFS at the above mentioned address and expect a status code 200 in the response. We can ignore the time stamp in the response body.
The send string will be:

GET /tfs/_apis/health HTTP1.1\r\nHost: your.tfs.address:port\r\n

meanwhile the receive string should be set to:

HTTP/1.1 200 OK

A simple check that the request succeeded (we are not interested in the timestamp in this case).

Do not also forget to provide a username and password of the account that has sufficient rights to access this resource on your TFS server. Username needs to be provided in the form of DOMAIN\UserName. A bare minimum of access rights are necessary for accessing this resource and a View instance-level information permission on the server level is more than sufficient. You can set server-level permissions from the Team Foundation Administration Console or using the TFSSecurity command line tool. Now assign the newly created health monitor to your NLB pool and you are ready to go.

In case you are trying to do so from a script for some of your custom dashboards, I wrote a CmdLet that will return true or false based on the response received from the call to the above mentioned REST resource.

function Get-ServerStatus()
{
	[CmdletBinding()]
    [OutputType([bool])]
	param
	(
		[parameter(Mandatory = $true)]
		[Uri]$url,
        [System.Management.Automation.PSCredential]$credential
	)
	BEGIN
    {
        if ($url.AbsoluteUri)
        {
            $url = $url.AbsoluteUri.TrimEnd('/')
        }

        Add-Type -AssemblyName System.Net.Http
	}
	PROCESS
	{
		$httpClientHandler = New-Object System.Net.Http.HttpClientHandler
 
        if ($Credential)
        {
		    $networkCredential = New-Object System.Net.NetworkCredential @($Credential.UserName, $Credential.Password)
		    $httpClientHandler.Credentials = $networkCredential
        }
        else
        {
            $httpClientHandler.UseDefaultCredentials = $true
        }

        $httpClient = New-Object System.Net.Http.Httpclient $httpClientHandler

        try
        {
			$response = $httpClient.GetAsync("$url/_apis/health").Result
 
			if ($response.IsSuccessStatusCode)
			{
				return $true
			}
 
			return $false
        }
        catch [Exception]
        {
			$PSCmdlet.ThrowTerminatingError($_)
        }
        finally
        {
            if($null -ne $httpClient)
            {
                $httpClient.Dispose()
            }
 
            if($null -ne $response)
            {
                $response.Dispose()
            }
        }

		return $false
	}
	END { }
}

It is sufficient to invoke this cmdlet by passing in the URL of your TFS instance and eventually the credentials. If no credentials are provided, current process credentials will be used.

$uri = "http(s)://your.tfs.address:port/tfs"
$credential = Get-Credential

$state = Get-ServerStatus $uri $credential

A simple solution is now in place that will keep other tools informed about the availability of our TFS instance.

Good luck!

Custom nuget.exe for TFS 2015 build

Introduction

I had a couple of users complaining about not being able to restore a specific version of AutoMapper package during their build. A quick search showed me that they are not the only one facing this issues and that this is quite a common problem. I verified that I’m able to reproduce this issue and I saw that it is presented based on the version of nuget client. As by default the build agent does use the nuget.exe that ships with the agent itself, I verified the version of it and saw that in my case (TFS 2015.3) it is 3.2.1.10581. With the 3.2.1.10581 version of nuget client I was unable to restore the package in question (AutoMapper.5.1.1) meanwhile from Visual Studio with version 3.4.3.855 all went well. The error I could see in the log is the following:

##[error]Unable to find version '5.1.1' of package 'AutoMapper'.

Without digging into details of why this is happening, I’ll show you how to push your build to use a different version of a nuget client.

Preparing the build server

As a first thing, let’s “install” the latest nuget version on our build server. Just download the latest version of nuget client and place it in a folder of your choice. Make sure that account on which your build agent is running has sufficient rights to access that path. For me it will be ‘D:\Program Files(x86)\Nuget‘.
Once placed your nuget.exe in the above mentioned folder, let’s add a system environment variable that will point to this executable. Open Control Panel > System and Security > System and choose Advanced system settings. In System properties dialog click Environment variables button and add a new System variable by click the new button (and be sure it is a System property and not a user variable). As a variable name choose NugetPath and as value set the path towards your nuget.exe file, which in my case is D:\Program Files(x86)\Nuget\nuget.exe

nuget-path-system

Now you should restart your agent services so that the new system variable is picked up by the agents. If everything went well you should see the following capability in the agent capability list:

agent-capability-nuget

If you can see it listed correctly, it all went well till now.

Setting up the build

Now it’s the time for the build. I suppose you are using the NuGet Installer build step in order to restore your packages before the build. If not, you should, as resorting the packages from Visual Studio Build step is obsolete and should not be used.
In order to force NuGet Installer build step to use our new nuget client, we need to expand the Advance group settings and set the Path to NuGet.exe option value to $(NuGetPath):

nuget-installer-build-step

Once this is done, just to be sure that only the build agents having the custom nuget version installed will be used, we are going also to specify a demand for our build. In the general tab of you build definition add new demand of type exists and set it to NuGetPath:

nugetpath-demand

Now, queue a new build and check in the log file that our new nuget client is used instead of the default one that ships with the build agent. You should find a similar line in your log:

D:\Program Files (x86)\NuGet\nuget.exe restore "E:\a1\_work\29\s\SimpleWebProject.sln" -NoCache -NonInteractive

That’s all folks, an easy way to push you build to use a specific version of the NuGet client instead of the default one.

Upgrading SonarQube to a newer version

This, as my other SonarQube guides, are meant for developers who are “improvising” system administrators. It is a detailed and comprehensive guide facing real life situations. As the upgrade guide on SonarQube documentation website is not, in my opinion, clear enough, I’ll try to describe the necessary steps in doing the upgrade. Specifically I will perform the upgrade from the SonarQube version 5.6 to SonarQube version 6.0. However this guide may be valid also for different version updates (or at least a part of it).

As I already have upgraded to the LTS version and there are no other LTS version available in my upgrade path, I can proceed with my simple upgrade. If you are not in this situation, please first check if there is an LTS version released in between your version and the one you intend to upgrade to, then first upgrade to the LTS version following this guide, then to your final version of choice. The steps that follow will be pretty much the same for both of the upgrades.

Preparation

Ideally you followed the instructions in my previous post about installing and configuring SonarQube. I will give for granted that SonarQube is replaying on the port 80 and that you do need to get through proxy for what concerns the internet access. If this is not your case, just keep present this information.

Download first the interested version of SonarQube at http://www.sonarqube.org/downloads/.

Extract the contents of the downloaded zip file in the folder of your choice. I usually do have a folder containing multiple version of the software, like shown in the following image:

sonar-folder

Now, before going any further it is wise to check if the community reported any issues in regard to the interested versions of software or about any of the plugins.
This is for sure the case for SonarQube 6.0.
It seems that the authentication interface is changed in SonarQube 6.0 in order to phase out some old software components, thus if you were using LDAP plugin, SSO will not work as expected. You can read further about this issue in a separate post of mine, SonarQube LDAP plugin: a love story

If you can live with eventual issues, proceed with the upgrade. Otherwise you will need to wait for another version hoping that your issue is going to be addressed and solved.

Another important thing is to follow the upgrade path. If not you may face different issues with the database upgrade. I saw many posts in which people didn’t followed the upgrade path and they were facing issues reporting problems with database collation etc.
One of most common ones is the following exception:

2016.09.28 18:23:57 ERROR web[o.s.s.d.m.DatabaseMigrator] Fail to execute database migration: org.sonar.db.version.v60.CleanUsurperRootComponents com.microsoft.sqlserver.jdbc.SQLServerException: Cannot resolve the collation conflict between "Latin1_General_CS_AS" and "SQL_Latin1_General_CP1_CS_AS" in the equal to operation.

This is due to the fact that people haven’t followed the upgrade path. In case you are running a version 5.x prior to the 5.6.x, please follow the upgrade path. This may sound confusing and people other jump over it in the SonarQube documentation. Thing is simple, if in between your version and the version you are trying to upgrade, there is an LTS (Long Term Supported) version of software being published, you first need to upgrade to the LTS version (or multiple upgrades in case you are running an really old version of SonarQube) then you will be able to upgrade to your version of choice.

Upgrading

Always backup your database before proceeding with the upgrade!

First and important thing is to start your new version of SonarQube as a separate instance. This is wise so that you can install and upgrade all of the plugins you need before actually upgrading your database and start using the new version.
Now before starting it, let check a couple of things. Open the sonar.properties configuration file that resides in the conf folder (of your new version 6.0). As I have opted for running SonarQube on port 80, I can stick with the default port and no change there will be necessary so that my services do not clash. Still there is one port more that we need to take care of and that is Elasticsearch. Default port for Elasticsearch is 9001 and if we do try to start another instance of SonarQube on the same machine, an error will be thrown.

sonar-no-start

Unfortunately we would not be able to see clearly what happened only from the error message shown in console. However in the log file you will find a BindTransportException: Failed to bind to [9001].
Because of this, in sonar.properties file find the sonar.search.port=9001 line, which by the way should be commented out. Remove the hash sign to uncomment it and change the port to 9002.
If you are behind the proxy do not forget to add the relevant settings as described in my previous post.
Once you set all up, you are ready to start in parallel the new instance on SonarQube. Open the command prompt and move do bin\windows-x86-64 folder, the launch StartSonar.bat. If all went well the last message you will see in the console will state Process[ce] is up. Now navigate to localhost:9000 and you should be able to see the new instance home page:

sonar-home-embedded

As you can see from the message in the bottom of the page, it started by using the embedded database. No worries about that. Log in as administrator with usual admin/admin credentials and move to the Update center. Here now install all of the plugins you are using in your previous version and update the default ones to the latest available version. Once installed, restart it by using the restart it WITHOUT using the restart button. The restart button only works in case you installed it as a service and not if you run it from the console. In this case a CTRL + C in the console window will stop your instance, then start it again in the same way.

sonar-home-upgrade-plugins

If you had other plugins that are installed and are not available in the update center, as it may be for your own custom plugin, install them manually and restart SonarQube to check that they are compatible with the new version. You will find them in extensions\plugins folder. A copy paste will be sufficient.
Once restarted, open the new versions home page again and check that the manually installed plugins are visible and that there are no errors in the log.

Now we are ready to proceed with the real upgrade. Make sure that all of the settings are equal, both in the sonar.properties files and wrapper.conf file. Once done, stop the service of the previous version and remove it. In console, move to the bin\windows-x86-64 folder and run the StopNTService.bat, then UninstallNTService.bat. Now the old instance of SonarQube is not running any more.

You can now install the service of the new version and start it. Move to the bin\windows-x86-64 folder of your 6.0 version and run InstallNTService.bat.

Note: If you were using a specific account to run your service, make sure that it is set correctly again and restart SonarQube. Otherwise you may face issues with the db upgrade.

Once started, on the server navigate to the http://localhost/setup to start the upgrade procedure. In this step, SonarQube will apply the necessary changes to the database. Again, be sure that you have a backup of your database before proceeding.
This is the page you should see:

sonar-setup-page

Click on the upgrade button and wait.

sonar-upgrade-inprogress

If case everything went well, soon you will be shown the database is up to date page which means that upgrade went well.

sonar-upgrade-succeeded

Congrats, your upgrade succeeded.
You will now be redirected to the homepage and you can again start using your SonarQube instance.

In case you get to see this

sonar-upgrade-failed

it means that something went wrong. Unfortunately you will not get much from this page, and in order to check what actually went wrong, you will need to dig into the log file.

Considerations

It is always wise to test the upgrade first in a clone of your production environment. As for many other things make sure you DR strategy is in place before upgrading.